In this tutorial we will see how you can easily connect your website in WEB.devad.io with your Custom Domain:
1- Send us the Request
2- Configure your DNS in domain provider
Request Custom Domain
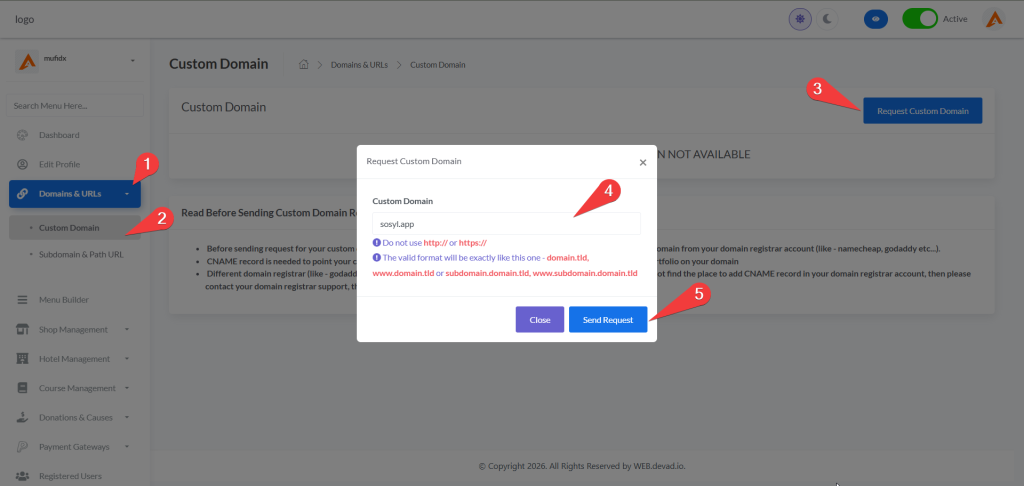
1- Go to Domains & URLs > Custom Domain
2- Enter you domain, Do not use http:// or https://
The valid format will be exactly like this : domain.tld, www.domain.tld or subdomain.domain.tld, www.subdomain.domain.tld
Our team will review your request within 1 wokring day. for faster approval you can contact us!
Configure your DNS in domain provider
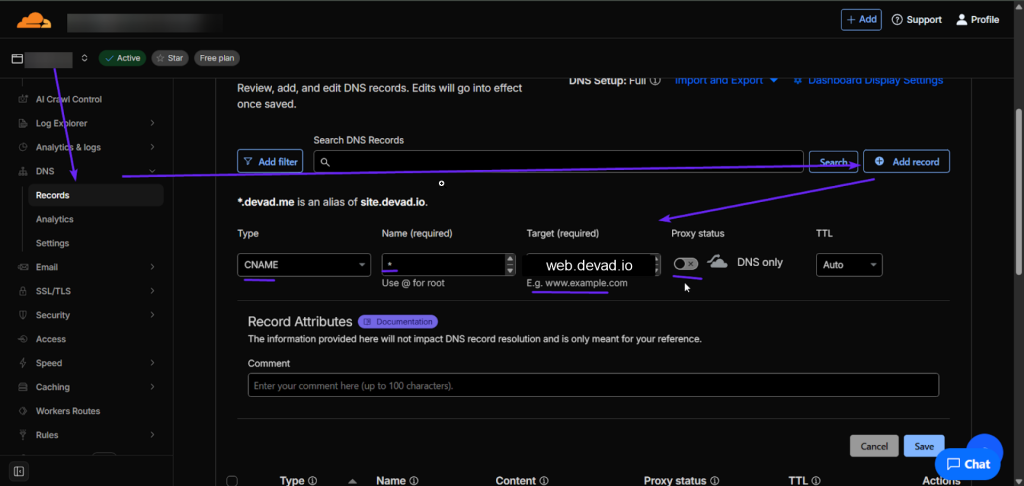
Option A: Cloudflare DNS manager:
Log In to Cloudflare
- Visit the Cloudflare dashboard and log in to your account.
Select Your Domain
- From the dashboard, select the domain you want to configure.
Add DNS Records
- Go to the DNS tab and click Add Record to add the necessary DNS entries.
| Type | Name | IPv4 address / Target | Proxy status | TTL |
| A | @ (for root domain) | Enter your server’s IP address | Enable (orange cloud icon) | Auto |
| CNAME | www | web.devad.io | Disabled (gray cloud icon) | Auto |
- Save each record after entering the details.
Option B: Domain Provider
1. Access Your DNS Management
- Log in to your domain registrar’s account (e.g., GoDaddy, Namecheap, Bluehost, etc.).
- Navigate to the DNS management section for the domain you wish to connect.
2. Add a CNAME Record
- Look for an option to add a new DNS record.
- Choose CNAME as the record type.
- Fill in the details as follows:
- Host: @ (This represents the root domain.)
- Value: web.devad.io
- Proxy Status: DNS only
- TTL: Leave it as the auto or set to your desired value.
| Type | Host | Value | Proxy Status | TTL |
| CNAME | @ | web.devad.io | DNS only | auto |
If you will use subdomain, replace @ in HOST with the subdomain in our example lp2 or add * as wildcard if you plan to add more subdomains in the future and avoid repeating these step later. Here an example
| Type | Host | Value | Proxy Status | TTL |
| CNAME | * | web.devad.io | DNS only | auto |
Save each record after entering the details.
5. Important Notes
Each domain provider has different interfaces and terminology. If something looks different from this guide, check your registrar’s documentation, as they often provide step-by-step visuals.
Provider-Specific Instructions

Steps:
Log into Cloudflare and select your domain.
Open the DNS tab.
Click “Add Record”.
Choose CNAME.
Set Name = @
Set Target = site.devad.io
Change proxy to DNS Only (grey cloud)
Save.
CNAME @ → site.devad.io Proxy Status: DNS Only TTL: Auto
Steps:
Log into GoDaddy → “My Products”.
Find your domain → “DNS”.
Scroll to “Records” → Add.
Choose CNAME.
Host: @
Points to: site.devad.io
TTL: 1 hour or Default
Save.
Type: CNAME Host: @ Points to: site.devad.io
Steps:
Log into Namecheap → Domain List.
Click “Manage” → “Advanced DNS”.
Under “Host Records”, click “Add New Record”.
Choose CNAME Record.
Host: @
Value: site.devad.io
TTL: Auto.
Save.
]

Steps:
Log into cPanel.
Search “Zone Editor”.
Choose your domain → “Manage”.
Click “Add Record”.
Type: CNAME.
Name: @
Record: site.devad.io
Save.
Open DNS or Zone Editor.
Add new record.
Type: CNAME.
Host: @.
Target: site.devad.io.
Save.
If your provider does not support CNAME on root, add:
www → CNAME → site.devad.ioThen redirect the main domain (“@”) to “www”.
Troubleshooting & FAQs
My domain is not verifying?
Can I use HTTPS?
What if my provider blocks root CNAME?
Final Steps
After adding your CNAME record, return to your Business Page or Store admin area and submit the custom domain. Your request will be processed by the administrator and typically completed within a short time window.
