Get your professional portfolio website up and running in minutes with our comprehensive setup guide. This document walks you through each essential step to create a stunning portfolio showcase that impresses clients and simplifies project management.
Admin Role
This section details the essential configuration steps required to activate and prepare Theme Twelve for portfolio management. It includes theme selection, category setup, and foundational content workflows tailored for the Portfolio Owner role.
Step 1: Activating Theme Twelve
Path 1: Selecting Theme Twelve from Available Templates
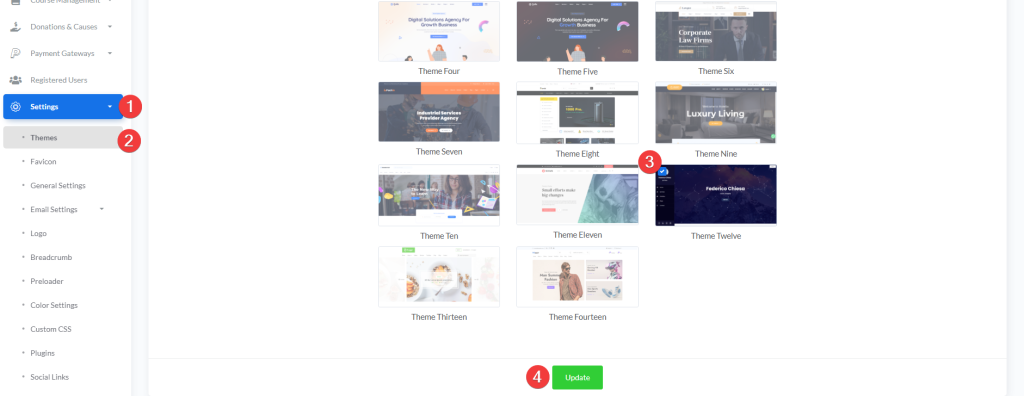
- Log in to your admin dashboard at https://web.devad.io/user/
- Navigate to Settings > Themes via the sidebar menu
- In the Theme Settings card, locate the Theme Twelve preview tile (labeled “Theme Twelve”)
- Click the radio button associated with home_twelve
- Scroll to the bottom of the form and click Update
Note: Only one theme can be active at a time. Activating Theme Twelve will immediately apply its layout, styles, and portfolio-specific features across the frontend.
Step 2: Managing Portfolio Categories
Portfolio categories are used to group and filter projects on the public portfolio page. Proper categorization enhances visitor navigation and SEO structure.
Path 1: Adding a New Portfolio Category

- From the dashboard sidebar, go to Portfolio > Category
- Click the Add Portfolio Category button (top-right corner)
- In the modal form, complete the following fields:
- Language: Select the target language (e.g., English)
- Name: Enter a descriptive category name (e.g., “Web Development”)
- Status: Choose Active to display it publicly
- Serial Number: Assign a numeric order (lower numbers appear first)
- Click Submit
Note: The serial number controls display order—not alphabetical sorting. Use consistent intervals (e.g., 10, 20, 30) to allow future insertions.
Path 2: Editing an Existing Portfolio Category
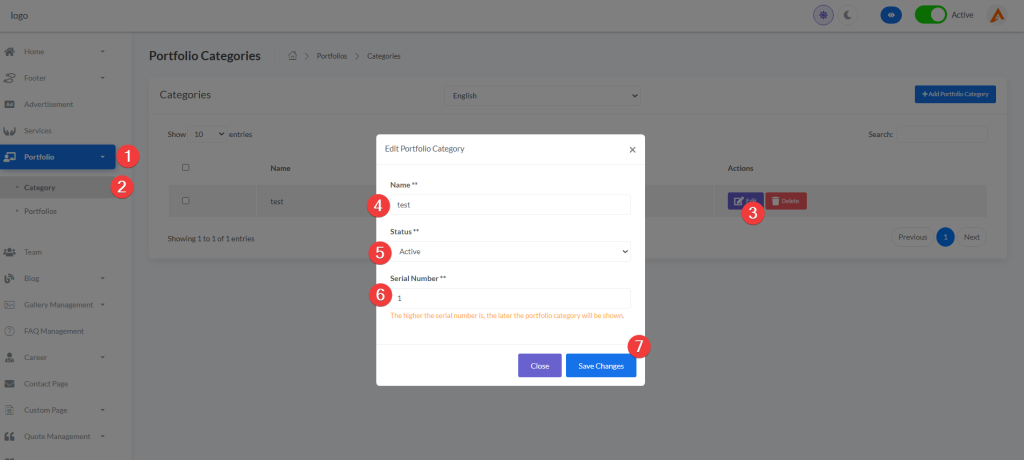
- On the Portfolio Categories page, locate the target row in the table
- Click the Edit button in the Actions column
- The modal will auto-fill with current values
- Modify any field as needed (name, status, serial number)
- Click Save Changes
Note: Changing a category’s status to Deactive hides all associated portfolios from public view but retains them in the database.
Step 3: Creating a Portfolio Item
Portfolio items represent individual case studies or projects. Each supports rich media, metadata, and client details.
Path 1: Adding a New Portfolio Entry
- Navigate to Portfolio > Portfolios in the sidebar
- Click Add Portfolio (top-right)
- Complete the multi-section form:
Media Section
- Thumbnail: Upload a featured image (JPG/PNG, recommended 800×600px)
- Slider Images: Use the Dropzone area to upload multiple high-res images for the project gallery
Basic Information
- Language: Select the content language
- Title: Enter a clear, SEO-friendly project title
- Category: Choose from active portfolio categories
- Serial Number: Set display priority (e.g., 100 for early display)
Project Details
- Status: Mark as Completed or In Progress
- Client Name: Optional but recommended for credibility
- Start Date / Submission Date: Use date pickers for accurate timelines
- Website Link: Add live URL if applicable
Content & SEO
- Content: Use the WYSIWYG editor (Summernote) to describe the project
- Meta Keywords: Enter comma-separated keywords (e.g., “UI design, React, Figma”)
- Meta Description: Write a 120–160 character summary for search engines
- Click Submit
Note: All fields marked with ** are required. Slider images must be JPG, JPEG, or PNG and under 2MB each.
Step 4: Editing an Existing Portfolio Item
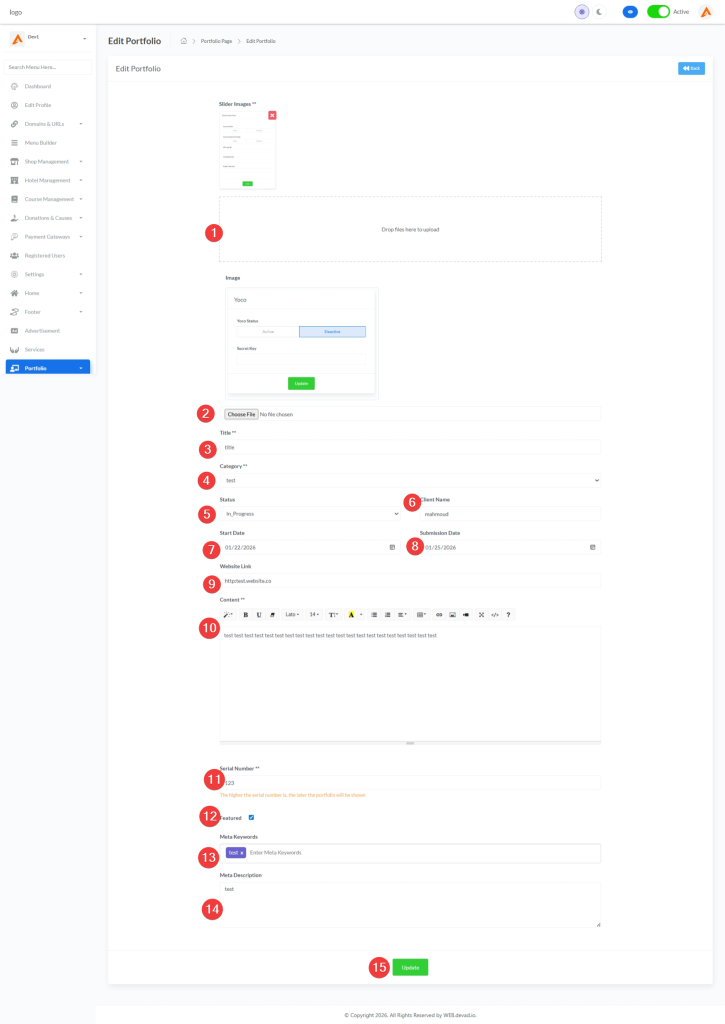
Path 1: Updating Portfolio Content and Metadata
- Go to Portfolio > Portfolios
- Find the desired entry and click the Edit icon (pencil) in the Actions column
- The edit page loads with all fields pre-populated
- You may:
- Replace the thumbnail or add/remove slider images
- Update title, category, dates, or client info
- Revise content using the embedded editor
- Adjust SEO metadata
- Scroll to the bottom and click Update
Note: At least one slider image must remain—the system prevents deletion below this threshold to ensure frontend integrity.
Guest Experience – Viewing Portfolios
1 Portfolio Homepage (Listing Page)
When guests visit your Portfolios page, they see a professional gallery of your best work.
Page Layout:
- Breadcrumb: “Home > Our Projects” navigation path
- Category Filters: Buttons at top (“All”, “portfolio1”, etc.) for instant filtering
- Project Grid: Cards showing portfolio items.
- Project Card Shows:
- Featured image (thumbnail)
- Project title
- Category tag
- Smooth hover animation
How Guests Browse:
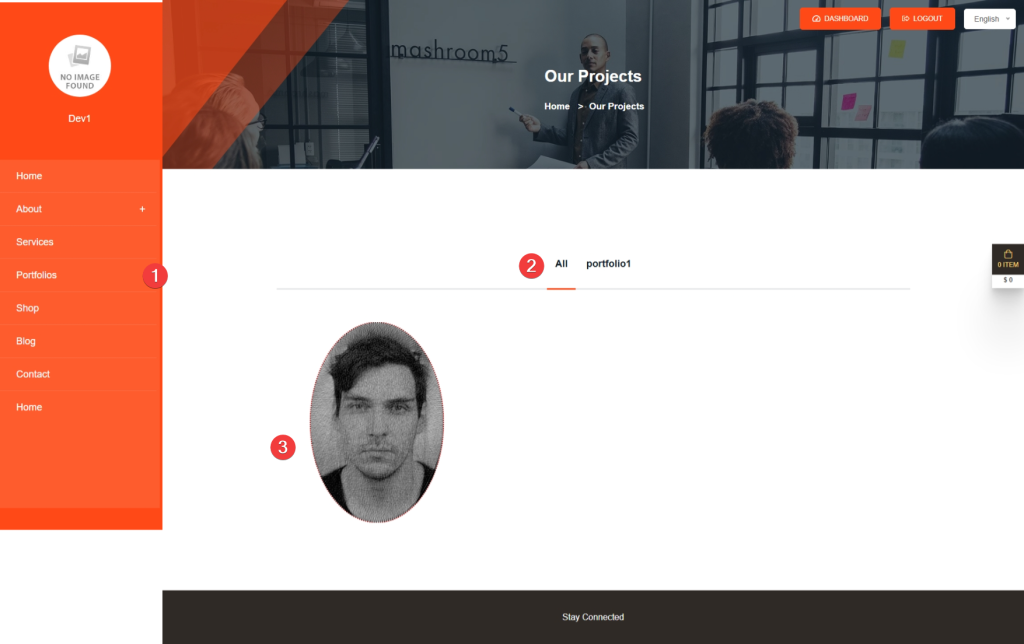
- Click “Portfolios” in main menu
- (Optional) Filter by category using top buttons:
- “All”: Shows every project
- Category name: Shows only matching projects
- Click any project card to view full details
2 Portfolio Detail Page – What Guests See
When a guest clicks a portfolio item, they see a rich, immersive project showcase:
| Section | Content | Purpose |
|---|---|---|
| Breadcrumb | “Home > Portfolio Details” | Easy navigation back |
| Image Gallery | Multiple high-quality images with lightbox popup | View enlarged images in modal window |
| Project Title | Large heading (e.g., “Jone Doe”) | Clear project identification |
| Project Details Sidebar | Structured information: – Category – Client Name – Start/End Dates – Website Link (clickable) | Quick reference of key facts |
| Full Description | Rich text content with headings, paragraphs, lists | Tells the project story professionally |
| Social Sharing | Facebook, Twitter, LinkedIn buttons | Share project with others |
Key Features Guests Experience:
- ✅ Lightbox Gallery: Click any image to view full-screen with navigation arrows
- ✅ Mobile-Optimized: Layout adapts perfectly to phones/tablets
- ✅ Easy Sharing: One-click sharing to social media
- ✅ Professional Presentation: Clean layout that builds trust
3 Step-by-Step Guest Journey
Step 1: Discover Portfolios
- Guest clicks “Portfolios” in main menu
- Sees visually appealing grid of your best work
- What they gain: Immediate visual proof of your hotel’s quality
Step 2: Filter Projects (Optional)
- Clicks category filter (e.g., “Wedding Events”)
- Sees only relevant projects instantly
- What they gain: Saves time finding what matters to them
Step 3: View Project Details
- Clicks a project that catches their eye
- Sees beautiful image gallery with lightbox functionality
- Reads professional description with project timeline
- Checks client name and website for credibility
- What they gain: Confidence in your capabilities through real examples
Step 4: Share or Take Action
- Shares project on social media
- Clicks client’s website link (sees real results)
- What they gain: Social validation and inspiration to book