Introduction
This comprehensive guide details how to create and manage a professional blog using Theme Thirteen on the web.devad.io platform. Whether you’re a content creator, business owner, or marketing professional, this documentation provides step-by-step instructions to build an engaging blog that drives traffic, builds authority, and connects with your audience through effective content management.
Part 1: Initial Setup
Step 1: Activating Theme Thirteen (Blog Theme)
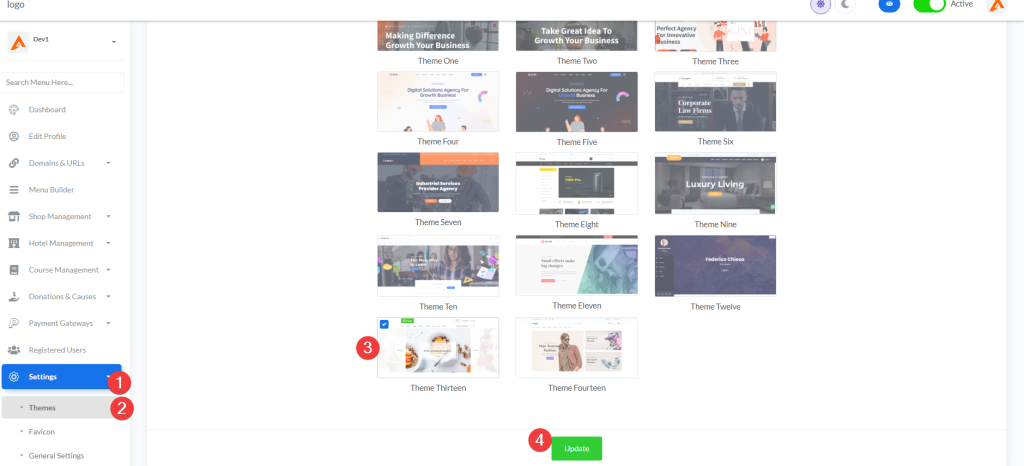
- Log in to your admin dashboard at
https://web.devad.io/user/dashboard - Navigate to Settings > Themes via the sidebar menu
- In the Theme Settings section, locate the Theme Thirteen preview tile (labeled “Theme Thirteen”)
- Click the radio button associated with
home_thirteen - Scroll to the bottom of the form and click Update
Note: Theme Thirteen is specifically designed for content-focused websites with advanced blogging capabilities. Activating this theme enables all blog-specific features including category management, post creation tools, and SEO optimization options.
Step 2: Accessing Blog Management Module
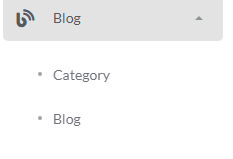
- After theme activation, locate Blog in the sidebar menu
- Click the caret icon next to “Blog” to expand the submenu
- The system displays the following management sections:
- Categories: Blog category organization
- Blog: Individual post management
- Click Categories to begin configuring your blog structure
Note: The Blog Management module only appears after successfully activating Theme Thirteen. If missing, verify theme selection and refresh your browser cache.
Part 2: Blog Categories Management
Step 1: Accessing Blog Categories
- From the expanded Blog menu, select Categories
- The system displays all configured blog categories in a table format
- Use the Language dropdown in the top-right section to filter categories by language
- Categories are displayed with key information:
- Thumbnail image
- Category name
- Status (Active/Deactive)
- Featured status
- Serial number (display priority)
- Action buttons (Edit/Delete)
Pro Tip: Organize your categories thoughtfully before creating posts. Well-structured categories improve user navigation and search engine visibility.
Step 2: Adding a New Blog Category
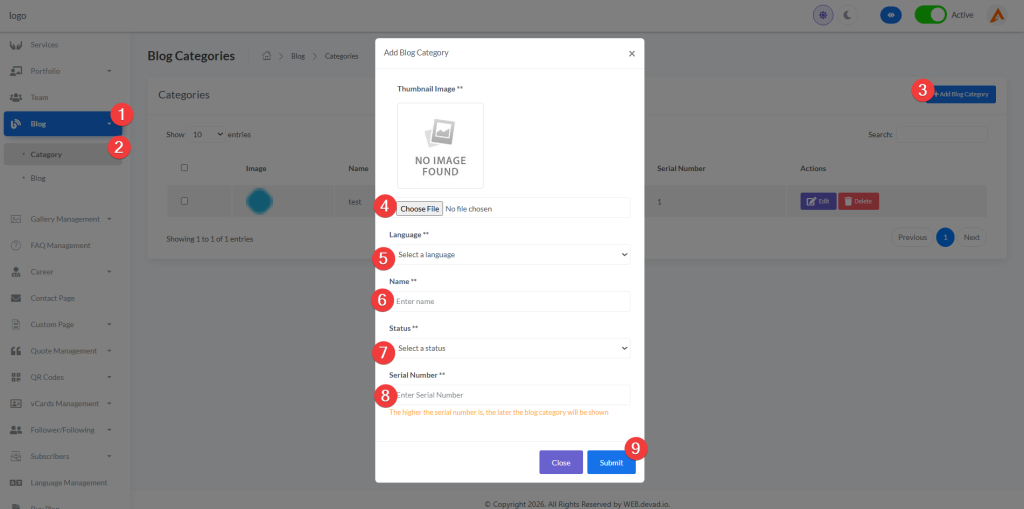
- On the Categories management page, click the Add Blog Category button (top-right corner)
- Complete the category creation form in the modal window:
Visual Elements
- Thumbnail Image:
- Click to upload a representative category image
- Supported formats: JPG, PNG, JPEG, SVG
- Recommended dimensions: 300x300px for consistent display
- This image appears in category navigation and archive pages
Content Fields
- Language: Select your target language (e.g., English)
- Name: Enter a descriptive category name (e.g., “Technology Trends”, “Industry Insights”)
- Status: Choose “Active” to make it visible immediately
- Serial Number: Assign display priority (lower numbers appear first)
- Click Submit to create the category
Best Practice: Use clear, search-friendly category names that match terms your audience would use. Avoid internal jargon or overly technical terms that might confuse readers.
Step 3: Managing Featured Categories
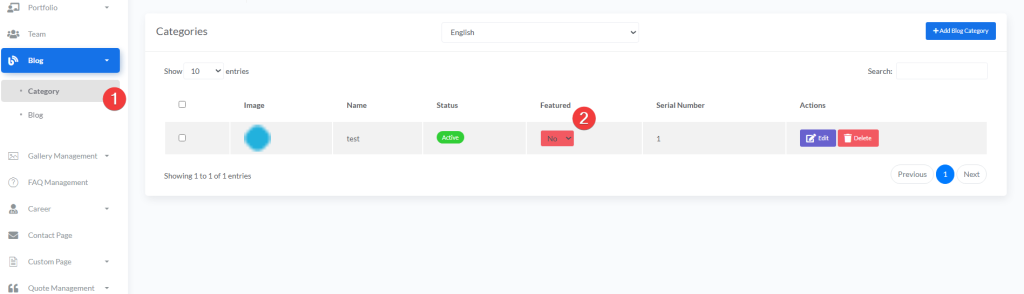
- In the Categories table, locate the Featured column
- Use the dropdown selector to mark important categories as featured:
- Yes: The category appears prominently in featured sections across your site
- No: The category follows standard display ordering
- Featured categories receive special placement in:
- Homepage category showcases
- Main navigation menus
- Category archive pages
Strategic Tip: Limit featured categories to your top 3-5 most important topics. Too many featured categories dilutes their impact and confuses visitors about your primary content focus.
Step 4: Editing Existing Categories
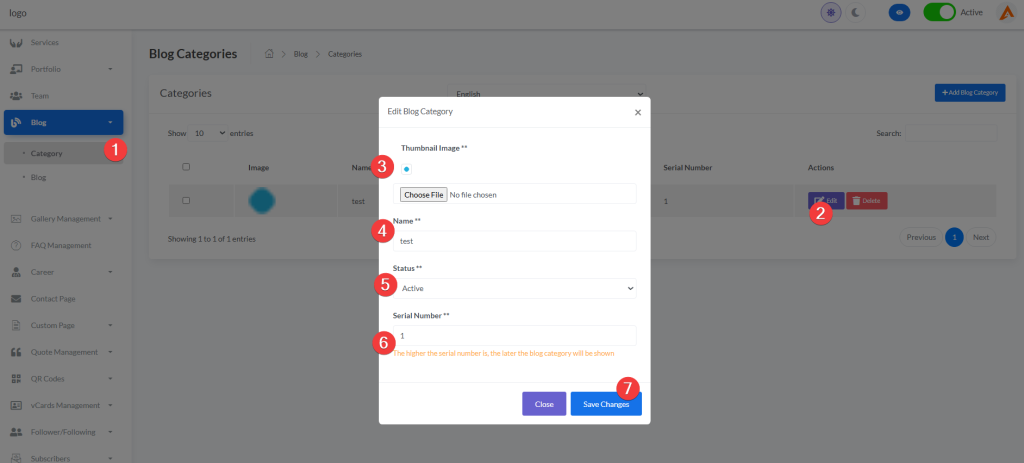
- Locate the category you wish to modify in the categories table
- Click the Edit button in the Actions column
- The edit modal will populate with current values
- You can modify any field including:
- Category name (for clarity or rebranding)
- Status (temporarily deactivate during content updates)
- Serial number (change display priority)
- Thumbnail image (upload a new representative image)
- Click Save Changes to update the category
Important: Changing a category name updates all associated blog posts automatically. However, changing the status to “Deactive” hides the category from public view while preserving all posts within it.
Step 5: Deleting Categories
Single Deletion:
- Find the category in the table and click the Delete button in its row
- Confirm deletion when prompted by the system warning dialog
- The category will be permanently removed from your system
Bulk Deletion:
- Check the boxes next to multiple categories you want to remove
- The Delete button at the top will become active (no longer hidden)
- Click the Delete button and confirm the action when prompted
Warning: You cannot delete a category that has blog posts assigned to it. First reassign posts to another category or delete the posts individually. The system will prevent deletion if dependencies exist.
Part 3: Blog Posts Management
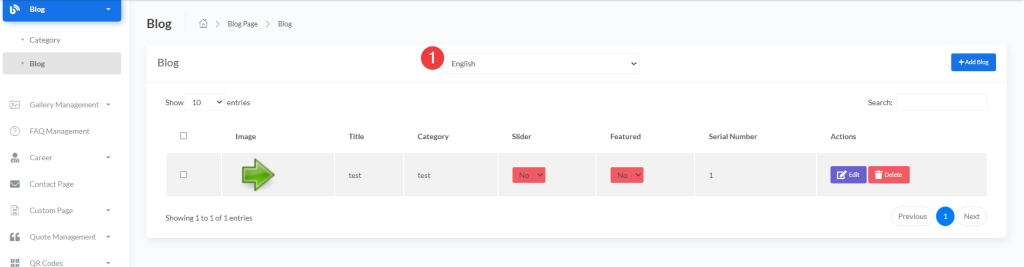
Step 1: Accessing Blog Posts
- From the Blog menu, select Blog
- The system displays all published blog posts in a table format
- Use the Language dropdown to filter posts by language
- Posts are displayed with key information:
- Featured image
- Post title
- Assigned category
- Slider status
- Featured status
- Serial number (display priority)
- Action buttons (Edit/Delete)
Pro Tip: Regularly review your post table to identify underperforming content that might need updates or repurposing.
Step 2: Adding a New Blog Post
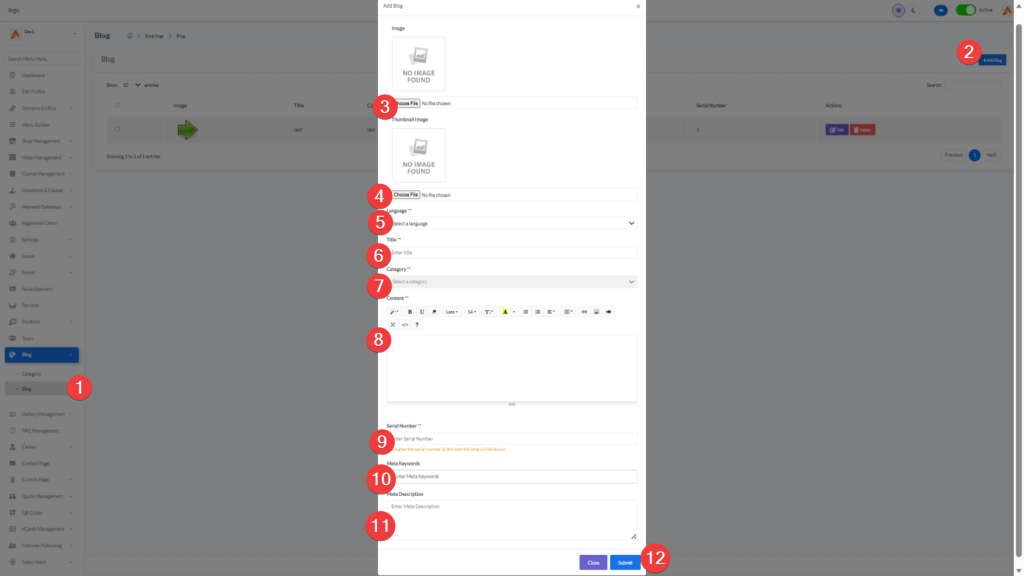
- On the Blog management page, click the Add Blog button (top-right corner)
- Complete the comprehensive post creation form:
Visual Elements
- Image (Main):
- Upload the primary post image that appears in listings
- Recommended dimensions: 800x600px
- This is the image shown in category archives and search results
- Thumbnail Image:
- Upload a secondary image for featured placements
- Used when the post is marked as “Featured” or “Slider”
- Different dimensions may be required for different placements
Content Fields
- Language: Select target language for this post
- Title: Create a compelling, SEO-friendly headline (under 60 characters recommended)
- Category: Select from your pre-configured categories
- Content: Use the rich text editor to create detailed content:
- Format text with headings, bold, italics
- Insert images, videos, and links
- Create bullet points and numbered lists
- Add blockquotes for emphasis
- Serial Number: Set display priority within category listings
- Meta Keywords: Add 5-10 relevant search terms separated by commas
- Meta Description: Write a 120-160 character summary for search engine results
- Click Submit to publish your post
Best Practice: Craft titles that include primary keywords while remaining compelling to human readers. Use power words like “Ultimate,” “Proven,” or “Essential” to increase click-through rates.
Step 3: Configuring Post Visibility Features
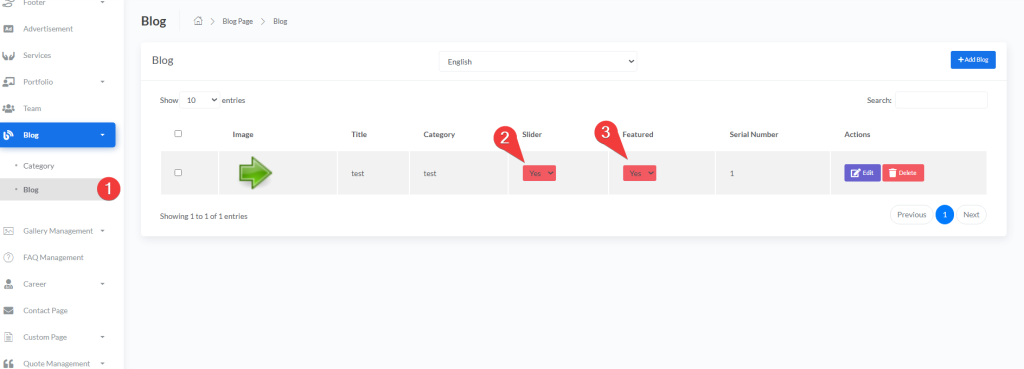
Slider Posts:
- In the Blog table, locate the Slider column for your post
- Use the dropdown to enable slider functionality:
- Yes: Post appears in homepage slider/carousel
- No: Post excluded from slider rotation
- When selecting “Yes,” a modal will appear:
- Upload a slider-specific image (recommended: 1030x700px)
- This ensures optimal display in the homepage slider
- Click Save to confirm
Featured Posts:
- In the Blog table, locate the Featured column
- Use the dropdown to mark as featured:
- Yes: Post appears in featured sections across your site
- No: Post follows standard display ordering
- When selecting “Yes,” a modal will appear:
- Upload a featured post image (recommended: 770x508px)
- This ensures optimal display in featured post sections
- Click Save to confirm
Strategic Tip: Rotate your featured and slider posts regularly to keep your homepage fresh and highlight your best content. Limit featured posts to 3-5 at any time for maximum impact.
Step 4: Editing Existing Blog Posts
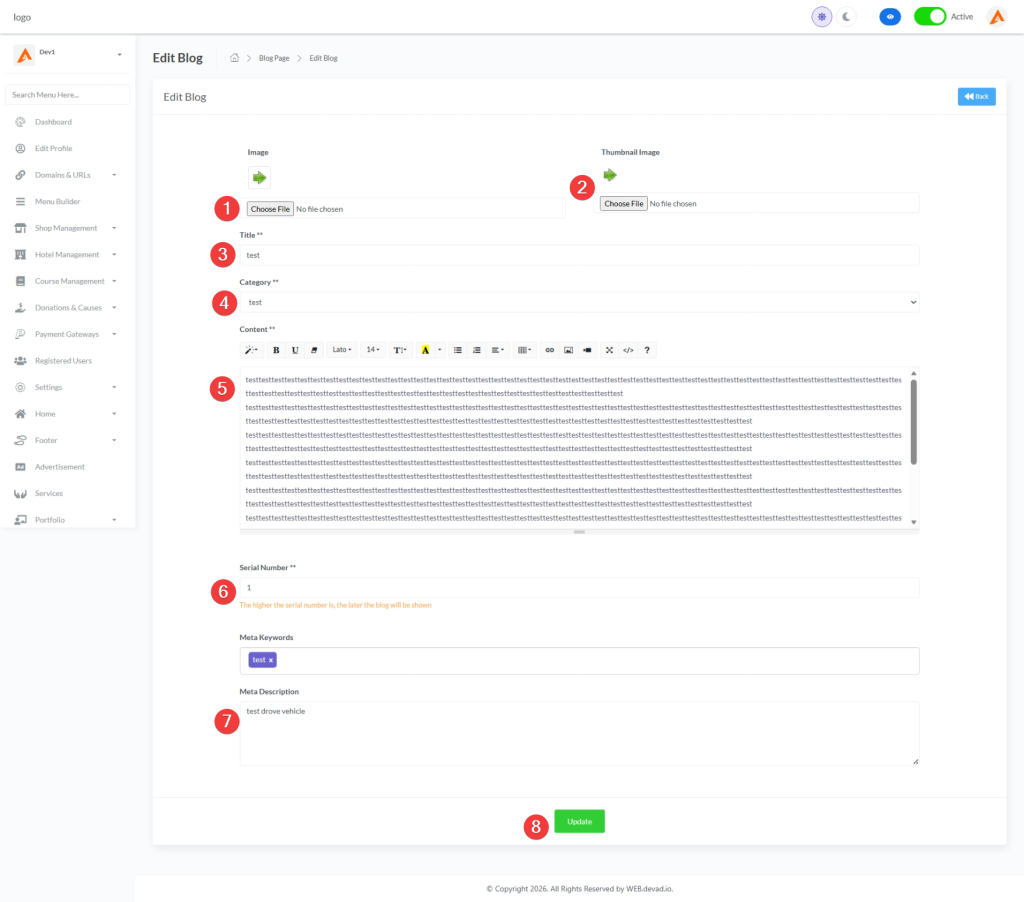
- Locate the post you wish to modify in the blog table
- Click the Edit button in the Actions column
- You will be redirected to the post edit page with all current information pre-filled
- Update any information as needed:
- Revise title for better SEO or clarity
- Update content with new information or corrections
- Change category assignment if content focus has shifted
- Refresh images with higher quality versions
- Update meta information for improved search visibility
- Click Update to save your changes
Important: Changes to blog posts take effect immediately on your live site. For significant content updates, consider adding an “Updated on [date]” note at the beginning of the post to maintain transparency with readers.
Step 5: Deleting Blog Posts
Single Deletion:
- Click the Delete button next to the post in the Actions column
- Confirm deletion when prompted
- The post will be permanently removed
Bulk Deletion:
- Check multiple posts you want to remove
- Click the active Delete button at the top
- Confirm the bulk deletion action
Content Strategy Note: Before deleting posts, consider whether they could be updated and repurposed instead. Older content can often be refreshed with new information rather than removed entirely.
Part 4: Advanced Blog Features
Step 1: Multi-language Blog Management
- Use the Language dropdown to create content in multiple languages
- For each language version:
- Create separate categories with translated names
- Write unique post content tailored to that language audience
- Upload language-specific images where appropriate
- The system automatically serves content based on visitor language settings
International Strategy: For global audiences, ensure translations are culturally appropriate, not just literal translations. Consider hiring native speakers for important markets to review your content.
Step 2: Strategic Post Ordering
- The Serial Number field controls display order across your blog
- Lower numbers appear first (higher priority):
- Serial Number 1: Appears at the top of category listings
- Serial Number 2: Appears second
- Serial Number 10: Appears near the bottom
- Strategic numbering recommendations:
- Use intervals (10, 20, 30) to allow for future insertions
- Place cornerstone content at the top of category listings
- Group related posts together with sequential numbers
- This ordering affects:
- Category archive pages
- Homepage blog sections
- Related post suggestions
SEO Tip: Place your most important, comprehensive posts at the top of category listings. Search engines often give more weight to content that appears first in category archives.
Step 3: Blog Post Status Management
- Active Status:
- Posts are visible to all visitors
- Appear in category pages, search results, and navigation
- Can be shared on social media and indexed by search engines
- Deactive Status:
- Posts are hidden from public view
- Still accessible via direct URL (useful for private content)
- Cannot be found through navigation or search
- Useful for:
- Draft posts in progress
- Seasonal content during off-seasons
- Posts being updated or revised
Workflow Tip: Create a content calendar and use the status feature to schedule posts. Set posts to “Deactive” until their publication date, then switch to “Active” when ready to publish.
Best Practices for Blog Management
Content Strategy
- Consistency: Publish on a regular schedule (weekly/bi-weekly) to build audience expectations
- Quality over Quantity: Focus on creating comprehensive, valuable content rather than frequent shallow posts
- Content Pillars: Organize your blog around 3-5 core topic areas that align with your expertise and audience interests
- Evergreen Content: Create foundational posts that remain relevant over time to drive consistent traffic
SEO Optimization
- Keyword Research: Use tools to identify relevant search terms before writing
- Internal Linking: Link to related posts within your content to keep readers engaged
- Image Optimization: Compress images and use descriptive filenames and alt text
- Mobile Optimization: Preview posts on mobile devices to ensure readability
Engagement Strategies
- Call-to-Actions: End posts with clear next steps (comment prompts, related content, newsletter signup)
- Comment Management: Respond to comments promptly to build community
- Social Sharing: Add social sharing buttons and create platform-specific snippets
- Email Integration: Promote new posts through email newsletters to your subscriber list
Performance Monitoring
- Track top-performing posts by pageviews and engagement
- Analyze which categories generate the most traffic
- Monitor bounce rates to identify content that fails to engage readers
- Use insights to refine your content strategy and topic selection
User Guide – Reading and Interacting with Blog
1 Blog page (Listing Page)
When guests visit your blog page, they see:
Main Content Area
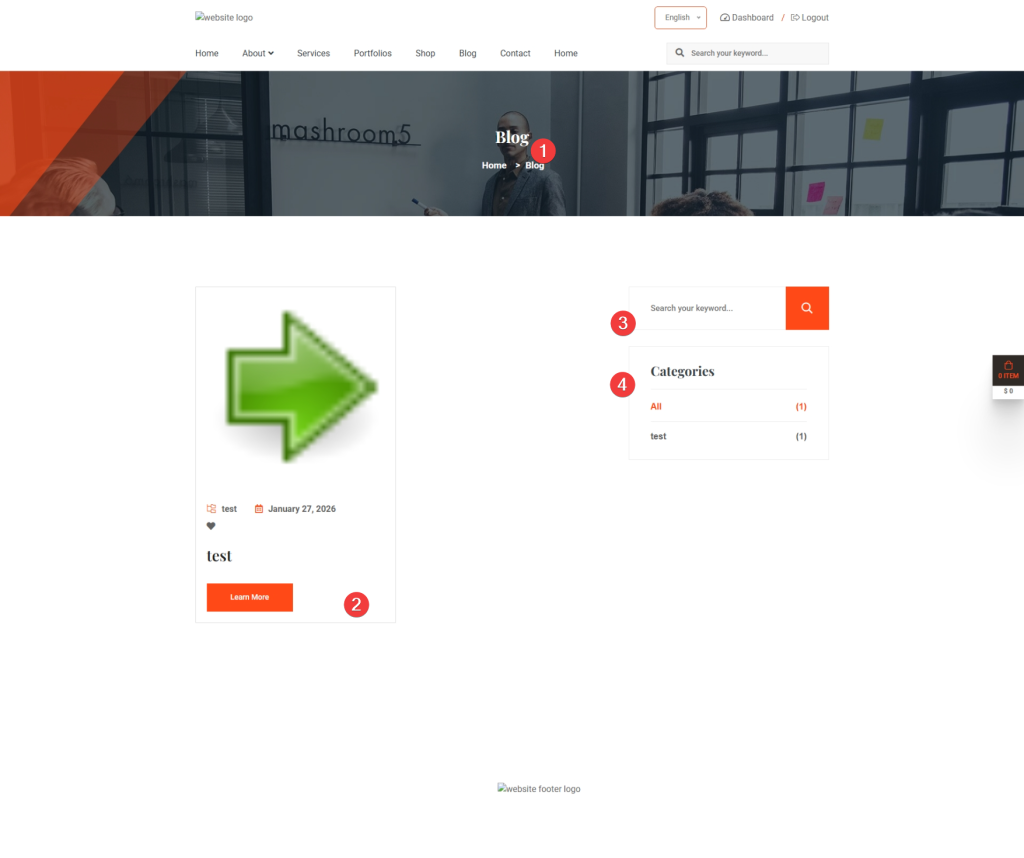
- Blog Posts Grid: Posts displayed in 2-column layout
- Each Post Card Shows:
- Featured image (thumbnail)
- Category tag (e.g., “Travel Tips”)
- Publication date (e.g., “January 27, 2026”)
- Like button (heart icon) with count
- Post title
- “Learn More” button to read full article
Sidebar Widgets
- Search Widget
- Search bar to find posts by keyword
- Enter term and click search icon
- Categories Widget
- List of all blog categories
- Click any category to filter posts
- Shows post count for each category
- “All” option shows all posts
1.1 Blog Post Detail Page
When a guest clicks “Learn More” or a post title, they see the full article:
Page Elements
| Element | Description | User Action |
|---|---|---|
| Featured Image | Large header image | View only |
| Category Tag | Post category link | Click to see more posts in this category |
| Date | Publication date | – |
| Title | Post title | – |
| Content | Full article text with formatting | Read and scroll |
| Share Buttons | Social media sharing options | Share on Facebook, Twitter, LinkedIn |
| Comments Section | Disqus comment system | Leave comments (if enabled) |
| Related Posts | Other posts in sidebar | Click to read more |
1.2 How Guests Interact with Your Blog
Step 1: Finding Posts
Guests can find blog posts in several ways:
- Click “Blog” in main menu
- Use search bar to find specific topics
- Browse by category in sidebar
- Click links from homepage or other pages
Step 2: Reading Posts
- Browse the blog listing page
- Click on any post title or “Learn More” button
- Read the full article with images and formatting
- Scroll to see all content
Step 3: Engaging with Content
Sharing Posts:
- Click Share section below the post
- Choose social media platform:
- Facebook: Share with friends
- Twitter: Tweet the article
- LinkedIn: Share professionally
- Post opens in new tab for sharing
1.3 Blog Search Functionality
How Search Works:
- Guest enters keyword in search box (header or sidebar)
- System searches in:
- Post titles
- Post content
- Categories
- Displays matching results
- Shows “No results found” if no matches
Search Tips for Guests:
- Use specific keywords (e.g., “pool” instead of “water”)
- Try different terms if first search fails
- Use category filters to narrow results
