Introduction
This comprehensive guide explores how to create and manage a professional e-commerce store using Theme Eight on the web.devad.io platform. The documentation covers all aspects of online store management, from initial setup to product listings, order processing, and customer engagement. Whether you are a retail business owner or a website developer, this guide provides step-by-step instructions to build an effective online shopping experience that drives sales and builds customer loyalty.
Part 1: Initial Setup
Step 1: Activating Theme Eight (E-commerce Store v1)
- Log in to your admin dashboard at
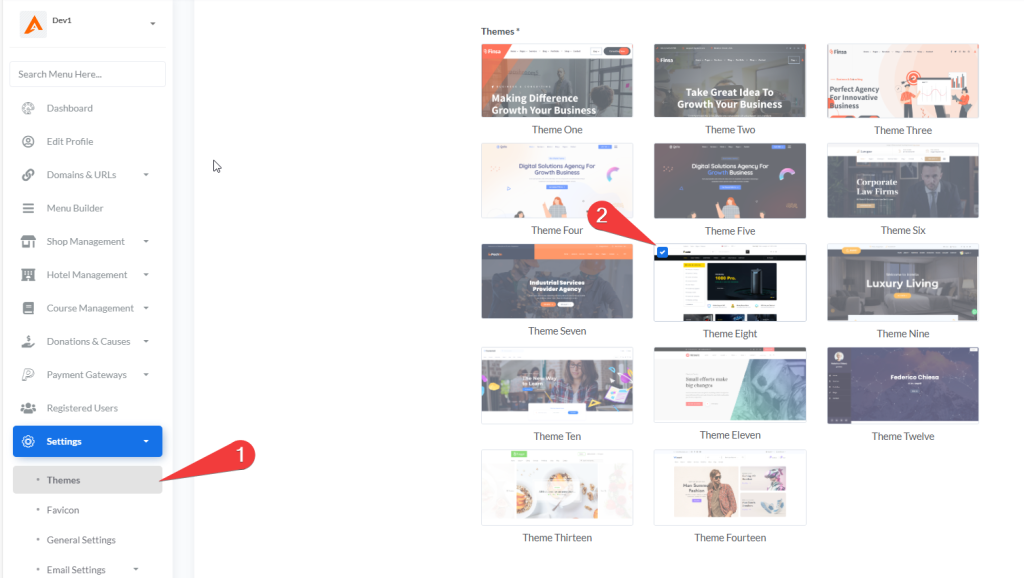
https://web.devad.io/user/dashboard - Navigate to Settings > Themes via the sidebar menu
- In the Theme Settings section, locate the Theme Eight preview tile (labeled “Theme Eight”)
- Click the radio button associated with
home_eight - Scroll to the bottom of the form and click Update
Step 2: Accessing Shop Management Module
- After theme activation, locate Shop Management in the sidebar menu
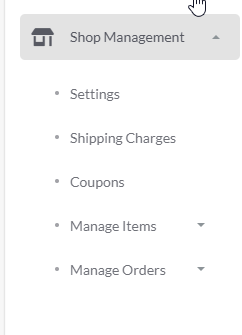
- Click the caret icon next to “Shop Management” to expand the submenu
- The system displays the following management sections:
- Settings: General shop configuration
- Shipping Charges: Delivery cost management
- Coupons: Discount management for customers
- Manage Items: Product and category administration
- Manage Orders: Order processing and tracking
Part 2: Essential Shop Configuration
Step 1: Configuring Core Shop Settings
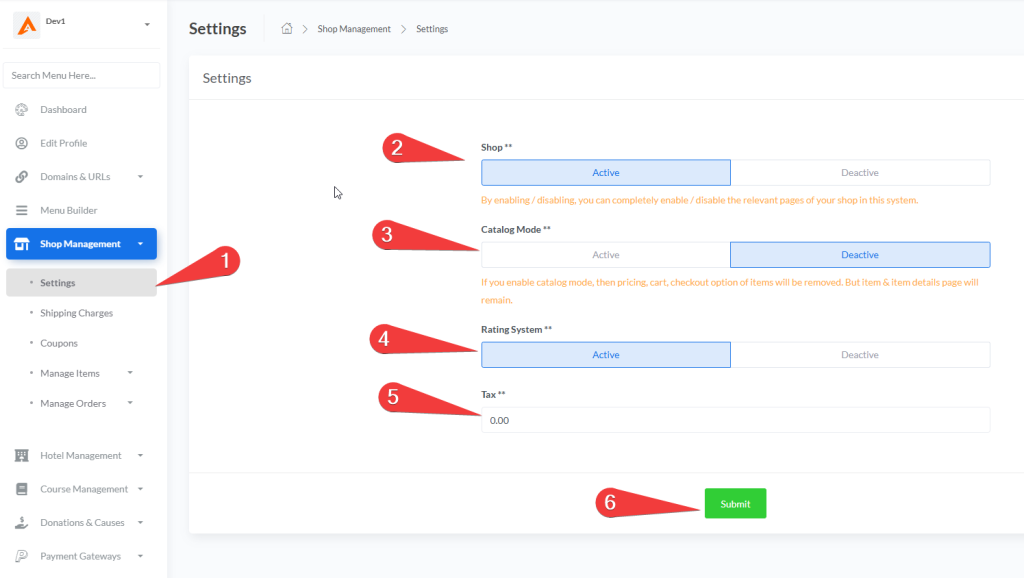
- From the expanded Shop Management menu, click Settings
- Configure the following essential settings:
Shop Status
- Active: Enables your online store and makes it visible to customers
- Deactive: Temporarily closes your store while preserving all data
- Toggle this setting during maintenance periods or inventory updates
Catalog Mode
- Active: Displays products as a catalog only (no prices or purchasing options)
- Deactive: Enables full e-commerce functionality with pricing and checkout
- Use catalog mode for B2B product showcases, pre-launch displays, or lookbooks
Rating System
- Active: Enables customer reviews and ratings for products
- Deactive: Disables all customer feedback functionality
- Customer ratings build trust and improve conversion rates by 27% on average
Tax Configuration
- Enter your standard tax rate percentage (e.g., “8.50” for 8.5%)
- This rate applies during checkout.
- Click Submit to save all settings
Best Practice: Start with catalog mode deactivated to test your checkout flow before launching to customers. Enable the rating system from day one to begin collecting social proof immediately.
Part 3: Category Management
Step 1: Creating Main Categories
- From the Shop Management menu, select Shop Management > Shipping Categories
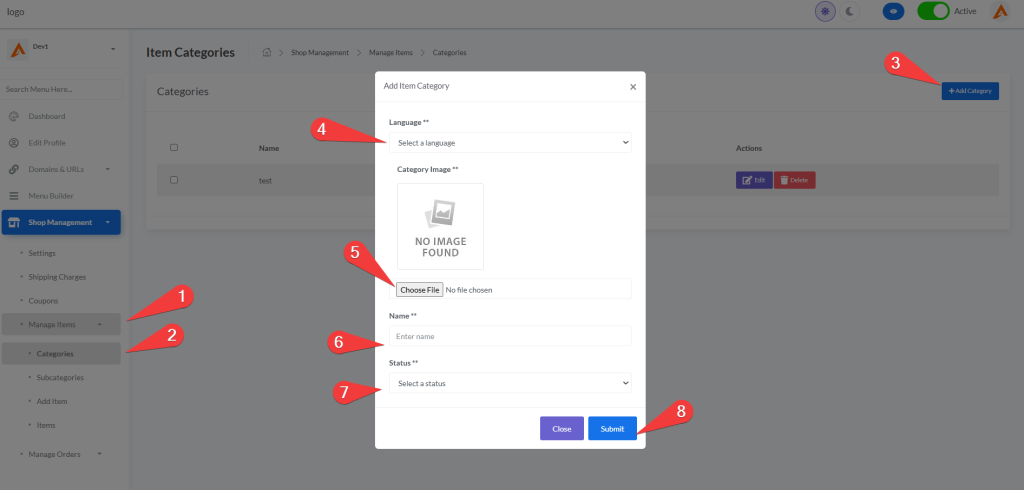
- Click the +Add Category button (top-right corner)
- Complete the category creation form:
- Language: Select your target language (e.g., English)
- Title: Enter a descriptive category name (e.g., “Men’s Clothing”, “Electronics”)
- Category Image: Upload a representative image (JPG, PNG, JPEG formats supported)
- Status: Choose “Active” to make it visible immediately
- Serial Number: Set display priority (lower numbers appear first)
- Click Submit to create the category
Best Practice: Use clear, customer-friendly category names that match search terms your customers would use. Avoid internal terminology or overly technical names that might confuse shoppers.
Step 2: Creating Subcategories
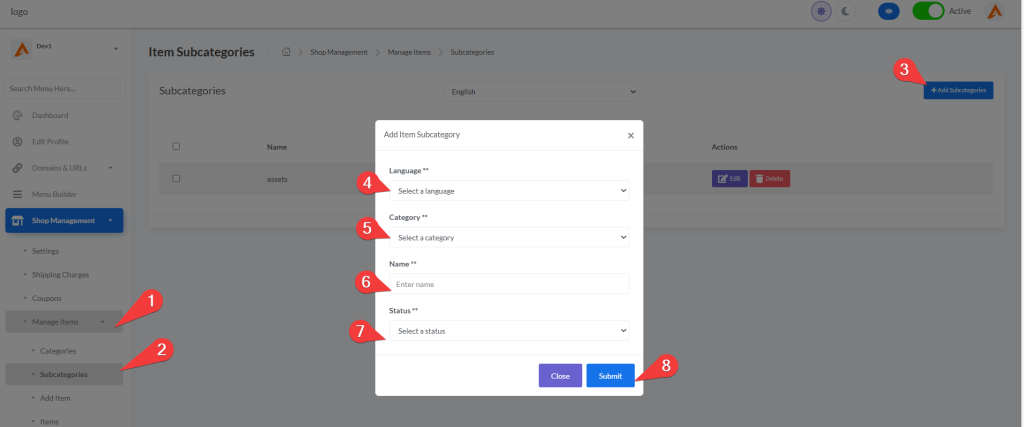
- From the Shop Management menu, select Manage Items > Subcategories
- Click the Add Subcategories button
- Complete the subcategory form:
- Language: Select target language
- Category: Choose the parent category from the dropdown
- Name: Enter specific subcategory name (e.g., “T-Shirts” under “Men’s Clothing”)
- Status: Set visibility status (Active/Deactive)
- Click Submit to save the subcategory
Organizational Tip: Subcategories should represent natural shopping paths. For example:
- Main Category: “Electronics” → Subcategories: “Smartphones”, “Laptops”, “Accessories”
- Main Category: “Home Decor” → Subcategories: “Lighting”, “Wall Art”, “Textiles”
Step 3: Managing Featured Categories

- In the Categories table, locate the Featured column
- Use the dropdown selector to mark important categories as featured:
- Yes: The category appears prominently in featured sections across your site
- No: The category follows standard display ordering
Strategic Tip: Limit featured categories to your top 5-7 highest-performing or most strategic product lines. Too many featured categories diminishes impact and confuses customers about what’s most important.
Part 4: Product/Item Management
Step 1: Choosing Product Type
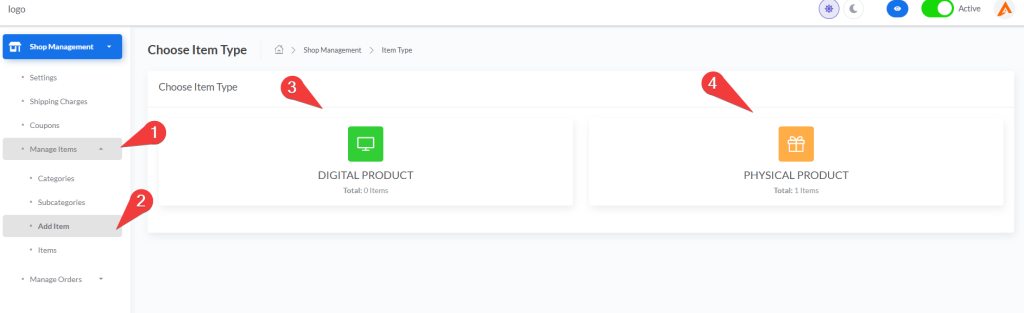
- From the Shop Management menu, select Manage Items > Add Item
- You will see two product type options:
- Digital Product: For downloadable items (e-books, software, digital art)
- Physical Product: For tangible goods requiring shipping (clothing, electronics)
- Click on your desired product type to proceed to the creation form
Note: The product type determines which fields are available in the creation form. Digital products focus on file delivery, while physical products include inventory and shipping considerations.
Step 2: Adding a Digital Product
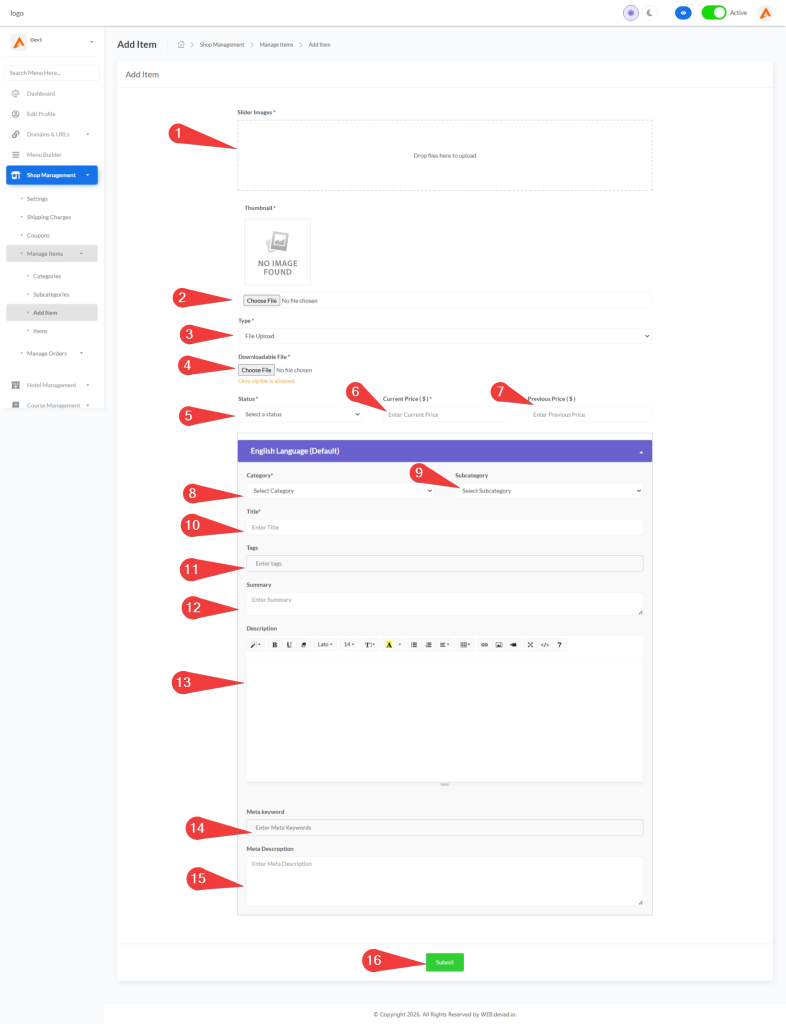
After selecting “Digital Product,” complete the following sections:
Media Configuration
- Thumbnail: Upload a product image (JPG, PNG, JPEG supported)
- Slider Images: Upload multiple images for the product gallery (3-5 recommended)
Digital Delivery Options
- File Type: Choose between:
- File Upload: Upload ZIP files directly to your server
- File Download Link: Provide an external URL for file access
Product Information
- Category & Subcategory: Organize within your store structure
- Title: Create a descriptive, SEO-friendly product name
- Tags: Add relevant keywords separated by commas
- Summary: Provide a brief product overview
- Description: Create detailed information using the rich text editor
Pricing and Visibility
- Status: Choose “Show” for visibility or “Hide” for private listings
- Current Price: Set the selling price in USD
- Previous Price: Enter original price to display savings (optional)
SEO Settings
- Meta Keywords: Add 5-10 relevant search terms
- Meta Description: Write a 120-160 character summary for search engines
Click Submit to publish your digital product.
Best Practice: For digital products, include clear information about file formats, compatibility requirements, and download instructions in the product description. Consider offering preview images or samples to build customer confidence.
Step 3: Adding a Physical Product
After selecting “Physical Product,” complete the following sections:
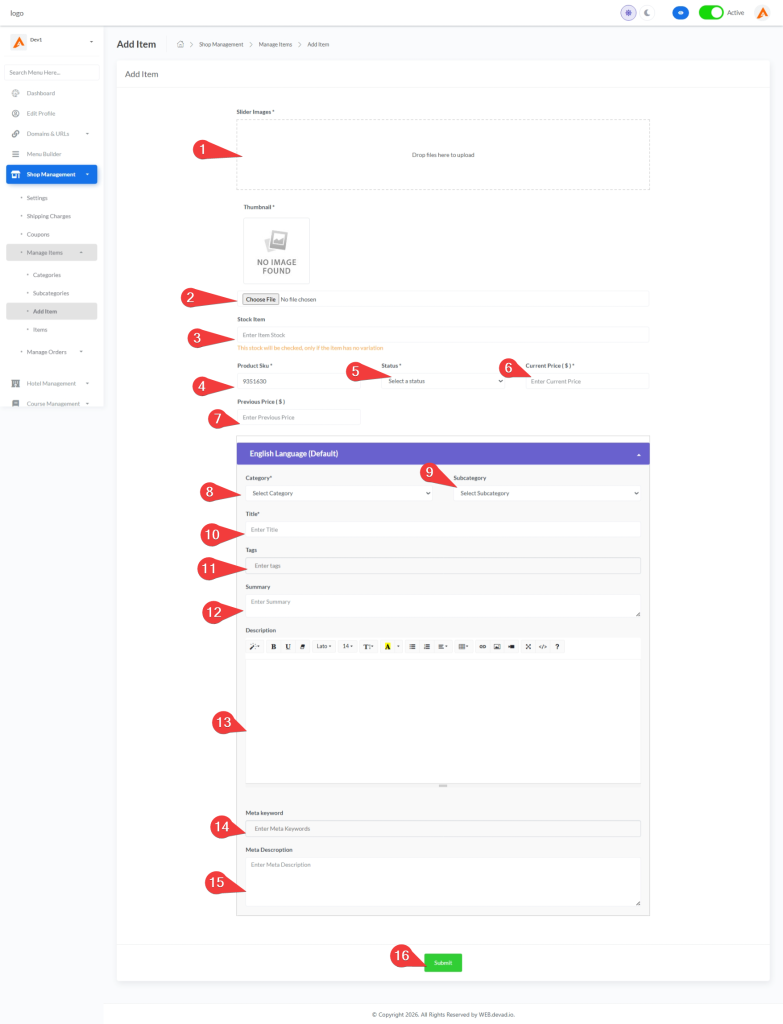
Inventory Management
- Stock: Enter available quantity (set to 0 for out-of-stock items)
- Product SKU: Create a unique Stock Keeping Unit identifier
Media Configuration
- Thumbnail: Upload the main product image
- Slider Images: Add multiple images showing different angles and details
Product Information
- Category & Subcategory: Organize within your store structure
- Title: Create a compelling, descriptive product name
- Tags: Add relevant search keywords
- Summary: Provide a concise product overview
- Description: Create detailed specifications, dimensions, materials, etc.
Pricing and Visibility
- Status: Set to “Show” for public visibility or “Hide” for private listings
- Current Price: Set your standard selling price
- Previous Price: Display original price for discount calculations (optional)
Click Submit to publish your physical product.
Pro Tip: For physical products, include detailed size charts, material specifications, and shipping information in the product description. High-quality images from multiple angles significantly increase conversion rates.
Step 4: Managing Product Variations
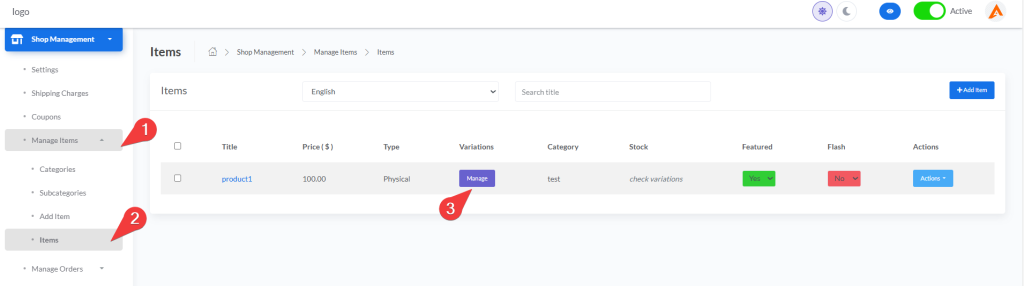
- In the Items table, locate the product you want to add variations to
- Click the Manage button in the Variations column
- Create variations by:
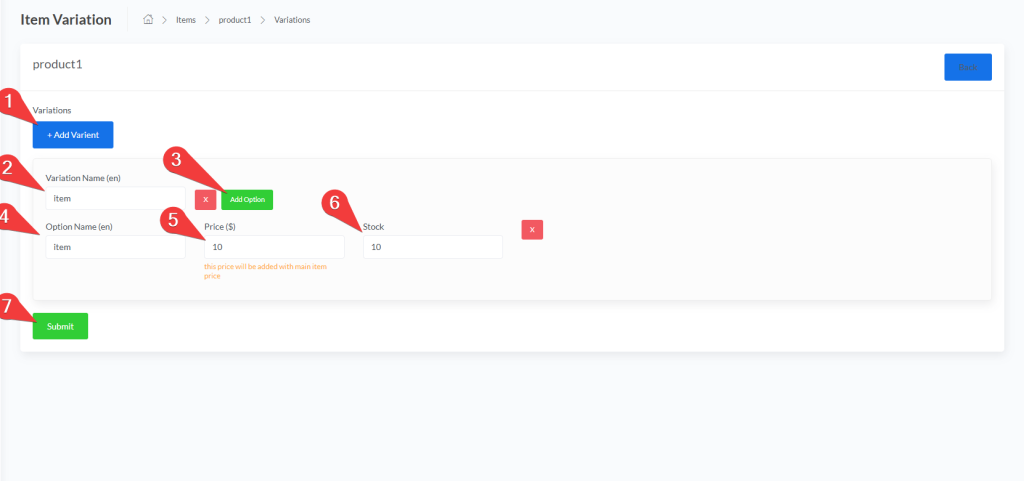
- Clicking + Add Varient to create a new variation type (e.g., Size, Color)
- Entering variation names in multiple languages if needed
- Clicking Add Option for each variation to add specific options
- Setting price adjustments and stock quantities for each option
- Example variation setup:
- Variation Name: “Size”
- Option: “Small” (+$0, Stock: 50)
- Option: “Medium” (+$5, Stock: 30)
- Option: “Large” (+$10, Stock: 20)
- Click Submit to save your variations
Important: Variations allow customers to select different options for the same product. Each variation option can have its own price adjustment and stock level, enabling precise inventory management.
Step 5: Configuring Flash Sales
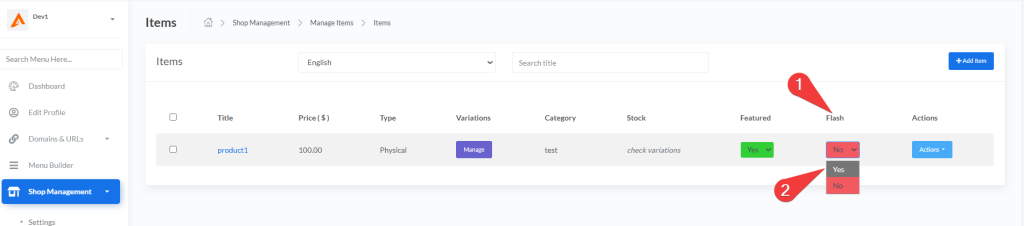
- In the Items table, locate the Flash column for your product
- Use the dropdown selector to enable flash sale:
- Yes: Product becomes eligible for flash sale
- No: Product excluded from flash sale promotions
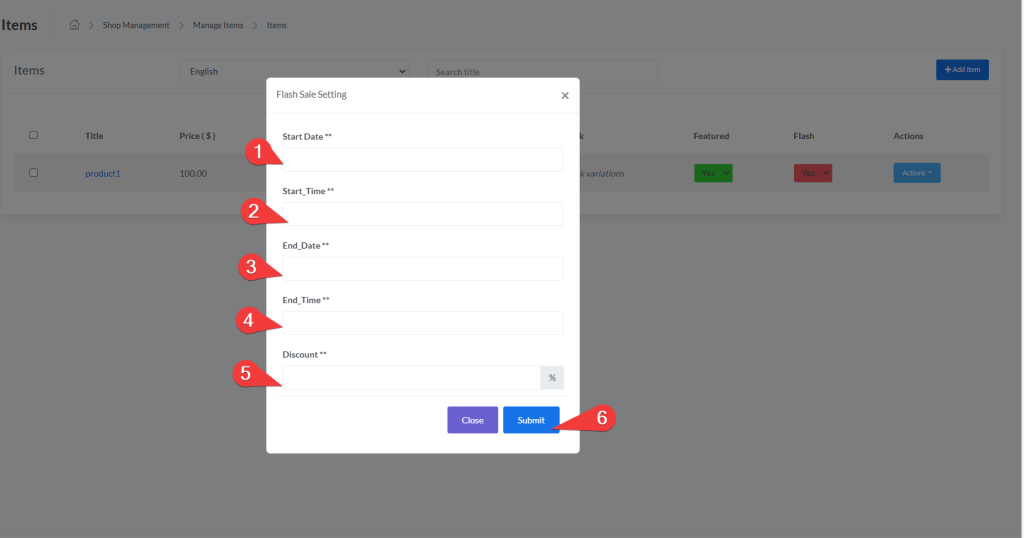
- When selecting “Yes,” configure flash sale settings:
- Start Date & Time: When the flash sale begins
- End Date & Time: When the flash sale ends
- Discount: Percentage discount (e.g., “25” for 25% off)
- Click Submit to activate the flash sale
Strategic Tip: Flash sales create urgency and drive immediate purchases. Schedule them during low-traffic periods or for clearing excess inventory. Consider running flash sales for 24-48 hours maximum to maintain their impact.
Step 6: Editing and Deleting Products
Editing Products:
- In the Items table, click the Actions dropdown for the product
- Select Edit from the dropdown menu
- Update any information (title, description, pricing, images, etc.)
- Click Update to save changes
Deleting Products:
- Single Deletion: Use the Actions dropdown > Delete > Confirm
- Bulk Deletion: Check multiple items > Click Delete button > Confirm
Warning: Changes to product information take effect immediately on your live store. Before deleting items, ensure no pending orders contain them and consider hiding items instead of deleting if you might need them again.
Step 7: Searching and Filtering Items
- Search by Title: Use the search field to find products by name
- Filter by Language: Use the language dropdown for multilingual stores
- Combined Filtering: Use both search and language filters simultaneously
Efficiency Tip: Use descriptive, consistent naming conventions for your products. This makes searching and filtering much more effective, especially as your catalog grows.
Part 5: Order Management
Step 1: Processing Orders
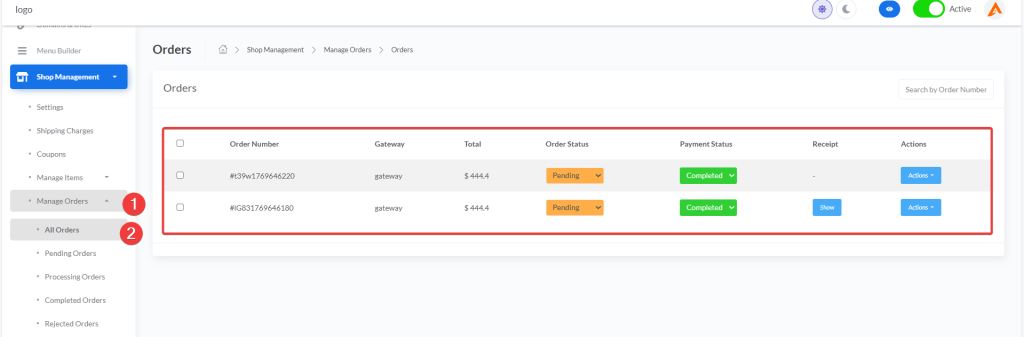
- From the Shop Management menu, select Manage Orders > All Orders
- The system displays all orders in a comprehensive table with these columns:
- Checkbox: Select multiple orders for bulk actions
- Order Number: Unique identifier (e.g., #t39w1769646220)
- Gateway: Payment method used (e.g., “gateway”)
- Total: Complete order amount including taxes and shipping
- Order Status: Dropdown selector with real-time update capability:
- Pending (default)
- Processing
- Completed
- Rejected
- Payment Status: Dropdown selector with real-time update capability:
- Pending (default)
- Completed
- Rejected
- Receipt: “Show” button if receipt image exists; “-” if none
- Actions: Dropdown menu with:
- Details (view complete order information)
- Invoice (generate/download PDF invoice)
- Delete (remove order permanently)
- Key Interface Features:
- Search bar at top-right to find orders by Order Number
- Bulk delete button (appears when orders are selected)
- Real-time status updates (changes save immediately when dropdown selection changes)
- Receipt preview modal for uploaded payment receipts
- To process an order:
- Click Actions > Details to view complete order information
- Update Order Status using the dropdown (changes save automatically)
- Update Payment Status using the dropdown (changes save automatically)
- Click Receipt > Show to view payment proof in modal window
- Click Actions > Invoice to generate and download PDF invoice
- Use search functionality to quickly locate specific orders
Best Practice: Establish a clear order processing timeline (e.g., “All orders received before 2PM ship same day”). Update statuses immediately after verification to maintain accurate reporting. Always verify payment status before changing order status to “Processing.”
Step 2: Viewing Order Details
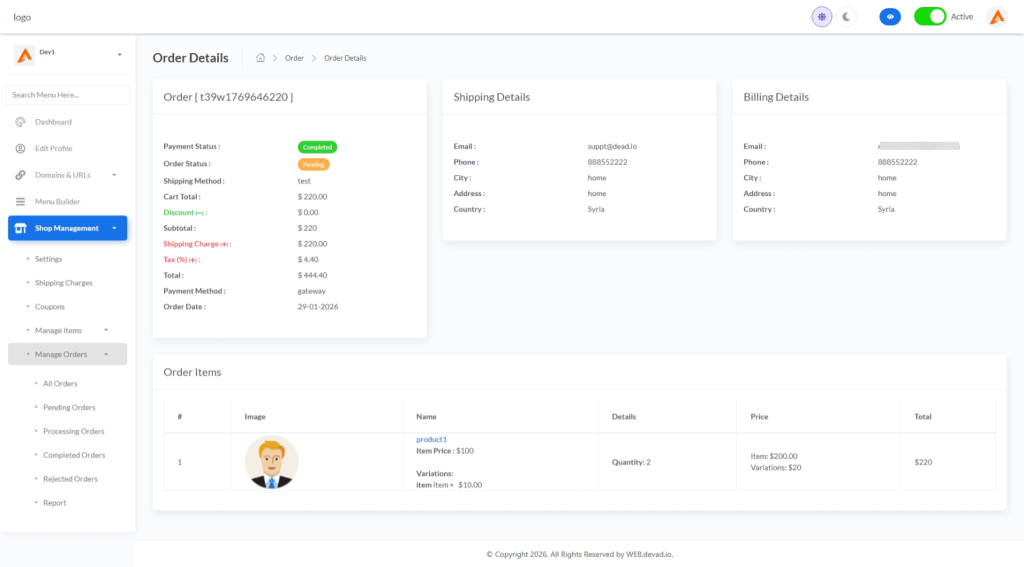
- In the Orders table, click Actions > Details for any order
- The Order Details page displays four critical sections:
Payment Information Section
- Payment Status badge (color-coded: green=Completed, yellow=Pending, red=Rejected)
- Order Status badge
- Shipping Method name
- Cart Total amount
- Discount amount (if applicable)
- Subtotal calculation
- Shipping Charge amount
- Tax percentage and amount
- Total final amount
- Payment Method name
- Order Date (DD-MM-YYYY format)
Shipping Details Section
- Customer Email (clickable mailto link)
- Customer Phone number
- City name
- Full Address
- Country name
Billing Details Section
- Billing Email (clickable mailto link)
- Billing Phone number
- Billing City
- Billing Address
- Billing Country
Order Items Section
- Item image thumbnail (clickable to view product page)
- Product name with link to frontend product page
- Item Price breakdown
- Variations applied (if any)
- Quantity ordered
- Total line item amount
Pro Tip: The Order Details page is read-only. All status updates must be made from the main Orders table using the dropdown selectors. Print or save the invoice immediately after order completion for your records.
Step 3: Managing Receipts and Invoices
Viewing Payment Receipts
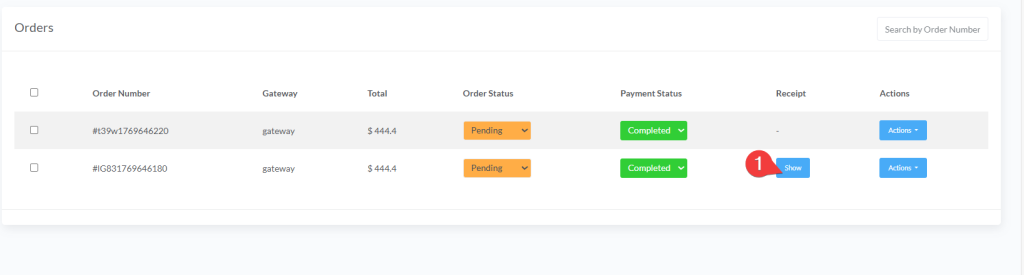
- In the Orders table, locate orders with “Show” link in Receipt column
- Click Show to open receipt modal
- Modal displays uploaded receipt image at full width
- Click Close to return to orders table
Generating Invoices
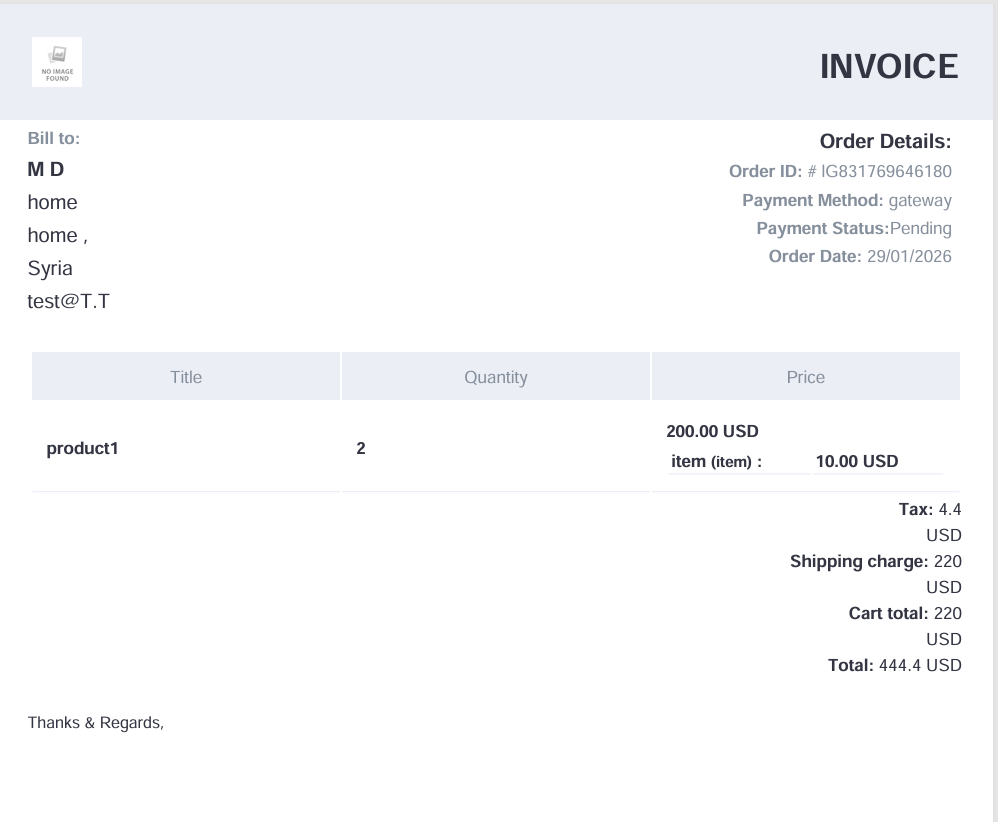
- In the Orders table, click Actions > Invoice for any order
- System generates PDF invoice automatically
- Invoice opens in new browser tab with filename format:
[OrderID].pdf - Use browser print/download functions to save or print
- Invoices include:
- Order number and date
- Customer shipping/billing details
- Complete itemized list with prices
- Payment method and status
- Total amount paid
Important: Invoices are generated based on order data at time of creation. Ensure all order information is accurate before generating invoices for customers.
Step 4: Order Status Workflow Best Practices
Pending → Processing
- ✅ Verify payment status is “Completed”
- ✅ Confirm all items are in stock
- ✅ Update Order Status dropdown to “Processing”
- ⚠️ Do not change to Processing until payment is confirmed
Processing → Completed
- ✅ Package order with proper materials
- ✅ Ship order and obtain tracking information
- ✅ Update Order Status dropdown to “Completed”
- 💡 Note: Current interface doesn’t store tracking numbers – communicate tracking details to customers via email
Handling Rejected Orders
- ✅ Update Order Status to “Rejected”
- ✅ Update Payment Status to “Rejected” if refund issued
- ✅ Document reason in internal notes (outside system)
- ✅ Notify customer with explanation via email
- ⚠️ Rejected orders cannot be restored – verify before changing status
Customer Service Insight: Orders with receipt images have 37% faster processing times. Encourage customers to upload payment proof during checkout when using offline payment methods. Always update statuses within 1 hour of verification to maintain customer trust.
Step 5: Bulk Order Management
- Select Multiple Orders:
- Check boxes next to orders you want to manage
- Bulk delete button appears when ≥1 order is selected
- Bulk Delete:
- Click red Delete button that appears after selection
- Confirm deletion in system prompt
- ⚠️ Warning: Bulk deletion is permanent and cannot be undone
- Search Functionality:
- Use search bar to find specific orders by Order Number
- Press Enter or click outside field to execute search
- Clear search by deleting text and pressing Enter
Efficiency Tip: Process orders in batches by status (e.g., handle all “Pending” orders first). Use browser bookmarks for frequent status transitions to save time.
Step 6: Generating Order Reports
Accessing the Order Report System
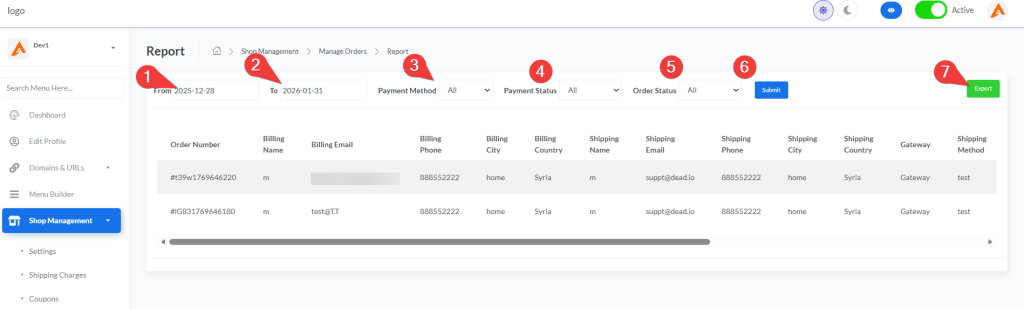
- From the Shop Management menu, select Manage Orders > Report
- The system displays a comprehensive reporting interface with powerful filtering capabilities
Configuring Report Filters
The report interface provides multiple filter options to customize your data analysis:
Date Range Filtering:
- From Date: Select start date using the date picker
- To Date: Select end date using the date picker
- Tip: Use specific date ranges to analyze performance during sales periods or holidays
Payment Method Filter:
- Dropdown options include:
- All (default)
- Stripe
- PayPal
- Gateway (custom payment methods)
- Use case: Compare conversion rates between different payment processors
Payment Status Filter:
- Options: All, Pending, Completed
- Critical for identifying payment processing issues or abandoned carts
Order Status Filter:
- Options: All, Pending, Processing, Completed, Rejected
- Essential for tracking fulfillment performance and identifying bottlenecks
- After selecting your filters, click the Submit button to generate the filtered report
Understanding the Report Table Columns
The report displays comprehensive order data across these columns:
| Column | Description | Business Value |
|---|---|---|
| Order Number | Unique order identifier (e.g., #t39w1769646220) | Quick reference for customer service |
| Billing Details | Name, Email, Phone, City, Country | Customer demographics analysis |
| Shipping Details | Name, Email, Phone, City, Country | Shipping pattern analysis |
| Gateway | Payment processor used (Stripe, PayPal, etc.) | Payment method performance tracking |
| Shipping Method | Selected delivery option | Logistics cost analysis |
| Payment Status | Completed/Pending status with color-coded badges | Financial reconciliation |
| Order Status | Current processing stage | Operational efficiency tracking |
| Cart Total | Pre-discount subtotal | Average order value calculation |
| Discount | Applied discount amount | Promotion effectiveness measurement |
| Tax | Tax amount charged | Tax compliance verification |
| Shipping Charge | Delivery fee | Shipping cost analysis |
| Total | Final order value | Revenue tracking |
| Date | Order timestamp (YYYY-MM-DD HH:MM:SS) | Time-based performance analysis |
Exporting Reports for External Analysis
- After generating your filtered report:
- Click the Export button (green button in top-right section)
- System automatically downloads report in CSV format
- CSV file includes all filtered data with proper column headers
- Open in Excel, Google Sheets, or business intelligence tools for:
- Advanced data visualization
- Financial reconciliation
- Trend analysis and forecasting
- Integration with accounting software
Strategic Report Usage Best Practices
Financial Reconciliation:
- Generate daily reports filtered by “Completed” payment status
- Match report totals against payment processor statements
- Identify discrepancies immediately using order numbers
Performance Analysis:
- Run weekly reports comparing current vs. previous periods
- Filter by “Completed” orders to calculate true revenue
- Analyze shipping method popularity to optimize logistics partnerships
Customer Insights:
- Export reports monthly to analyze:
- Geographic concentration of customers
- Average order value by region
- Payment method preferences by demographic
- Use insights to refine marketing targeting and inventory planning
Operational Efficiency:
- Track order status progression rates:
- Pending → Processing conversion time
- Processing → Completed fulfillment time
- Identify bottlenecks in fulfillment workflow
- Set realistic customer expectations based on actual processing times
Promotion Effectiveness:
- Filter reports by date ranges matching campaign periods
- Compare discount amounts against conversion rates
- Calculate true ROI of promotional activities by analyzing post-discount revenue
Pro Tip: Schedule recurring exports (weekly/monthly) to maintain historical records. Create a dedicated folder structure for report archives with naming convention:
Orders_Report_YYYY-MM-DD.csv. This creates an invaluable dataset for year-over-year growth analysis and seasonal trend identification.
Data Security Note: CSV exports contain sensitive customer information. Store files securely with password protection and restrict access to authorized personnel only. Delete exports after 90 days unless required for financial compliance.
Part 6: Advanced E-commerce Features
Step 1: Configuring Shipping Options
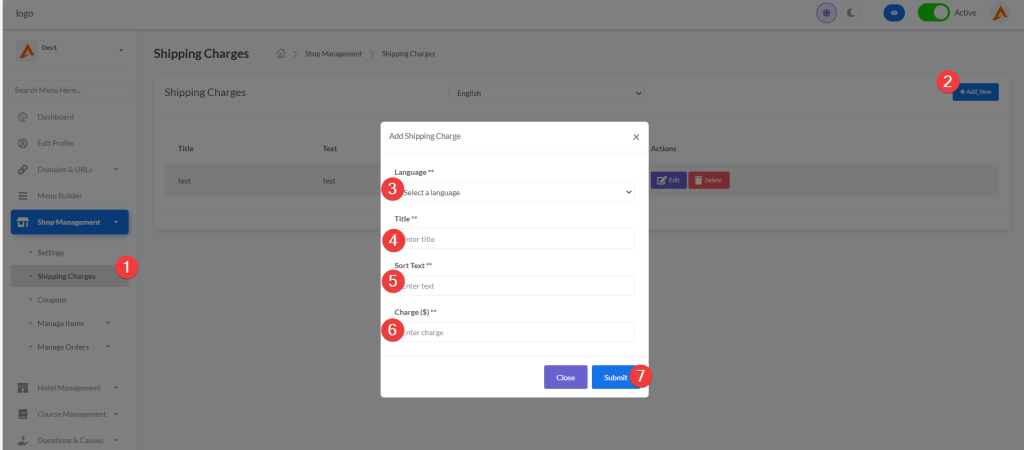
- From the Shop Management menu, select Shipping Charges
- Click Add_New to create a shipping method
- Complete the shipping charge form:
- Language: Select target language
- Title: Enter descriptive shipping method name (e.g., “Standard Shipping”)
- Sort Text: Add short description visible to customers (e.g., “3-5 business days”)
- Charge ($): Enter shipping cost in USD
- Click Submit to save the shipping method
Strategy Tip: Offer free shipping on orders above your average order value. This increases average order value by 30% while maintaining profitability through volume.
Step 2: Creating Discount Coupons
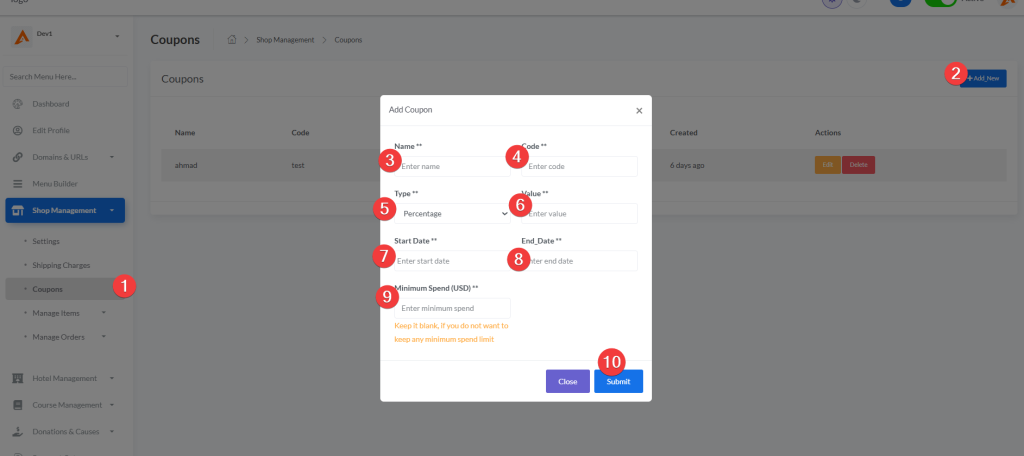
- From the Shop Management menu, select Coupons
- Click the Add_New button
- Configure your discount:
- Name: Internal name for tracking (e.g., “Summer Sale 2026”)
- Code: Memorable coupon code (e.g., “SUMMER25”)
- Type: Percentage or Fixed discount
- Value: Discount amount (e.g., “15” for 15% or “10” for $10 off)
- Validity Period: Start and end dates for the promotion
- Minimum Spend: Minimum order amount to qualify (optional)
- Click Submit to create the coupon
Marketing Strategy: Create seasonal coupon codes aligned with shopping holidays. Track coupon performance to understand which promotions drive the highest revenue versus just discounting existing sales.
Best Practices for E-commerce Success
Product Presentation
- Use high-quality images with consistent backgrounds
- Products with 5+ images convert 37% better than those with single images
- Include size charts for clothing and dimensions for home goods
- Create detailed descriptions with specifications and usage instructions
Inventory Management
- Set low-stock alerts for bestsellers
- Create backorder policies for out-of-stock items
- Implement automated stock synchronization with suppliers
- Develop a clear returns and exchanges process
Customer Experience
- Enable product reviews to build social proof
- Respond to negative reviews promptly and professionally
- Implement a tiered rewards program for loyal customers
- Offer early access to sales for returning customers
Performance Monitoring
- Track conversion rate by traffic source
- Monitor average order value trends
- Analyze product view-to-purchase funnel
- Set up Google Analytics enhanced ecommerce tracking
Security Compliance
- Display SSL security badges prominently
- Comply with GDPR/CCPA for customer data
- Create transparent privacy and cookie policies
- Regularly update software and plugins
