Comprehensive User Guide – Code-Verified & Complete
1. System Overview
The Hotel Management System is an integrated module within the website’s admin dashboard that enables full control over accommodation operations—from foundational settings to room, amenity, coupon, category, and booking management.
Setting up Theme:
Dashboard → Settings → Themes → Theme Nine

Navigation Path:
Dashboard → Settings → Themes → Theme Nine → Hotel ManagementAvailable Sections:
- Settings – General system configuration
- Coupons – Discount code management
- Amenities – Room facilities management
- Categories – Room type classification
- Rooms – Individual room configuration
- Room Bookings – Booking management (All, Paid, Unpaid)
2. Settings
The Settings page controls the overall behavior of the hotel booking system.
2.1. Available Settings
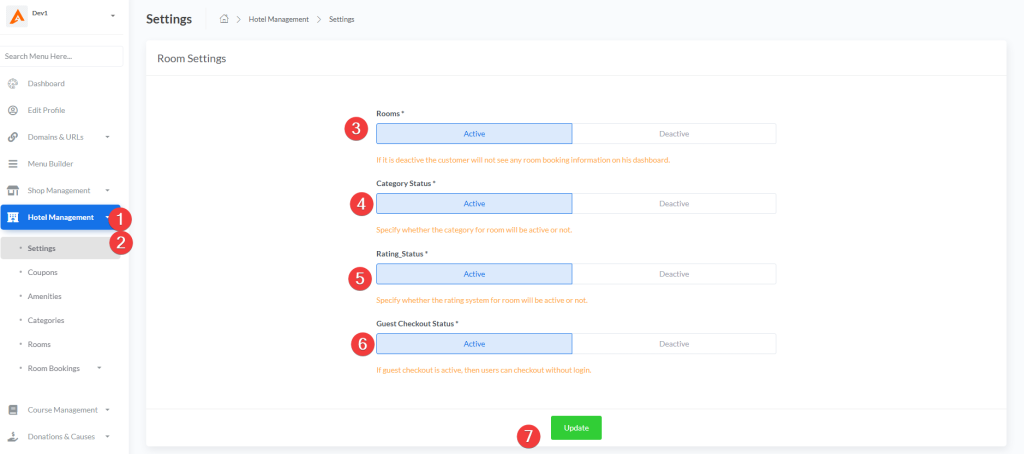
| Setting | Options | Description | Impact |
|---|---|---|---|
| Rooms | Active / Deactive | Enables/disables the entire room booking system | When deactive, customers won’t see any room booking information on their dashboard |
| Category Status | Active / Deactive | Controls visibility of room categories | Determines whether categories are shown publicly |
| Rating Status | Active / Deactive | Enables/disables guest rating system | Allows or prevents guests from submitting room reviews |
| Guest Checkout Status | Active / Deactive | Allows booking without account creation | When active, users can checkout as guests without logging in |
2.2. How to Update Settings
- Navigate to:
Hotel Management → Settings - Select desired options for each setting using radio buttons
- Click Update button to save changes
⚠️ Warning: Changes to settings take effect immediately and affect all users.
3. Coupons Management
Coupons allow you to create promotional discount codes for room bookings.
3.1. Coupon Table Structure
| Column | Description |
|---|---|
| # | Sequential ID number |
| Name | Internal reference name (e.g., “Summer Sale”) |
| Code | Coupon code customers enter (e.g., “SUMMER20”) |
| Discount | Discount value (Fixed amount or Percentage) |
| Created | Creation timestamp (e.g., “1 week ago”) |
| Status | Active/Inactive badge indicator |
| Actions | Edit and Delete buttons |
3.2. Creating a New Coupon
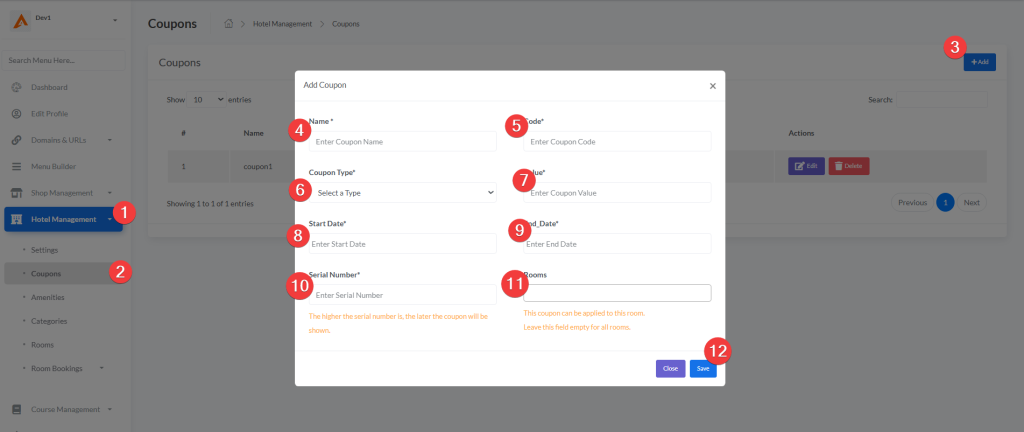
Access: Hotel Management → Coupons → Add (top-right button)
Form Fields:
| Field | Type | Required | Description | Example |
|---|---|---|---|---|
| Name | Text | ✅ | Internal reference name | “Winter Promotion” |
| Code | Text | ✅ | Coupon code for customers | “WINTER25” |
| Coupon Type | Dropdown | ✅ | Fixed or Percentage | “Percentage” |
| Value | Number | ✅ | Discount amount (step: 0.01) | 25.00 |
| Start Date | Datepicker | ✅ | When coupon becomes valid | 12/29/2025 |
| End Date | Datepicker | ✅ | When coupon expires | 01/31/2026 |
| Serial Number | Number | ✅ | Display priority | 1 |
| Rooms | Multi-select | ❌ | Specific rooms for this coupon | (Leave empty for all rooms) |
3.3. Coupon Types
| Type | Calculation | Example |
|---|---|---|
| Fixed | Subtract fixed amount from total | Room: $200 – Coupon $30 = $170 |
| Percentage | Apply percentage discount | Room: $200 – Coupon 15% = $170 |
3.4. Serial Number Priority
- Lower number = Appears first (higher priority)
- Higher number = Appears later (lower priority)
Recommended Practice: Use intervals (10, 20, 30) to allow future insertions without renumbering.
3.5. Room-Specific Coupons
- Targeted Promotion: Assign coupons to specific rooms only
- Leave Empty: Coupon applies to all rooms in the system
- Multi-select: Hold Ctrl/Cmd to select multiple rooms
3.6. Editing & Deleting Coupons
| Action | Process |
|---|---|
| Edit | Click “Edit” → Modify fields → Update |
| Delete | Click “Delete” → Confirm in modal → Permanent removal |
⚠️ Warning: Deleted coupons cannot be recovered.
4. Amenities Management
Amenities are facilities and features available in rooms that you can showcase to guests.
4.1. Amenities Table
| Column | Description |
|---|---|
| Checkbox | Select for bulk operations |
| Name | Amenity title (e.g., “Free Wi-Fi”) |
| Serial Number | Display order priority |
| Actions | Edit or Delete options |
4.2. Creating a New Amenity

Access: Hotel Management → Amenities → Add Amenity
Form Fields:
| Field | Type | Required | Description | Example |
|---|---|---|---|---|
| Language | Dropdown | ✅ | Content language | English |
| Amenity Name | Text | ✅ | Descriptive title | “Free High-Speed Wi-Fi” |
| Serial Number | Number | ✅ | Display priority | 1 |
4.3. Serial Number Display Logic
- Lower number = Appears first in the list
- Higher number = Appears later in the list
Example Display Order:
- Free Wi-Fi
- Air Conditioning
- Smart TV
- Mini Fridge
4.4. Bulk Operations
The system supports bulk deletion of amenities:
- Select multiple amenities using checkboxes
- Click the “Delete” button that appears
- Confirm deletion in the modal
⚠️ Warning: Bulk deletion is permanent and cannot be undone.
4.5. Language Management
- Amenities support multilingual content
- Select language from dropdown before creating/editing
- Each language version is stored separately
- Guests see amenities in their selected language
5. Room Categories Management
Categories classify rooms into different types (e.g., Standard, Deluxe, Suite).
5.1. Categories Table
| Column | Description |
|---|---|
| Checkbox | Select for bulk operations |
| Name | Category title (e.g., “Deluxe Room”) |
| Status | Active/Inactive badge indicator |
| Serial Number | Display priority |
| Actions | Edit or Delete options |
5.2. Creating a New Category
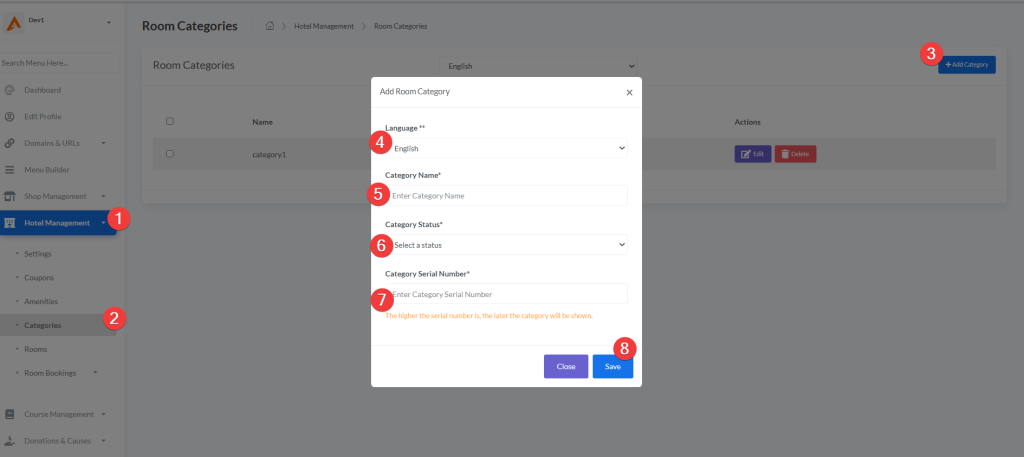
Access: Hotel Management → Categories → Add Category
Form Fields:
| Field | Type | Required | Description | Example |
|---|---|---|---|---|
| Language | Dropdown | ✅ | Content language | English |
| Category Name | Text | ✅ | Descriptive name | “Family Suite” |
| Category Status | Dropdown | ✅ | Active or Deactive | Active |
| Category Serial Number | Number | ✅ | Display priority | 1 |
5.3. Category Status
| Status | Effect |
|---|---|
| Active | Category is visible to guests on the website |
| Deactive | Category is hidden from public view |
5.4. Serial Number Priority
- Lower number = Appears first in category listings
- Higher number = Appears later in category listings
Recommended: Use intervals (10, 20, 30) for flexibility.
5.5. Bulk Operations
- Select multiple categories using checkboxes
- Click Delete button for bulk removal
- Confirm deletion in modal
6. Rooms Management
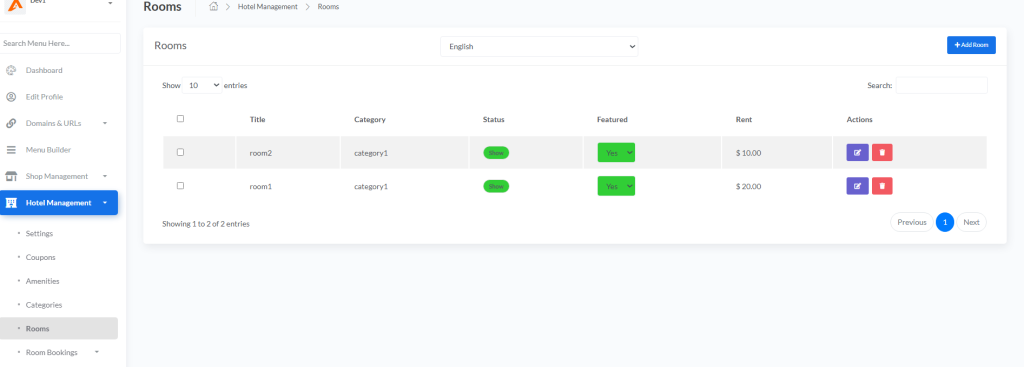
This section allows you to create and configure individual rooms with complete details.
6.1. Rooms Table
| Column | Description |
|---|---|
| Checkbox | Select for bulk operations |
| Title | Room name/title |
| Category | Assigned category |
| Status | Show/Hide badge |
| Featured | Yes/No dropdown (toggle featured status) |
| Rent | Price per night |
| Actions | Edit and Delete buttons |
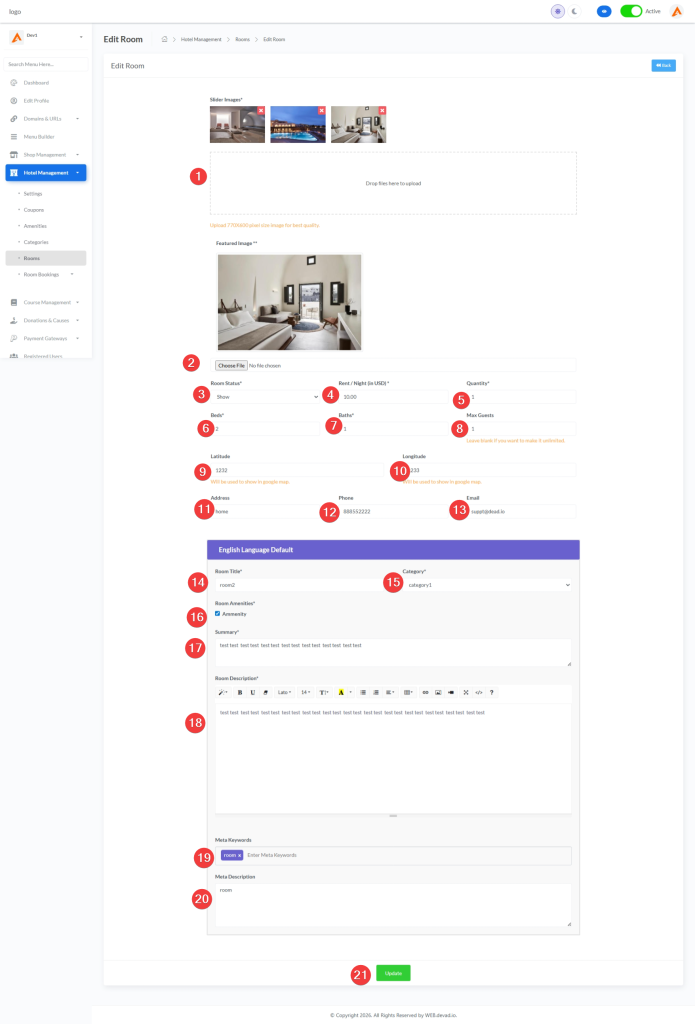
6.2. Creating a New Room
Access: Hotel Management → Rooms → Add Room
6.3. Room Configuration Form
The room creation form is divided into several sections:
Section 1: Media Upload
| Field | Type | Required | Description | Notes |
|---|---|---|---|---|
| Slider Images | Dropzone Upload | ✅ | Multiple images for room gallery | Recommended size: 770×600 pixels |
| Featured Image | File Upload | ✅ | Main room image | Shown as primary thumbnail |
Section 2: Basic Information
| Field | Type | Required | Description | Example |
|---|---|---|---|---|
| Room Status | Dropdown | ✅ | Show or Hide | Show = visible to guests |
| Rent / Night | Number | ✅ | Price per night (step: 0.01) | 20.00 |
| Quantity | Number | ✅ | Number of available rooms | 1 |
| Beds | Number | ✅ | Number of beds | 2 |
| Baths | Number | ✅ | Number of bathrooms | 1 |
| Max Guests | Number | ❌ | Maximum occupancy | Leave blank for unlimited |
Section 3: Location Information
| Field | Type | Required | Description | Example |
|---|---|---|---|---|
| Latitude | Text | ❌ | GPS latitude for Google Maps | 1232 |
| Longitude | Text | ❌ | GPS longitude for Google Maps | 1233 |
| Address | Text | ❌ | Physical address | “123 Hotel Street” |
| Phone | Text | ❌ | Contact phone number | +090123456789 |
| ❌ | Contact email | [email protected] |
ℹ️ Note: Latitude and Longitude will be used to display the room location on Google Maps.
Section 4: Language-Specific Content
(Accordion section for each language)
Default: English Language
| Field | Type | Required | Description |
|---|---|---|---|
| Room Title | Text | ✅ | Room name/title |
| Category | Dropdown | ✅ | Assign room category |
| Room Amenities | Checkboxes | ✅ | Select available amenities |
| Summary | Textarea | ✅ | Brief room description (3 rows) |
| Room Description | Summernote Editor | ✅ | Detailed description (WYSIWYG editor) |
| Meta Keywords | Tags Input | ❌ | SEO keywords (comma-separated tags) |
| Meta Description | Textarea | ❌ | SEO meta description (5 rows) |
6.4. Editing Existing Rooms
Access: Click Edit button on any room row
Features:
- All fields from creation form are editable
- Existing slider images are displayed with delete option
- Featured image preview shown
- Language content can be modified
- Amenities can be checked/unchecked
6.5. Featured Room Toggle
Each room has a Featured dropdown in the table:
- Yes = Room appears in featured sections (homepage, promotions)
- No = Room appears in standard listings only
💡 Strategy: Mark high-margin or premium rooms as “Featured” to increase visibility and bookings.
6.6. Room Status
| Status | Effect |
|---|---|
| Show | Room is visible to guests and can be booked |
| Hide | Room is hidden from public view but remains in system |
6.7. Bulk Operations
- Select multiple rooms using checkboxes
- Click Delete button for bulk removal
- Confirm deletion in modal
⚠️ Warning: Bulk deletion is permanent and cannot be undone.
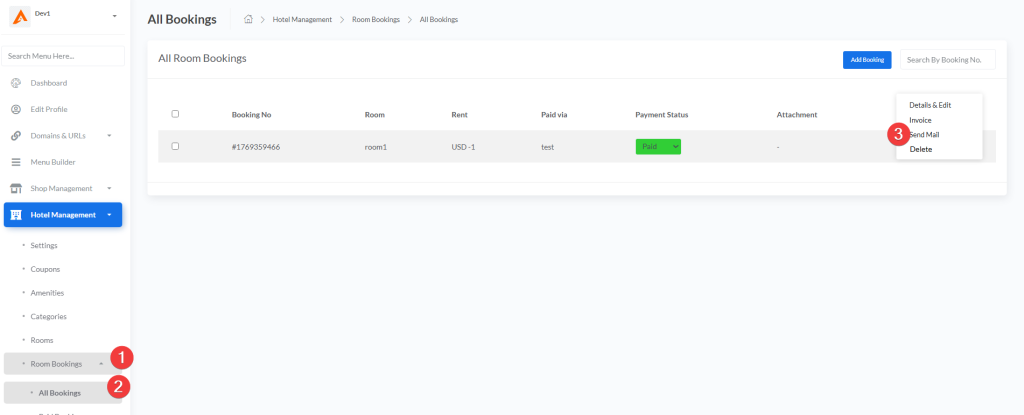
7. Room Bookings Management
The Room Bookings section allows you to view, manage, and create room reservations.
7.1. Booking Subsections
| Section | Description | Path |
|---|---|---|
| All Bookings | View all room bookings (paid & unpaid) | Room Bookings → All Bookings |
| Paid Bookings | View only paid reservations | Room Bookings → Paid Bookings |
| Unpaid Bookings | View only unpaid reservations | Room Bookings → Unpaid Bookings |
7.2. All Bookings Table
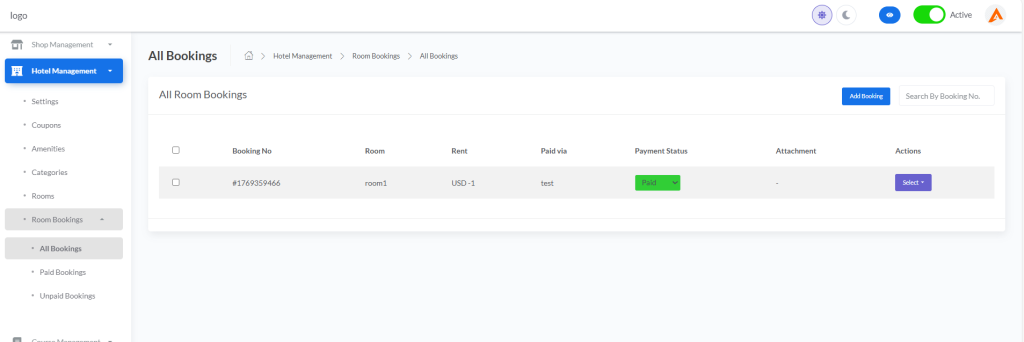
| Column | Description |
|---|---|
| Checkbox | Select for bulk operations |
| Booking No | Unique booking reference number (e.g., #1769359466) |
| Room | Room name/title |
| Rent | Booking amount (currency + value) |
| Paid via | Payment method used (e.g., Stripe, PayPal) |
| Payment Status | Paid/Unpaid dropdown (toggle status) |
| Attachment | Booking attachment file (if any) |
| Actions | Details, Invoice, Send Mail, Delete |
7.3. Booking Actions
| Action | Description | Access |
|---|---|---|
| Details & Edit | View and modify booking details | Dropdown → Details & Edit |
| Invoice | Generate and view PDF invoice | Dropdown → Invoice |
| Send Mail | Send email to customer | Dropdown → Send Mail |
| Delete | Permanently remove booking | Dropdown → Delete |
7.4. Search & Filter
- Search by Booking No.: Use the search input field to find specific bookings by reference number
- Bulk Delete: Select multiple bookings using checkboxes and click the Delete button
7.5. Creating a New Booking
Access: Room Bookings → All Bookings → Add Booking (button)
Process:
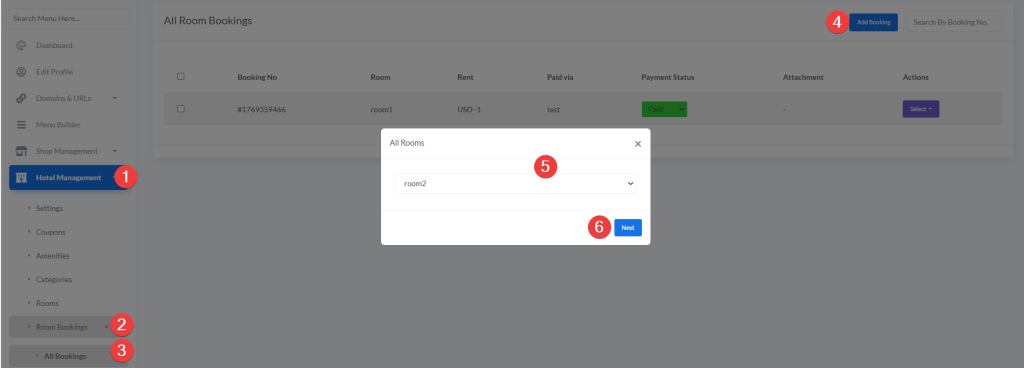
- Select Room Modal appears
- Choose a room from the dropdown list
- Click Next button
- Fill in the booking form (see section 7.6)
7.6. New Booking Form
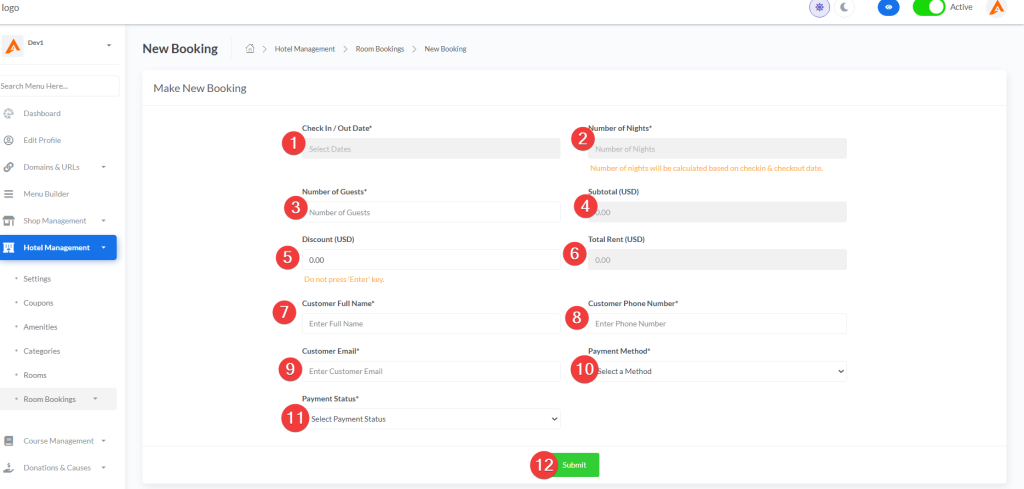
| Section | Field | Type | Required | Description | Example |
|---|---|---|---|---|---|
| Dates | Check In / Out Date | Date Range Picker | ✅ | Select arrival and departure dates | 2026-01-21 – 2026-01-25 |
| Dates | Number of Nights | Text (Readonly) | ✅ | Auto-calculated based on dates | 4 |
| Guests | Number of Guests | Number | ✅ | Total guests for this booking | 2 |
| Pricing | Subtotal (USD) | Text (Readonly) | ✅ | Room rent × nights | 80.00 |
| Pricing | Discount (USD) | Text | ❌ | Discount amount to apply | 10.00 |
| Pricing | Total Rent (USD) | Text (Readonly) | ✅ | Subtotal – Discount | 70.00 |
| Customer | Customer Full Name | Text | ✅ | Guest’s full name | John Doe |
| Customer | Customer Phone Number | Text | ✅ | Contact phone | +1234567890 |
| Customer | Customer Email | ✅ | Contact email | [email protected] | |
| Payment | Payment Method | Dropdown | ✅ | Payment gateway | Stripe |
| Payment | Payment Status | Dropdown | ✅ | Paid or Unpaid | Paid |
7.7. Discount Application
- Enter discount amount in the Discount field
- Total Rent updates automatically (JavaScript calculation)
- ⚠️ Note: Do not press ‘Enter’ key after entering discount
7.8. Payment Methods
Available payment gateways (configured in system):
- Stripe
- PayPal
- Custom Gateway (offline/other methods)
- And any another available Gateway
7.9. Payment Status Toggle
Each booking has a Payment Status dropdown:
- Paid = Payment received, booking confirmed
- Unpaid = Payment pending, booking awaiting payment
Changing Status:
- Select new status from dropdown
- Form auto-submits via JavaScript
- Status updates immediately
7.10. Booking Details & Edit Page
Access: Click Details & Edit from booking actions dropdown
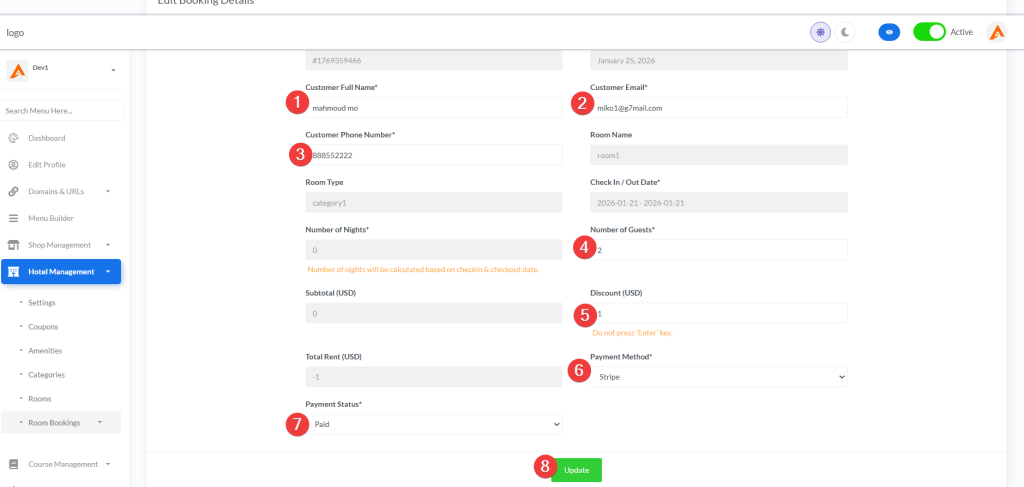
Form Fields:
| Section | Field | Type | Editable | Description |
|---|---|---|---|---|
| Booking Info | Booking Number | Text | ❌ | Unique reference number |
| Booking Info | Booking Date | Text | ❌ | When booking was created |
| Customer | Customer Full Name | Text | ✅ | Guest’s name |
| Customer | Customer Email | ✅ | Contact email | |
| Customer | Customer Phone Number | Text | ✅ | Contact phone |
| Room Info | Room Name | Text | ❌ | Room title |
| Room Info | Room Type | Text | ❌ | Category name |
| Dates | Check In / Out Date | Text | ❌ | Booking dates (readonly) |
| Dates | Number of Nights | Text | ❌ | Auto-calculated |
| Guests | Number of Guests | Number | ✅ | Total guests |
| Pricing | Subtotal (USD) | Text | ❌ | Base price |
| Pricing | Discount (USD) | Text | ✅ | Discount amount |
| Pricing | Total Rent (USD) | Text | ❌ | Final price |
| Payment | Payment Method | Dropdown | ✅ | Payment gateway |
| Payment | Payment Status | Dropdown | ✅ | Paid/Unpaid |
7.11. Sending Email to Customer
Access: Click Send Mail from booking actions dropdown
Email Form:
| Field | Type | Required | Description |
|---|---|---|---|
| Customer Mail Address | ✅ | Pre-filled from booking (readonly) | |
| Subject | Text | ✅ | Email subject line |
| Message | Summernote Editor | ✅ | Email body content (WYSIWYG) |
Process:
- Modal opens with pre-filled customer email
- Enter subject and message
- Click Send button
- Email is sent to customer
7.12. Invoice Generation

- Click Invoice from booking actions dropdown
- PDF invoice opens in new tab/window
- Invoice filename format:
{booking_number}.pdf - Location:
https://web.devad.io/assets/invoices/rooms/{booking_number}.pdf
7.13. Bulk Delete Bookings
- Select multiple bookings using checkboxes
- Click the Delete button that appears
- Confirm deletion in SweetAlert modal
- Selected bookings are permanently removed
⚠️ Warning: Bulk deletion is irreversible.
8. Best Practices
8.1. Settings Optimization
| Goal | Recommended Setting |
|---|---|
| Allow guest bookings | Guest Checkout Status: Active |
| Collect customer feedback | Rating Status: Active |
| Temporarily pause bookings | Rooms: Deactive |
| Hide categories during updates | Category Status: Deactive |
8.2. Coupon Strategy
| Goal | Recommended Approach |
|---|---|
| Increase bookings | Create limited-time percentage discounts (10–20%) |
| Clear slow rooms | Offer fixed discounts on specific room types |
| Upsell premium rooms | Create exclusive coupons for higher-tier rooms |
| Seasonal promotions | Set start/end dates aligned with peak/off-peak seasons |
8.3. Category Organization
| Priority | Category Type | Serial Number |
|---|---|---|
| 1 | Premium Suite | 10 |
| 2 | Deluxe Room | 20 |
| 3 | Standard Room | 30 |
| 4 | Budget Room | 40 |
8.4. Room Configuration Tips
| Aspect | Recommendation |
|---|---|
| Images | Upload 3–5 high-quality slider images per room |
| Featured Image | Use the most attractive angle as featured image |
| Description | Write detailed, benefit-focused descriptions |
| Amenities | Check all applicable amenities for each room |
| SEO | Fill meta keywords and description for better search visibility |
| Pricing | Set competitive rates based on category and amenities |
8.5. Booking Management Best Practices
| Practice | Benefit |
|---|---|
| Regular status updates | Keep payment status accurate for financial tracking |
| Send confirmation emails | Improve customer communication and satisfaction |
| Use discount strategically | Offer discounts to fill low-demand dates |
| Monitor unpaid bookings | Follow up on pending payments promptly |
| Generate invoices | Maintain professional records for accounting |
9. Quick Reference Tables
9.1. Settings Summary
| Setting | Active Effect | Deactive Effect |
|---|---|---|
| Rooms | System enabled | System disabled |
| Category Status | Categories visible | Categories hidden |
| Rating Status | Reviews enabled | Reviews disabled |
| Guest Checkout | Guest booking allowed | Login required |
9.2. Coupon Field Summary
| Field | Required | Format | Example |
|---|---|---|---|
| Name | ✅ | Text | Summer Promotion |
| Code | ✅ | Alphanumeric | SUMMER20 |
| Type | ✅ | Fixed/Percentage | Percentage |
| Value | ✅ | Number (0.01 step) | 20.00 |
| Start Date | ✅ | MM/DD/YYYY | 06/01/2026 |
| End Date | ✅ | MM/DD/YYYY | 08/31/2026 |
| Serial Number | ✅ | Integer | 10 |
| Rooms | ❌ | Multi-select | Leave empty for all |
9.3. Room Field Summary
| Section | Field | Required | Notes |
|---|---|---|---|
| Media | Slider Images | ✅ | 770×600px recommended |
| Media | Featured Image | ✅ | Primary thumbnail |
| Basic | Status | ✅ | Show/Hide |
| Basic | Rent | ✅ | Per night price |
| Basic | Quantity | ✅ | Available rooms |
| Basic | Beds/Baths | ✅ | Room capacity |
| Location | Lat/Long | ❌ | For Google Maps |
| Content | Title/Category | ✅ | Per language |
| Content | Amenities | ✅ | Check all that apply |
| SEO | Meta Keywords | ❌ | Tags input |
| SEO | Meta Description | ❌ | 5 rows textarea |
9.4. Booking Field Summary
| Section | Field | Required | Editable | Notes |
|---|---|---|---|---|
| Info | Booking Number | ✅ | ❌ | Auto-generated |
| Info | Booking Date | ✅ | ❌ | Creation timestamp |
| Dates | Check In/Out | ✅ | ❌ | Date range picker |
| Dates | Nights | ✅ | ❌ | Auto-calculated |
| Guests | Number of Guests | ✅ | ✅ | Integer input |
| Pricing | Subtotal | ✅ | ❌ | Rent × nights |
| Pricing | Discount | ❌ | ✅ | Manual input |
| Pricing | Total | ✅ | ❌ | Subtotal – Discount |
| Customer | Name/Email/Phone | ✅ | ✅ | Contact details |
| Payment | Method | ✅ | ✅ | Gateway selection |
| Payment | Status | ✅ | ✅ | Paid/Unpaid toggle |
Guest Booking Guide – Step by Step
Here’s exactly what your guests will see and do when booking a room on your website:

From home page search for a room:
Enter check-in and check-out dates using the calendar
(Optional) Use filters to refine search:
Beds: Select 1, 2, or more beds needed
Baths: Choose number of bathrooms
Guests: Set party size (1-10 people)
Click “Search” button so it goes to room page:
📍 Step 1: Find Available Rooms
(Page: “Room” listing page)
What guests do:
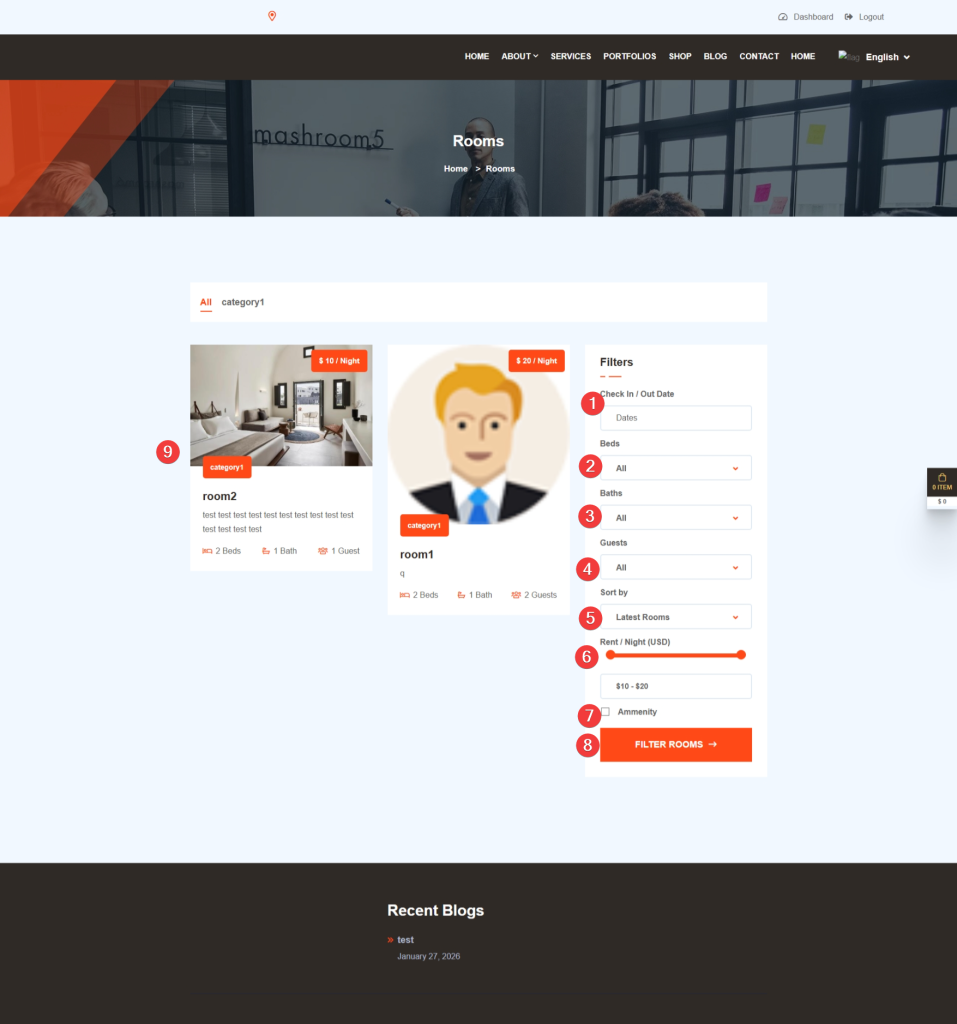
- Enter check-in and check-out dates using the calendar
- (Optional) Use filters to refine search:
- Beds: Select 1, 2, or more beds needed
- Baths: Choose number of bathrooms
- Guests: Set party size (1-10 people)
- Price Range: Slide to set budget
- Amenities: Check boxes for must-haves (Wi-Fi, AC, etc.)
- Click “Filter Rooms” button
- Browse results – each room shows:
- Beautiful photo
- Price per night (e.g., “$10 / Night”)
- Room type (e.g., “category1”)
- Number of beds, baths, and max guests
💡 Guest Tip: Click any room photo or title to see full details!
📍 Step 2: View Room Details
(Page: Individual room details page)
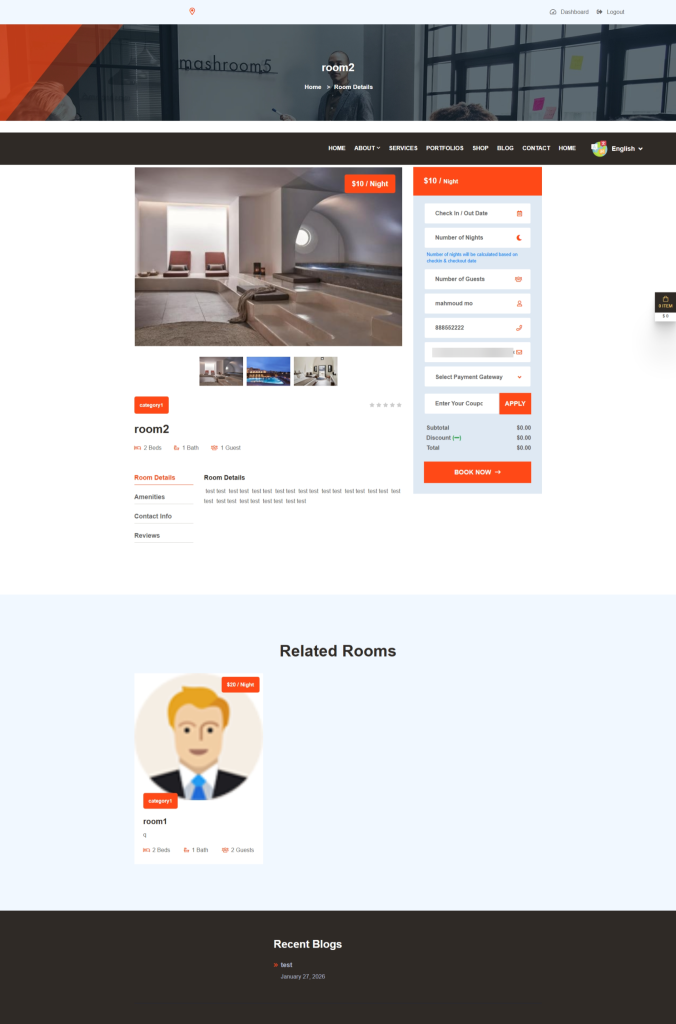
What guests see:
- Photo Gallery: Multiple high-quality images in a slider with thumbnail navigation
- Room Info: Title, category, price tag ($10/Night), beds/baths/guests count
- Four Tabs to explore:
- Room Details: Full description of the space
- Amenities: Complete list of facilities (Wi-Fi, TV, etc.)
- Contact Info: Address, phone, email + Google Map showing location
- Reviews: Guest ratings and written feedback
What guests do:
- Browse photos by clicking arrows or thumbnails
- Read room description and amenities
- Check location on the embedded Google Map
- Scroll down to the booking sidebar on the right to start reservation
💡 Guest Tip: Look for the green “Book Now” button in the sidebar to start booking!
📍 Step 3: Fill Booking Form
(Sidebar on room details page)
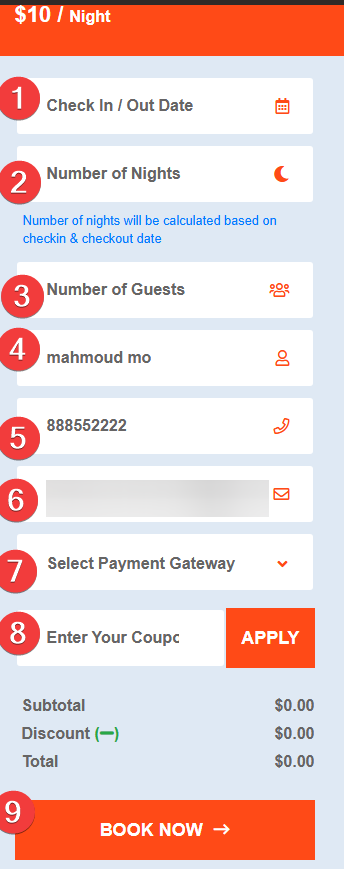
What guests see: A simple form with these fields:
| Field | What to Enter | Notes |
|---|---|---|
| Check In/Out Date | Select dates using calendar | Auto-calculates nights |
| Number of Nights | (Read-only) | Shows automatically based on dates |
| Number of Guests | Enter total people | Must not exceed room capacity |
| Full Name | Your name | Pre-filled if logged in |
| Phone | Contact number | For booking updates |
| Email address | For confirmation & invoice | |
| Payment Gateway | Select method | Options: Stripe, PayPal, or offline bank transfer |
| Coupon Code | Discount code (optional) | Click “Apply” to activate |
What guests do:
- Fill all required fields (marked with *)
- Select payment method from dropdown
- (Optional) Enter coupon code and click “Apply”
- Review price breakdown below the form:
- Subtotal: Room rate × nights
- Discount: Coupon amount (if applied)
- Total: Final price to pay
- Click the big orange “Book Now” button
⚠️ Important: All fields with * are required. Don’t press “Enter” after typing coupon code—use the “Apply” button instead.
📍 Step 4: Complete Payment
What happens next depends on payment method:
✅ If paying online (Stripe/PayPal):
- Guest is redirected to secure payment page
- Enter card details (Stripe) or log in to PayPal
- After successful payment: Instant confirmation screen appears
- Confirmation email arrives within minutes with booking number
✅ If paying offline (bank transfer):
- Guest sees payment instructions on screen
- Can upload payment receipt using “Attachment” field
- Booking is created with “Unpaid” status
- Hotel staff will confirm payment manually and update status
- Guest receives email when booking is confirmed
💡 Guest Tip: Save your booking number from the confirmation email—it’s your reference for check-in and support.
📍 Step 5: After Booking – Your Dashboard
What guests get:
- Confirmation Email containing:
- Booking number (e.g., #1769359466)
- Room details and dates
- Total amount paid
- Check-in instructions
- Hotel contact information
- Customer Dashboard Access (
YourWebsite.com/customer/dashboard):- View all your bookings in one place
- Download PDF invoices anytime
- Leave reviews after your stay
- Update your profile information
- Contact hotel directly through messaging
- Check-in Day:
- Bring ID and booking confirmation (digital or printed)
- Show booking number at reception
- Enjoy your stay!
💡 Guest Tip: No account needed! With “Guest Checkout” enabled, you can book without registering—just provide your details during booking.
📍 Step 6: After Your Stay – Leave a Review
How to share your experience:
- Log in to your Customer Dashboard
- Find your completed booking
- Click “Leave a Review”
- Select star rating (1-5 stars)
- Write your feedback in the text box
- Click “Submit”
💡 Why review matters: Your feedback helps future guests choose the right room and helps the hotel improve service!
Guest Dashboard Features
After booking, guests can access their dashboard at: https://web.devad.io/{username}/customer/dashboard
Dashboard Sections:
| Section | Features | Guest Actions |
|---|---|---|
| My Bookings | List of all reservations | View details, download invoice |
| Booking Details | Complete reservation info | See dates, room, payment status |
| Invoices | PDF download links | Download/print for records |
| Reviews | Leave feedback | Rate rooms and write comments |
| Profile | Account information | Update contact details |
Leaving Reviews:
Guests can rate their stay and leave comments:
- Star rating: 1-5 stars (click to select)
- Written review: Share experience in text box
- Helps future guests make informed decisions
Related Rooms Display
On each room details page, guests see “Related Rooms” section showing:
- Similar rooms in the same category
- Helps guests compare options
- Increases chances of booking
