Table of Contents
This blog contains every detail you need to know about what you should add to make your website complete
1- Footer

A footer is where the end of a web page is, where there are usually link, info , and more about the website the user sees
1- “Footer logo and text” specializes in the general footer setting ranging from text, logo, brief describtion for the web page
2- “Quick links” provides the links the footer hosts related to the web page and other related links
2- Favicon

A favicon is the logo the browser puts next to the name of the website when the tab is loading, and to access it, go to settings, then go to favicon,when chosen,it should display it on the tab for your website
Choose file : Let’s the admin choose an image to be used as a favicon
Update : confirms the chosen image and saves it
Choose file : Let’s the admin choose an image to be used as a favicon
Update : confirms the chosen image and saves it
3- General settings

“General settings” is what the namesake suggests, and can be accessed from setting => General settings
General settings include options like website title, timezone, and currency used in financial aspects
-Website title : the name of your website
-Timezone : let’s you set the timezone your website is set on
-Email verification status : can be activated or deactivated, while active, it forces the users to use their email to make a new account
-Dashboard language : sets the language of the admin’s dashboard
4- Color settings

“Color settings” controls the color scheme used in the website, accessed by going to settings =>Color settings
Primary color : controls the colors of the header,buttons,backgrounds and links
Secondary color : controls the color of subheading,borders and dividers
Primary color : controls the colors of the header,buttons,backgrounds and links
Secondary color : controls the color of subheading,borders and dividers
5- plugins

Plugins can be accessed by going to settings => plugins
plugins are great tools for help in add extra features from outside sources such as Google Analytics, Google Recaptcha, Disqus, WhatsApp, Facebook Pixel, Tawk.to
-“Plugin name” status : let’s the user toggle between disabling and activating the toggle within the website
-Update : saves the changes made
6- Breadcrumbs

breadcrumbs are those links, usually at the top of a webpage, that show your path from the homepage down to your current page, forming a trail of internal links to help you navigate to where you want in your website,you access it by going to settings => Breadcrumb
-Choose file : Let’s you choose the image you want to use on your header
-Update : confirms the chosen image
-Choose file : Let’s you choose the image you want to use on your header
-Update : confirms the chosen image
7- Preloader

The preloader is what the browser displays on the web page while the page is loading before being able to fully browse the page with its content, accessed by clicking on settings => Preloader
8- Logo
Logo let’s you upload your main logo to appear in the site header and on your profile cards,and to be access,press settings => Logo
-Choose file : let’s the image to be used for your logo
-Update : saves the changes made with the chosen image
-Choose file : let’s the image to be used for your logo
-Update : saves the changes made with the chosen image
9- Email settings

Email settings are the section that enables the admin able to automate emails sent to customers,it can be accessed by going to settings => Email settings
-Reply to : This is the email address where replies will go if the recipient clicks “Reply
-From name : This is the name that appears in the recipient’s inbox as the sender
-Mail templates : sets up the structure of emails sent in different situation such as email verification and password reset
-Reply to : This is the email address where replies will go if the recipient clicks “Reply
-From name : This is the name that appears in the recipient’s inbox as the sender
-Mail templates : sets up the structure of emails sent in different situation such as email verification and password reset
10- Custom CSS

Custom CSS let’s you do other visual things not regularly available like hiding elements,access it by going to Settings => Custom CSS
11- Social links

The Social section lets you connect and manage your social media accounts to your page,you can access it by clicking Settings => Social links
-Social icon : sets up the icon for the social link used
-URL : the link for said social link
-Serial number : a variable used to organize the order in which the many social links are displayed
-Social icon : sets up the icon for the social link used
-URL : the link for said social link
-Serial number : a variable used to organize the order in which the many social links are displayed
12- SEO informations

SEO “Search Engine optimization” information let’s you set up your website to show more in search engine such as meta page description and keywords,it can be accessed by going to settings => SEO information
13- Cookie alert

Cookies are small pieces of data that websites store in the browser to remember user preferences, keep users logged in, and improve the overall experience,and this page allows to control the alert regarding it,whether wanted to be activated or not, the text of its button and the text contained within it,it can be accessed by going to settings => Cookie alert
14- Hero section

The Hero Section is the first and most visible area of a webpage. It appears at the top of the page and is designed to immediately communicate the main purpose of the website,to access it,go to home=>Hero Section.
It usually includes:
A main headline,A short description or supporting text,A call-to-action button (such as Get Started or Browse Courses),Optional background image or video
It usually includes:
A main headline,A short description or supporting text,A call-to-action button (such as Get Started or Browse Courses),Optional background image or video
15-Action section

The Action Section can be added to any page. Its purpose is to encourage visitors to take a specific action, such as signing up, enrolling, contacting the business, or exploring more content,to access the action section,go to Home=>Call to Action Section.
16-Testimonial

The Testimonials section displays feedback or reviews from customers or users. Its purpose is to build trust by showing real experiences and opinions about the service or product,to access it,go to Home=>Testimonial
17 Section Hide/Show

The Section Hide/Show option allows admins to control whether a specific section is visible on a page or not. It helps customize the page layout by showing only the sections that are needed,to access it,go to Home=>Section Hide/Show.
18- Video section

The Video Section is used to display a video on a page, such as an introduction, tutorial, or promotional video. It helps present information in a visual and engaging way,to access it,head to Home=>Video Section.
19- Header (Menu)
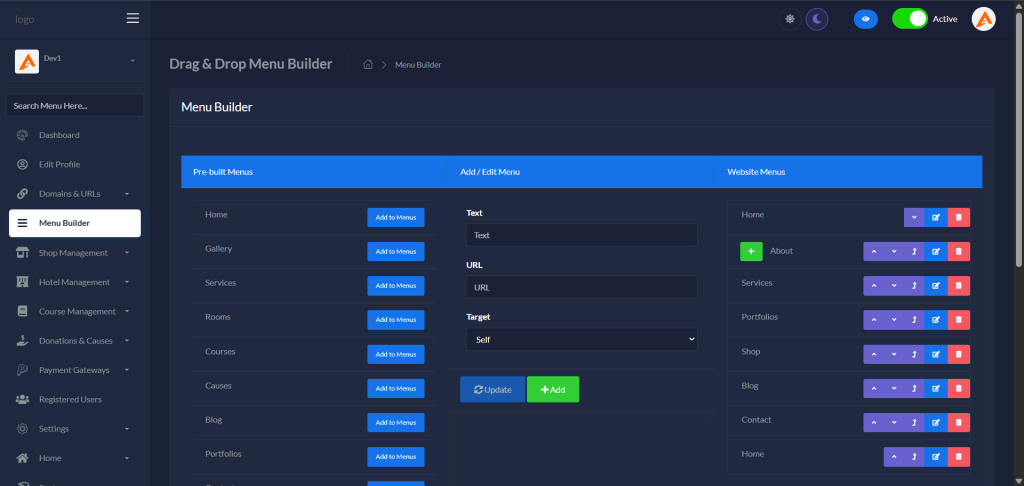
You can customize your website header menu by choosing “Pre-built Menus” section or create your own link as in “Add / Edit Menu” section.
You can change the order or set sub menu as in “Website Menus” section
You can change the order or set sub menu as in “Website Menus” section
