---
title: "CHAT Docs — Devad"
url: "https://devad.io/help/docs/chat"
---
[Skip to content](https://devad.io/help/docs/chat#main-content)
[Devad](https://devad.io/help)
[Docs](https://devad.io/help?type=doc&lang=en&view=list) [Guides](https://devad.io/help?type=guide&lang=en&view=list) [Blog](https://devad.io/help?type=article&lang=en&view=list) [Changelog](https://devad.io/help?type=changelog&lang=en&view=list)
[](https://devad.io/help#hc-search) [Agent view](https://devad.io/help/docs/chat.md)
[Docs](https://devad.io/help?type=doc&lang=en&view=list) [Guides](https://devad.io/help?type=guide&lang=en&view=list) [Blog](https://devad.io/help?type=article&lang=en&view=list) [Changelog](https://devad.io/help?type=changelog&lang=en&view=list)
Browse this Help Center
[7 Ai Agentic Chatbot](https://devad.io/help/docs/chat#ai-agentic-chatbot)
- [AI Agent & Chatbot for Automated Appointment & Booking System](https://devad.io/help/docs/chat#ai-agent-chatbot-for-automated-appointment-booking-system)
- [AI Basic Settings : Human takeover, Smart reply, & Troubleshooting](https://devad.io/help/docs/chat#ai-basic-settings-human-takeover-smart-reply-troubleshooting)
- [AI & Chatbot Builder](https://devad.io/help/docs/chat#ai-chatbot-builder)
- [Google Calendar & TidyCal Integrations with Chatbot](https://devad.io/help/docs/chat#appointments-with-google-calendar-or-tidycal)
- [Flows Builder & External API](https://devad.io/help/docs/chat#flows-builder-external-api)
- [Google Integration & AI Features](https://devad.io/help/docs/chat#google-integration-ai-features)
- [OpenAI, Integrations, & Chatbot Training](https://devad.io/help/docs/chat#openai-chatbottidycal-flows-builder)
[5 Features Use Cases](https://devad.io/help/docs/chat#features-use-cases)
- [AI Agent & Chatbot for e-Commerce [ WooCommerce, shopify, Opencart & Others]](https://devad.io/help/docs/chat#ai-agent-chatbot-for-e-commerce-woocommerce-shopify-opencart-others)
- [AI Agentic Chatbot Features](https://devad.io/help/docs/chat#features-use-cases-ai-agentic-chatbot)
- [Appointments, Reservations, and meeting Scheduling](https://devad.io/help/docs/chat#appointments-reservations-and-meeting-scheduling)
- [Customer Support Features](https://devad.io/help/docs/chat#customer-support-features)
- [Marketing Feautres for Any Business](https://devad.io/help/docs/chat#marketing-feautres-for-any-business)
[10 Settings Area](https://devad.io/help/docs/chat#settings-area)
- [Articles & Tickets Sections](https://devad.io/help/docs/chat#articles-tickets-sections)
- [Automations & Cron Job](https://devad.io/help/docs/chat#automations-cron-job)
- [Conversation Management System](https://devad.io/help/docs/chat#conversation-management-system)
- [Department Settings & Configuration](https://devad.io/help/docs/chat#department-settings-configuration)
- [Departments, Queue and routing](https://devad.io/help/docs/chat#departments-queue-and-routing)
- [Email, Newsletter, SMS, & Notifications](https://devad.io/help/docs/chat#email-notifications-sms)
- [Language and Translations](https://devad.io/help/docs/chat#language-and-translations)
- [Mobile App & Other Settings](https://devad.io/help/docs/chat#mobile-app-other-settings)
- [Miscellaneous: More Features & settings](https://devad.io/help/docs/chat#more-features-settings)
- [Notifications Management](https://devad.io/help/docs/chat#notifications-management)
[5 Setup Basics](https://devad.io/help/docs/chat#setup-basics)
- [Chat & Conversations](https://devad.io/help/docs/chat#chat-conversations)
- [Having problems?](https://devad.io/help/docs/chat#having-problems)
- [Installing CHAT Widget](https://devad.io/help/docs/chat#installing-chat-widget)
- [Plans & Pricing](https://devad.io/help/docs/chat#plans-pricing)
- [Users & Access](https://devad.io/help/docs/chat#users-access)
[7 Whatsapp](https://devad.io/help/docs/chat#whatsapp)
- [Connect WhatsApp Business With CHAT.devad.io](https://devad.io/help/docs/chat#connect-whatsapp-business-with-chat-devad-io)
- [How to Connect WhatsApp Twilio to Chat.devad.io](https://devad.io/help/docs/chat#how-to-connect-whatsapp-twilio-to-chat-devad-io)
- [How to Create and Keep WhatsApp Business Account Healthy](https://devad.io/help/docs/chat#how-to-create-and-keep-whatsapp-business-account-healthy)
- [Setting Up Your 360dialog Account](https://devad.io/help/docs/chat#setting-up-your-360dialog-account)
- [WhatsApp Shop](https://devad.io/help/docs/chat#whatsapp-shop)
- [WhatsApp Templates & Flows](https://devad.io/help/docs/chat#whatsapp-templates)
- [WhatsApp voice & video calls](https://devad.io/help/docs/chat#whatsapp-voice-video-calls)
[5 More Integrations](https://devad.io/help/docs/chat#more-integrations)
- [WordPress Integration](https://devad.io/help/docs/chat#full-wordpress-integration)
- [How To Export and Import Users in CHAT.devad.io Safely](https://devad.io/help/docs/chat#how-to-export-and-import-users-in-chat-devad-io-safely)
- [More Integration: Slack, Opencart, Martfury, Zalo, Zendesk, Viber, Line, WeChat](https://devad.io/help/docs/chat#more-integration-slack-opencart-martfury-zalo-zendesk-viber-line-wechat)
- [OpenCart](https://devad.io/help/docs/chat#opencart)
- [Shopify Integration](https://devad.io/help/docs/chat#shopify-integration)
[2 Facebook Instagram Messenger](https://devad.io/help/docs/chat#facebook-instagram-messenger)
- [Messenger (Facebook & Instagram) Setup](https://devad.io/help/docs/chat#how-to-enable-messenger-facebook-instagram)
- [Reply Comments & DM for Comments](https://devad.io/help/docs/chat#reply-comments-dm-for-comments)
[1 General](https://devad.io/help/docs/chat#general)
- [User Management](https://devad.io/help/docs/chat#user-management)
[1 Telegram](https://devad.io/help/docs/chat#telegram)
- [Telegram AI Agent & Chatbot Setup](https://devad.io/help/docs/chat#telegram-ai-agent-chatbot-setup)
[1 Twitter X](https://devad.io/help/docs/chat#twitter-x)
- [X (Twitter) AI Agent & Chatbot Setup](https://devad.io/help/docs/chat#x-twitter-ai-agent-chatbot-setup)
[Help Center](https://devad.io/help) › [Docs](https://devad.io/help?type=doc&lang=en) › CHAT Docs
Docs
# CHAT Docs
CHAT documentation for setup, operations, automations, integrations, and support workflows.
CHAT.devad.io documentation for setup, customer conversations, WhatsApp, AI agents, automation, integrations, and support workflows.
## Ai Agentic Chatbot
### AI Agent & Chatbot for Automated Appointment & Booking System
Streamline your scheduling process and eliminate the endless back-and-forth of email coordination with our advanced AI Agent and Chatbot Booking System. By integrating powerful tools like TidyCal, Calendly, and Google Calendar directly into your chat widget, you allow leads and customers to book appointments effortlessly 24/7. This automated system is not just a convenience; it is a scalable solution ideal for doctors managing patient intake, online course providers scheduling student 1:1s, and consultants securing high-value meetings.
### Automated Appointment & Booking System Overview
Transform your chat widget into a fully functional scheduling assistant. Whether you are using TidyCal for cost-effective scheduling, Calendly for professional meeting coordination, or Google Calendar for direct time-blocking, the AI chatbot acts as your personal secretary. It can check availability, book slots, and manage cancellations in real-time.
### TidyCal Integration
TidyCal is a favorite among freelancers and small business owners for its simplicity. Enable this integration to authorize the OpenAI chatbot to access your TidyCal account directly. This allows users to book appointments and manage them seamlessly within your existing TidyCal ecosystem.
### AI Tasks for TidyCal
- **Book an event:** The chatbot can book events in your TidyCal on behalf of the user, automating the intake process.
- **Update an event:** The chatbot allows users to reschedule by updating an existing event in your TidyCal account.
- **Cancel an event:** If plans change, the chatbot can cancel an existing event for a user instantly.
- **List events:** The chatbot can retrieve and list all upcoming events associated with a specific user.
- **Show available booking times:** The chatbot checks your calendar in real-time to show only the available booking times to the visitor.
### TidyCal Setup Guide
1
### Activate Integration
Navigate to **Settings > Artificial Intelligence > TidyCal integration** in your admin panel and click **Activate**.
2
### Generate API Key
Log in to your TidyCal account and go to **Integrations > Advanced > API Keys** (or click the direct link provided in settings). Create a new **Personal Access Token**. Copy this token and paste it into **Settings > Artificial Intelligence > TidyCal integration > Access token**. Remember to save your changes.
3
### Set Booking Type
Enter the exact **title** of the booking type you wish to automate in **Settings > Artificial Intelligence > TidyCal integration > Booking type title**. Save the changes to confirm.
4
### Configure Slots
Configure the available booking times, buffer times (before and after bookings), and the slot duration directly inside your TidyCal account. Once completed, you are done. The chatbot can now fully book and manage events in your TidyCal account.
**Information:**
Currently, only events without a price (free events) are supported. Note that the selected booking type is cached for 24 hours. If you update the event in TidyCal, you may need to wait up to 24 hours for the changes to take effect in the chat. To apply changes immediately, create a new booking type or change its title and update the reference in the CHAT.devad.io settings.
### Calendly Booking Workflow
With the Calendly integration, scheduling meetings with your site visitors becomes a breeze. Your leads can easily book appointments directly from the chat widget. Follow these steps to send a Calendly booking invitation via the chat.
- Create an event type from `https://calendly.com/event_types/user/me`.
- Click **Share** and copy the URL.
- To send the invitation, utilize the **rich message button type**.
Ensure you enter the Calendly URL you copied in the previous step as the URL. Additionally, include the `success` attribute to customize the confirmation message that will be sent to the user after the booking is successfully completed.
~~~
[button link="https://calendly.com/your-name/meeting" name="Schedule a meeting" success="Thank you! Your meeting has been scheduled."]
~~~
### Google Calendar Automation
Enable this integration to allow the OpenAI chatbot to directly access your Google Calendar. This integration is powerful for service businesses requiring strict time management, allowing users to book appointments and manage them in real-time on your calendar.
### AI Tasks for Google Calendar
- **Book an event:** The chatbot can book events in your Google Calendar on behalf of the user.
- **Update an event:** Users can request changes, and the chatbot can update an existing event directly in your calendar.
- **Cancel an event:** The chatbot can cancel an existing event for a user if necessary.
- **List events:** The chatbot can list the events of a user from your Google Calendar to confirm schedules.
- **Show available booking times:** The chatbot proactively shows available booking times to avoid scheduling conflicts.
### Google Calendar Setup
Setting up Google Calendar requires a few simple synchronization steps.
- Go to **Settings > Artificial Intelligence > Google Calendar integration** and click **Activate**.
- Click **Settings > Artificial Intelligence > Google > Synchronize** and complete the synchronization process to authorize access.
- Set the available booking times under **Settings > Miscellaneous > Scheduled Office Hours**.
You are done. The chatbot can now book and manage events in your Google Calendar.
**Important Configuration Settings:**
**Slot duration:** This setting defines the duration of the booked event (e.g., 30 minutes).
**Buffer time:** This setting is used to add a buffer (in minutes) between bookings so you are not booked back-to-back.
**Minimum booking time:** This setting is the minimum time (in minutes) required to book an event from the current time. It is used to prevent bookings occurring too close to the present moment.
### Use Cases for Automated Scheduling
Automated booking systems are revolutionizing how service-based sectors operate. By removing the friction of manual scheduling, professionals can focus on delivering value rather than managing calendars.
**Doctors & Healthcare:** Allow patients to book consultations or follow-up appointments instantly, reducing front-desk workload.
**Online Course Providers:** Enable students to schedule 1:1 mentorship sessions or office hours directly from the course dashboard.
**Consultants & Lawyers:** Secure paid or discovery calls efficiently using TidyCal or Calendly integration without email ping-pong.
**Service Businesses:** From beauty salons to home repair, allow clients to view available slots and book services 24/7.
### AI Basic Settings : Human takeover, Smart reply, & Troubleshooting
### ARTIFICIAL INTELLIGENCE
The settings below are related to the Artificial Intelligence app.
---
### Installation
- From **Settings > Apps**, click **Artificial Intelligence** and activate the app..
---
### Human takeover
The human takeover happens in these cases:
- When a human agent replies to a user’s message.
- When the **Settings > Artificial Intelligence > Human takeover > Active** option is checked. It is triggered automatically when the chatbot fails to understand a user’s message or it can be requested manually by the user explicitly asking to contact a human agent.
### General information
- When the human takeover is activated the chatbot is automatically disabled for as long as the last human agent that replied to the conversation is online. If no agents have responded to the conversation yet, the chatbot will remain active. After that, the chatbot is activated again but no default fallback messages will be sent within 10 days of human takeover if the chatbot doesn’t know the answer to the user’s question in the same conversation. You can force a Dialogflow message to be always sent by adding to the Intent the custom Payload value **“force-message”: true**.
- The chatbot is fully activated again if the conversation is archived or deleted.
- If you’re using Slack, no messages will be sent if the chatbot knows the answer. Once the human takeover is active all conversation’s messages are sent to Slack.
- When a human agent reply to a user the human takeover is activated automatically.
- The human takeover feature is compatible with OpenAI and will continue to function even if the Dialogflow chatbot is deactivated.
- To fully disable the chatbot on human takeover, check the option **Human takeover > Disable chatbot**.
- If the human takeover is already active, it will not be activated again, and the human takeover message will not be sent. The **fallback message** will be sent instead.
- The **Settings > Artificial Intelligence > Human takeover > Fallback message** feature sends an automatic fallback message when a user sends a new message while human takeover is active. It’s useful for letting users know that their messages have been received and that an agent will reply shortly. The fallback message is sent at most once every 30 minutes and only if the user’s new message is sent more than 30 minutes after the last agent reply.
- Human takeover works seamlessly across all messaging apps, like WhatsApp, Messenger, Telegram, and others. Users don’t need to click a confirmation button, any text reply confirming the request will activate the human takeover automatically.
### **Human takeover option**
When the option **Human takeover** is active the following happens:
- If enabled, the request is sent only if the message sent by the user is longer than 3 chars and contains at least two words. This optimization prevents mistaken requests.
- The conversations to which the chatbot was able to answer correctly, are marked as read and moved at the bottom of the **Inbox** list.
When the user confirms the human takeover, or if it is automatic, the following happens:
- The conversation is marked as unread and moved on top of the **Inbox**.
- Any future user messages in the same conversation sent within 10 days of the human takeover will trigger agent notifications.
- If agents email notifications are active, an email notification is sent to the agent assigned to the conversation, or, if the user’s conversation is assigned to a [department](https://devad.io/help/docs/chat#departments) , to the agents assigned to that department, otherwise it is sent to all offline agents.
- If Push notifications are active, a push notification is sent to the agent assigned to the conversation, or, if the user’s conversation is assigned to a [department](https://devad.io/help/docs/chat#departments) , to the agents assigned to that department, otherwise it is sent to all offline agents.
- If text message notifications are active, a text message is sent to the agent assigned to the conversation, or, if the user’s conversation is assigned to a [department](https://devad.io/help/docs/chat#departments) , to the agents assigned to that department, otherwise it is sent to all offline agents.
- No human takeover requests within 10 days of the human takeover will be sent in the same conversation.
- The [follow-up message](https://devad.io/help/docs/chat#follow-up-message) and [offline message](https://devad.io/help/docs/chat#offline-message) are activated.
- If [queue](https://devad.io/help/docs/chat#queue-routing) settings are active, the queue or routing is activated.
### **Manual human takeover – Dialogflow Only**
- You can manually trigger the human takeover by creating a new Dialogflow **Intent** with the following **Custom Payload** response: **{ “human-takeover”: true }**.
- The manual takeover automatically notify agents via email and leave the conversation marked as unread.
- To manually send a human take over request use the chips rich message with ID **sb-human-takeover**. Ex. **[chips id=”sb-human-takeover” options=”Human support,Cancel” message=””]**.
### **Manual human takeover – OpenAI Only**
- The human takeover can be requested manually by the user explicitly asking to contact a human agent. This setting is active by default.
### **Human takeover via Q&A**
You can enable the human takeover for specific user messages via [Q&A](https://devad.io/help/docs/chat#open-ai-qea) by adding the **human takeover** action in **set data and actions**.
### **OpenAI Assistant**
To enable human takeover on an OpenAI Assistant add the following **function** in the OpenAI [functions area](https://platform.openai.com/assistants) :
~~~
{
"name": "sb-human-takeover",
"description": "I want to contact a human support agent or team member. I want human support.",
"parameters": {
"type": "object",
"properties": {},
"required": []
}
}
~~~
---
### Smart reply
Smart Reply suggests quick responses in real-time during a conversation. Once active, you will see the suggested replies in the conversation area, if any.
### **Information**
- The Smart Reply feature initially checks for suggestions from the Dialogflow chatbot, provided it is active. If there is at least one suggestion, it will promptly display the results. However, if Dialogflow is inactive, or there are Dialogflow suggestions, the OpenAI suggestions will be returned instead.
- If the [language detection](https://devad.io/help/docs/chat#language-detection) feature is active, the smart replies will use language detection as well.
- If the [multilingual via translation](https://devad.io/help/docs/chat#multilingual-via-translation) feature is enabled, the smart replies will utilize multilingual translation as well.
- To read the complete text of a smart reply, hover the mouse pointer over it for a duration of 3 seconds.
- To restore the previous message, press the keyboard shortcuts **CTRL + Z**.
---
### Optimal configuration for the chatbot
CHAT.devad.io provides powerful tools to assist you in the process of creating the chatbot.
- Activate **Artificial Intelligence > Google > Dialogflow chatbot**. If you have general or specific inquiries that require a definitive response, or if you want to use [rich messages](https://devad.io/help/docs/chat#rich-messages) like buttons, the Dialogflow chatbot is the best option and it can work alongside the OpenAI chatbot. The Dialogflow and OpenAI chatbots can work together simultaneously. More details [here](https://devad.io/help/docs/chat#dialogflow-bot) .
- Keep improviding the chatbot from the [chatbot training panel](https://devad.io/help/docs/chat#chatbot-training-window) .
- Activate **Artificial Intelligence > Smart Reply**. More details [here](https://devad.io/help/docs/chat#smart-reply) .
- Activate the following **OpenAI** settings: **Chatbot**, **Spelling Correction**, **Dialogflow spelling correction**, **Rewrite Message Button**. More details [here](https://devad.io/help/docs/chat#open-ai) .
- Train your OpenAI chatbot with your own content, more details [here](https://devad.io/help/docs/chat#open-ai-training) .
- Set the value of **Google > Dialogflow Intent detection confidence** to **0.81**.
- If your website receives traffic from multiple countries, consider activating the following **Google** options: [multilingual via translation](https://devad.io/help/docs/chat#multilingual-via-translation) , [automatic translation](https://devad.io/help/docs/chat#google-translation) , [language detection](https://devad.io/help/docs/chat#language-detection) .
- Change the chatbot name from **Settings > Users > Bot name**.
---
### Problems?
The most frequent reasons for OpenAI or Google not functioning properly are listed below. For more details about the issue, open the **browser developer tools** and then the **console** tab, send a message through the CHAT.devad.io chat, and an error should appear in the console. On Chrome you can open the console from **Settings > More tools > Developer tools > Console**.
### OpenAI and Google AI Problem?
- There is a [human takeover](https://devad.io/help/docs/chat#human-takeover) .
- You can hire us to make the synchronization for you, details at the [hire us](https://devad.io/help/hire-us) page.
### OpenAI Troubleshooting
- Click the **Settings > Artificial Intelligence > OpenAI > Troubleshoot problems** button and check for any error. If there is an error, it will be related to your OpenAI account, follow the error message instructions to fix the issue.
- Make sure to check the option **Settings > Artificial Intelligence > OpenAI > Chatbot**.
- You reached the quote limit or you are encountering billing problems with your OpenAI account. Check it at [https://platform.openai.com/account/usage](https://platform.openai.com/account/usage) .
- If Dialogflow is enabled, OpenAI may not work correctly because your Dialogflow agent does not have the Fallback Intent. Please verify its presence on the Intents page, and if it’s missing, you can create it again by following the instructions [here](https://cloud.google.com/dialogflow/es/docs/intents-default) . To quickly check if this is the issue, you can disable Dialogflow and send a message consisting of 2-3 words. Then, check if the browser console has errors.
- If the chatbot is not replying at all and you have some Google setting active, try to disable the Google settings and check if the chatbot is working.
- Make sure to read the general [information](https://devad.io/help/docs/chat#open-ai-sync-info) .
- If the training is not working as intended, for instance, if the chatbot is not responding to questions relevant to the training data, try to delete all training data from **Chatbot > Training > Informaion > Delete all training data** and train the chatbot again.
- If the training is not working as intended, for instance, if the chatbot replies are cut off or partially incorrect, try asking the same question a few more times. The responses should improve over time. OpenAI is needs to learn from the user interactions.
- If your training data is from a website, and the website is multilingual, make sure the **lang** attribute of the **** tag contains the correct language.
- Delete all of your OpenAI settings, leave only the OpenAI key and try again.
- Try to use the OpenAI [assistant](https://devad.io/help/docs/chat#open-ai-assistant) instead.
- If you are having issue with ai answers, you can use our OpenAI key by setting **Settings > Artificial Intelligence > OpenAI > Sync mode** to **Automatic**. If this resolves your problems, it means that the issue originates from your OpenAI account. You need to purchase [credits](https://devad.io/help/docs/chat#cloud-credits) to use this option.
**Here are the top 10 common issues your end users might face with the OpenAI:**
**API Key Invalid or Expired**
Users may encounter errors if their OpenAI API key is invalid, missing, or expired.
**Rate Limiting or Quota Exceeded**
Requests may be throttled or rejected if users exceed their allotted usage limits or request rate.
**Latency or Slow Response Times**
Users might experience delays in receiving responses from the OpenAI API due to network or server load.
**Unexpected or Incorrect AI Outputs**
The AI may generate inaccurate, irrelevant, or misleading content, sometimes called hallucinations. We highly Recommand you using default settings, if it failed use our Ai credit or try OpenAI Assistant API for better results
**Authentication Failures**
Failures in authenticating API requests due to improper key usage or configuration issues.
**Usage Costs and Billing Concerns**
Users may face unexpected charges or misunderstandings about billing tied to their consumption of the OpenAI service.
**Integration or Compatibility Issues**
Challenges integrating OpenAI API into user applications, including SDK version mismatches or unsupported platforms.
**Security and Data Privacy Questions**
Concerns regarding how user data and queries are handled, stored, or protected by OpenAI.
**Limited Feature Access or Model Availability**
Access restrictions to certain models or features based on plan limits or regional availability.
### Google Troubleshooting
- Click the **Settings > Artificial Intelligence > Google > Troubleshoot problems** button and check for any error. If there is an error, it will be related to your Google account, follow the error message instructions to fix the issue.
- Make sure to check the option **Settings > Artificial Intelligence > Google > Dialogflow chatbot**.
- If your synchronization was not successful we suggest reviewing our documentation and repeating the synchronization steps to correct any errors. If needed, we provide integration services. Details at the [hire us](https://devad.io/help/hire-us) page.
- You selected the wrong agent location.
- Make sure are not using a mega agent.
- Make sure to read the general [information](https://devad.io/help/docs/chat#dialogflow) .
---
We are officially discontinuing support for Dialogflow and advise new users against using it. The platform has been effectively abandoned by its developer, so we recommend our modern Our FLOWS Builder and OpenAI to ensure a more reliable and updated experience.
### AI & Chatbot Builder
### Artificial Intelligence Module Installation
To unlock the power of automated support, navigate to **Settings > Apps**, select **Artificial Intelligence**, and enter your license key to install and activate the application. If you are utilizing the cloud version of our platform, simply click **Active** to begin.
### Human Takeover System
The Human Takeover system ensures a seamless transition between your AI chatbot and human support agents. It is designed to prioritize human interaction whenever necessary, preventing the chatbot from interfering during a live conversation.
**Workflow Logic!**When human takeover is activated, the chatbot is automatically disabled as long as the agent is online. If no agents reply, the chatbot reactivates. However, no fallback messages will be sent for **10 days** within the same conversation to prevent user annoyance.
### Triggers & Activation
- **Agent Reply:** Takeover activates instantly when a human agent sends a message.
- **Automatic:** Triggered when the chatbot fails to understand a user query (if enabled in settings).
- **Manual Request:** Users can explicitly ask to speak to a human. This works seamlessly across WhatsApp, Telegram, and other channels without needing clickable buttons.
**Optimized Requests:** To prevent accidental triggers, automatic requests are only sent if the user’s message exceeds 3 characters and contains at least two words.
### OpenAI Integration & Configuration
Integrating OpenAI (ChatGPT) gives your chatbot the ability to understand natural language and answer questions based on your specific data sources.
Automatic Sync
Manual Sync
**Ready-to-use:** No configuration required. Simply set *Sync mode* to Automatic. You will need to purchase credits to utilize this option. This is the simplest way to get started with the Cloud version.
**Custom Control:** Register at OpenAI platform, generate an API Key, and paste it into *Settings > Artificial Intelligence > OpenAI*. Set *Sync mode* to Manual. This allows you to manage your own billing and limits directly with OpenAI.
### Chatbot Response Modes
- **General Questions:** The bot uses its general knowledge to answer. It ignores your specific training data.
- **Sources Only:** The bot *only* answers based on the data you have provided (PDFs, website, etc.). It strictly ignores general knowledge questions.
- **All Questions (Recommended):** The bot prioritizes your specific data but falls back to general knowledge for other inquiries.
- **Assistant:** Select this if you are connecting a custom OpenAI Assistant created in the OpenAI dashboard.
### OpenAI Assistants
You can link your own Assistants created at `platform.openai.com/assistants`. To use multiple assistants, link their IDs to specific departments in *Settings > Artificial Intelligence > OpenAI Assistants – Department linking*. Note: Assistants are used for chat responses and smart replies, but not for features like message rewriting.
### Training Your Chatbot
Training allows the AI to learn from your specific business content. You can train the bot using various sources found under the **Chatbot > Training** menu.
Files (PDF & TXT)
Upload PDF or TXT files directly. Once the “Train chatbot” button is clicked, the system processes the content and deletes the files from the server for security.
Website & Sitemaps
You can enter a website URL to crawl all child pages. For larger sites, providing an **XML Sitemap** is highly recommended to prevent errors and infinite loops. If re-training the same URL, delete previous data first.
Q&A Manual Entry
Manually input Question and Answer pairs. This is excellent for specific FAQ items. You can add variations to the question (e.g., “Who are you?”, “Are you a bot?”) to improve recognition.
Conversations (Auto-Train)
Automatically use past user/agent conversations for training via cron job. **Warning:** Review data regularly, as unhelpful agent responses can degrade bot quality.
Chatbot Training Panel
Improve the bot on the fly. Hover over a message in the admin area and select “Train chatbot” to instantly add that interaction as a new learning source.
### Google Calendar Integration
Allow the chatbot to book, update, and cancel appointments directly on your Google Calendar. Enable this via *Settings > Artificial Intelligence > Google Calendar integration*.
1
### Activate Integration
Navigate to Settings > Artificial Intelligence > Google Calendar integration and click Activate.
2
### Synchronize Google
Go to Settings > Artificial Intelligence > Google > Synchronize and complete the Google login process.
3
### Configure Schedule
Set available booking times under Settings > Miscellaneous > Scheduled Office Hours. You can also define **Slot duration** and **Buffer time** to prevent back-to-back bookings.
### Multilingual Capabilities
The AI module supports advanced multilingual features to serve a global audience.
- **Automatic Translation:** Real-time translation of user messages into the agent’s language and vice-versa. Requires configuring the Cloud Translation API.
- **Multilingual via Translation:** Automatically translates static text (rich messages, articles, forms) into the user’s language. This is cost-effective as it caches translations.
- **Language Detection:** Automatically detects the user’s language from their first few messages (minimum 2 words) and switches the chat language context accordingly.
### Advanced AI Features
**Smart Reply:** Suggests quick responses to agents in real-time. It prioritizes data from Dialogflow (if active) and then falls back to OpenAI suggestions.
**Message Rewriting:** Agents can click a button to rewrite their draft message to be more friendly and professional.
**Speech & Image Recognition:** The bot can convert audio messages to text and analyze images sent by users (requires GPT-4 models).
**Important Notice: Dialogflow Deprecation**
We are discontinuing support for Dialogflow by the end of 2025. All features are now available natively through OpenAI. We strongly recommend migrating to our Native Flow Builder and OpenAI integration for better performance and future-proofing.
### Google Calendar & TidyCal Integrations with Chatbot
### Chatbot Integrations for Lead & Customers
The following integrations are available from **Settings > Artificial Intelligence** and can be used to enhance the OpenAI chatbot’s capabilities Lead Generation & Customers. Integrations are conversational, [multilingual](https://devad.io/help/docs/chat#multilingual) , and compatible with any messaging app such as [WhatsApp](https://devad.io/help/docs/chat#whatsapp) , [Messenger](https://devad.io/help/docs/chat#messenger) , [Telegram](https://devad.io/help/docs/chat#telegram) , and more.
### **Google Calendar**
Enable this integration to allow the OpenAI chatbot to access your Google Calendar, so users can book appointments and manage them on your calendar.
- **Book an avent**: The chatbot can book events in your Google Calendar on behalf of the user.
- **Update an avent**: The chatbot can update an existing event for a user in your Google Calendar.
- **Cancel an avent**: The chatbot can cancel an existing event for a user in your Google Calendar.
- **List events**: The chatbot can list the events of a user from your Google Calendar.
- **Show available booking times**: The chatbot can show the available booking times.
- Go to **Settings > Artificial Intelligence > Google Calendar integration** and click **Activate**.
- Click **Settings > Artificial Intelligence > Google > Synchronize** and complete the synchronization process.
- Set the available booking times under **Settings > Miscellaneous > Scheduled Office Hours**.
- You are done. The chatbot can now book and manage events in your Google Calendar.
- The **Slot duration** setting is the duration of the booked event.
- The **Buffer time** setting is used to add a buffer (in minutes) between bookings so you are not booked back-to-back.
- The **Minimum booking time** setting is the minimum time (in minutes) required to book an event from the current time. It is used to prevent bookings too close to the current time.
---
### TidyCal
Enable this integration to allow the OpenAI chatbot to access your TidyCal account, so users can book appointments and manage them on your TidyCal account.
- **Book an avent**: The chatbot can book events in your TidyCal on behalf of the user.
- **Update an avent**: The chatbot can update an existing event for a user in your TidyCal.
- **Cancel an avent**: The chatbot can cancel an existing event for a user in your TidyCal.
- **List events**: The chatbot can list the events of a user from your TidyCal.
- **Show available booking times**: The chatbot can show the available booking times.
- Go to **Settings > Artificial Intelligence > TidyCal integration** and click **Activate**.
- In your TidyCal account, go to **Integrations > Advanced > API Keys** or click [here](https://tidycal.com/integrations/oauth) . Create a **Personal Access Token**, copy it, and paste it into **Settings > Artificial Intelligence > TidyCal integration > Access token**. Then, save the changes.
- Enter the title of the booking type you want to use in **Settings > Artificial Intelligence > TidyCal integration > Booking type title**, and save the changes.
- Configure the **available booking times**, **buffer times before and after bookings**, and the **slot duration** directly in your TidyCal account.
- You are done. The chatbot can now book and manage events in your TidyCal account.
- Only events without a price are supported.
- The selected booking type is cached for 24 hours. If you update it, you may need to wait up to 24 hours for the changes to take effect. To apply changes immediately, create a new booking type or change its title and update it in the CHAT.devad.io settings.
---
### FAQs
**Q: How can I integrate Google Calendar or TidyCal with the lead management system?**You can connect your Google Calendar or TidyCal account through the integration settings in the CHAT App dashboard to sync appointments and manage leads seamlessly.
**Q: Can the chatbot create, update, or cancel appointments automatically?**Yes, the chatbot can create, update, cancel, and display bookings in real time while keeping everything synchronized with Google Calendar or TidyCal.
**Q: Are appointment settings like office hours and buffer times customizable?**Absolutely. You can configure available time slots, office hours, slot durations, and buffer times from the CHAT App dashboard to suit your lead management needs.
**Q: How do leads book appointments through the chatbot?**Leads can book appointments naturally via a chat conversation with the AI chatbot without filling out forms; the chatbot guides them smoothly through the scheduling process.
**Q: Can admins and agents manage bookings directly from the CHAT App panel?**Yes, admins and agents have real-time access to view, cancel, or create appointments via the CHAT App admin panel, with full synchronization to Google Calendar or TidyCal.
**Q: Is the chatbot multilingual for booking appointments?**Yes, the integrations are fully multilingual, allowing the chatbot to understand and respond in any language, making global lead management easy.
**Q: Which messaging platforms support booking through Google Calendar or TidyCal?**The booking integrations work across WhatsApp, Messenger, Telegram, Instagram, Line, Viber, Zalo, WeChat, Email, and SMS platforms.
**Q: How quickly can I set up the Google Calendar or TidyCal integration?**Setting up either integration takes only a few minutes and involves connecting your account and configuring your preferences through CHAT App .
**Q: Can the chatbot handle appointment reminders and notifications?**Yes, with the integrations, your AI chatbot can send booking confirmations, reminders, and updates automatically via supported messaging platforms.
**Q: What should I do if appointments don’t sync correctly between CHAT App and Google Calendar or TidyCal?**Ensure your integration is properly connected and authorized in the dashboard; real-time synchronization should maintain consistency, and quick setup guides are available to troubleshoot potential syncing issues
Q: What is Lead Management in the cloud version?
Lead Management helps you organize, track, and manage potential customers’ information and interactions efficiently in one place.
Q: How can I add a new lead manually?
You can add new leads manually through the admin panel or import them using supported formats.
Q: Can I track the status of a lead throughout the sales process?
Yes, the system allows you to monitor each lead’s progress from initial contact to conversion or disqualification.
Q: Is it possible to assign leads to specific agents or team members?
Yes, lead assignment can be done automatically or manually to ensure proper follow-up by the responsible agents.
Q: How do I integrate Google Calendar for managing appointments?
You can connect your Google Calendar account within the platform to schedule and sync appointments directly.
Q: Can my customers book appointments via TidyCal?
Yes, if integrated, customers can easily book appointments through TidyCal, which sync back to your calendar system.
Q: How are appointment notifications handled?
Notifications and reminders for appointments are sent automatically to both agents and customers to reduce no-shows.
Q: Can I view all my scheduled appointments in one place?
Yes, all appointments booked via Google Calendar or TidyCal appear in your unified calendar dashboard.
Q: Is it possible to reschedule or cancel appointments?
Yes, both rescheduling and cancellations are supported via the calendar integrations, with automatic updates and notifications.
Q: Does the lead management system support follow-up reminders?
Yes, you can set automated follow-up reminders to ensure timely contact with your leads for better conversion chances.
### Use Case
Q: What kinds of use cases can CHAT App handle for appointments, reservations, and meeting scheduling?
CHAT App can be used in various industries for appointments and meeting management, including doctors and healthcare providers, real estate agents, salons and spas, consultants, tutors, legal services, fitness trainers, event planners, car service centers, and hospitality businesses.
Q: How can doctors use CHAT App for appointments and meeting rescheduling?
Doctors can use CHAT App to allow patients to book consultations, schedule follow-ups, and reschedule appointments. The chat interface can integrate calendars to manage availability and send automated reminders, reducing no-shows and improving patient engagement.
Q: In real estate, how does CHAT App improve appointment and reservation management?
Real estate agents can enable clients to schedule property viewings and virtual tours through CHAT App. The system can handle rescheduling requests effortlessly and send notifications to both agents and clients, streamlining the communication process.
Q: How can salons or spas utilize CHAT App features for reservations?
Salons and spas can allow clients to book treatments or services directly through the chat. CHAT App can manage appointment slots, handle cancellations or rescheduling, and notify staff, ensuring smooth operations.
Q: What benefits does CHAT App provide consultants for meeting management?
Consultants can use CHAT App to schedule client meetings or coaching sessions, manage calendars with Google Calendar or TidyCal integrations, and offer easy rescheduling or cancellations within the chat system.
Q: How can tutors or educational services use CHAT App for appointments?
Tutors can offer students a quick way to book lessons, change times, or cancel sessions through CHAT App. Automated calendar updates and reminders help reduce scheduling conflicts and absenteeism.
Q: Can legal services use CHAT App for managing client meetings?
Yes, legal professionals can streamline appointment booking, rescheduling, and client communication with CHAT App, providing an efficient and professional experience for clients.
Q: How does CHAT App assist fitness trainers in appointment booking?
Fitness trainers can manage session bookings, cancellations, and rescheduling through the chat, integrating calendars for real-time availability and automatic reminders to clients.
Q: What use does event planners have for CHAT App in reservations?
Event planners can handle client consultations, schedule planning meetings, and manage bookings for event services, allowing easy rescheduling and cancellation through CHAT App chat.
Q: How can car service centers benefit from CHAT App for appointment management?
Car service centers can allow customers to book maintenance or repair appointments, reschedule or cancel as needed, and get automated notifications, keeping the scheduling process smooth and user-friendly.
### Flows Builder & External API
The information below is related to the chatbot flows area. Flows allows you to esely create conversation flows powered by the chatbot. Use them to guide the user toward a specific goal with a series of pre-defined messages.
### Flows Builder
### Flow blocks
- **Start**: Use the start block to set when the flows should start. It can be everytime the user start a new conversation, when it sends a specific message, or on page load. If you set **conditions**, the flow will only start when all conditions are met. If you set a **depertment**, the flow will only start for conversations assigned to that department. If you set a **source**, the flow will only start for conversations from that source.
- **Send message**: Send a message to the user.
- **Send choices**: Send a list of buttons to the user or allow it to choose one. When **conversational mode** is enabled, buttons are hidden, the chatbot sends only text, and users select options by replying with text. The AI interprets the message and selects the corresponding option, continuing the flow as if the button were pressed. This creates a more natural, chat-like experience and is automatically activated, only when needed, on messaging channels such as WhatsApp and Instagram. If the user’s reply doesn’t match any option, a fallback message with the available choices will be sent. You can add variations to the button texts by separating them with the **|** char, for example: **Yes|Yeah|Sure**. They will help the AI to understand the user reply.
- **Send video**: Send a video to the user.
- **Get user details**: Get the user details and store them in CHAT.devad.io. You will see such values in the user details panel. You can leave the **description** field empty for default details, but it’s required if using custom user fields. Note that user details will not be saved if you test this flow in the **playground**, as the user there is temporary. To see details saved, test the flow with a real user. 
- **Set data**: Set the specified user values when the block is executed. You will see such values in the user details panel.
- **Actions**: Execute the specified actions when the block is executed.
- **Conditions**: Use it to create different branches in the flow. If the conditions are met, the flow will follow the branch set as **true**, otherwise the one set as **false**.
- **Rest API**: Use it to send data to your server. The body must be a JSON array. Details like user ID and conversation ID are automatically included in the data sent to your server under the **sb** key. Use the **save response** section to save specified user details with values from your server response. Use the JSON dot notation. Our support doesn’t include assistance with this feature, as it is for advanced users and requires custom code on your server. For help with this, feel free to [hire us](https://devad.io/help/hire-us) .
- **Tools calling**: For more details go [here](https://devad.io/help/docs/chat#open-ai-tools) .
- **Flow connector**: Connect the flow to another flow and start it.
### FAQs About Flows Builder
- Flows can be multilingual. Add translations for messages, button texts, and other content in the [translations](https://devad.io/help/docs/chat#multilingual) area. You can also use the [multilingual via translation](https://devad.io/help/docs/chat#multilingual-via-translation) feature for automatic translations. If the default language of your flows is not English you have also to set the default language under **Settings > Artificial Intelligence > OpenAI > Training Sources Language**.
- Users can move back to earlier steps and update previously entered details in a conversational manner. For example, they might say “Sorry, I entered the wrong email”, “I need to update my email and phone number”, or even a general message like “Sorry, I entered the wrong details, go back”, which will return them to the previous step.
Q: What are Flows Builder?
Flows are sequences of interactions between the user and the chatbot that guide the user through a series of questions and answers.
Q: How can I start a Flow?
Use the Start block to set when the Flows should start, such as when a user starts a new conversation, sends a specific message, or on page load. Flows can start only when all set conditions are met.
Q: What action blocks are available in Flows?
Available blocks include Send message, Send button list, Send video, Get user details, Set data, Actions, Conditions, and Rest API.
Q: How do Conditions work in Flows?
Conditions create different branches in the Flow. If a condition is met, the Flow follows the true branch; otherwise, it follows the false branch.
Q: Can Flows collect user information?
Yes, using the Get user details block, Flows can gather and store user information.
Q: How can I send data to my server from a Flow?
Use the Rest API block to send data via a JSON array to your server. User details are included automatically under the sb key.
Q: Are there predefined Flows?
Yes, CHAT App automatically generates flows such as Registration and Follow-up flows based on specific settings.
Q: Can I customize Flows according to my needs?
Yes, you can create custom Flows combining various blocks and conditions to guide your users toward specific goals.
Q: Is technical knowledge required to use the Rest API block in Flows?
Yes, the Rest API block requires advanced knowledge and custom server code for proper integration.
Q: Can users take control from an automated Flow and talk to a human agent?
Yes, Flows support a human takeover feature where users can switch from the automated flow to live human support.
Q: How do I track the performance of my Flows?
You can monitor Flow engagement and conversion statistics in the analytics section of CHAT App to optimize your setup.
---
### Tools calling
Tools calling allows to connect the chatbot to external tools and systems to retrive information needed to answer the user. The chatbot will query your server and return the information from your server to the user. The data sent to your server is in the body and it includes the user input, user ID, and conversation ID. Tools calling is used by [Q&A](https://devad.io/help/docs/chat#open-ai-qea) and [Flows](https://devad.io/help/docs/chat#open-ai-flows) . More details [here](https://platform.openai.com/docs/guides/function-calling) . Our support doesn’t include assistance with this feature, as it is for advanced users and requires custom code on your server. For help with this, feel free to [hire us](https://devad.io/help/hire-us) .
- **URL**: Enter the URL of the API endpoint that will supply the necessary values for the function.
- **Headers**: If you are setting up a Q&A, enter key-value header parameters, separated by commas. E.g. **apikey:123345, json:true**. If you are setting up a flow, enter add key-value header parameters by clicking the **Add new item** button.
- **Properties**: Enter values that the user must provide to the chatbot. For example a city, a tracking number, etc. The chatbot will ask the user for these values. If you already know all the possible values, you can enter them in the **Allowed values** field.
CHAT.devad.io will send the following information to your server. If you use the **POST** method, it will be included in the **JSON body**, if you use the **GET** method, it will be included in the **header**.
~~~
{
"sb": {
"user_id": "123",
"conversation_id": "123",
"user_language": "es"
},
"arguments": {}
}
~~~
The **arguments** array contains the values provided by the user. The keys are the name converted to kebab case, for example if the property name is **Order Number**, the key will be **order-number**. The **user_id** is the ID of the user in CHAT.devad.io and **conversation_id** is the ID of the conversation. You can use these IDs to retrieve more information about the user and the conversation via the REST API.
Your server must returns a JSON array with the values required by the chatbot. Include **success: true** only when the request is successful and the expected information is returned. Do not include it if the information cannot be retrieved (e.g., when an invalid order number is provided). See the example below for more details.
~~~
{ "order_status": "Delivered 2 hours and 25 minutes ago", "success": true}
~~~
### Google Integration & AI Features
The settings below are related to the Artificial Intelligence app.
---
### Synchronization
To start using the Google AI services and Dialogflow follow the steps below.
### Automatic sync mode
We are officially discontinuing support for Dialogflow and advise new users against using it. so we recommend our modern Our FLOWS Builder and OpenAI to ensure a more reliable and updated experience.
note that other google services are working fine
- Click **Synchronize now** and complete the procedure.
- If you want to activate the Dialogflow chatbot, check **Settings > Artificial Intelligence > Google > Dialogflow chatbot**. Also, you have to enter your chatbot Project ID or Agent Name, to get it follow the [steps below](https://devad.io/help/docs/chat#dialogflow-project-id) .
- You need to purchase [credits](https://devad.io/help/docs/chat#cloud-credits) to use this option.
### Manual sync mode
- Enable the **CHAT.devad.io > Settings > Artificial Intelligence > Google > Dialogflow Chatbot** option and save the changes.
- Go to [console.cloud.google.com](https://console.cloud.google.com/) and sign in.
- Select or create a project by clicking the **Select a project** button on top-left. [](https://devad.io/help/media/docs/dialogflow-sync-1.jpg) Name the project as you want. [](https://devad.io/help/media/docs/dialogflow-sync-2.jpg)
- Activate the Dialogflow API by entering **Dialogflow API** on the top search bar. Click **Dialogflow API** and then click **Enable**. Do the same for the **Cloud Natural Language API**, **Cloud Translation API**, and **Google Calendar API**. [](https://devad.io/help/media/docs/dialogflow-api.jpg)
- Select the project and the go to **Left menu > APIs and services > OAuth consent screen**. Select **External** and click **Create**. [](https://devad.io/help/media/docs/dialogflow-sync-3.jpg) In **App name** enter what you want, in **User support email** and **Developer contact information** enter your email. Click **Save and continue**. [](https://devad.io/help/media/docs/dialogflow-sync-4.jpg)
- In the **Data access** area, click **Add or remove scopes**, scroll bottom and into the **Manually add scopes** area enter **https://www.googleapis.com/auth/dialogflow,https://www.googleapis.com/auth/cloud-language,https://www.googleapis.com/auth/cloud-translation,https://www.googleapis.com/auth/calendar**. Click **Add to table** and then **Update** and **Save and continue**. [](https://devad.io/help/media/docs/dialogflow-sync-5.jpg)
- In the **Audience** area, click **Add users** and add your Google email, use the same email as the currently logged in account. Click **Save and continue**. [](https://devad.io/help/media/docs/dialogflow-sync-6.jpg) Click **PUBLISH APP**. There is no need to complete the review process, leave it in the pending review state.
- Go to **Left menu > APIs and services > Credentials** and click **Create credentials**, select **OAuth client ID**. [](https://devad.io/help/media/docs/dialogflow-sync-7.jpg) As **Application type** select **Web application**. Enter any name you want. In **Authorised redirect URI** enter the redirect URL, get it from **CHAT.devad.io > Settings > Artificial Intelligence > Google > Authorised redirect URI**. Click **Create**. [](https://devad.io/help/media/docs/dialogflow-sync-8.jpg)
- Copy **Client ID** and **Client Secret** and paste them into **CHAT.devad.io > Settings > Artificial Intelligence > Dialogflow**. Save the settings. [](https://devad.io/help/media/docs/dialogflow-sync-9.jpg)
- Click **CHAT.devad.io > Settings > Artificial Intelligence > Google > Synchronize**. Login with the same Google account you have used till now. On the next screen click **Continue**. [](https://devad.io/help/media/docs/dialogflow-sync-10.jpg) On the next screen select all scopes and click **Continue**. [](https://devad.io/help/media/docs/dialogflow-sync-11.jpg)
- Copy the **Refresh token** and paste it into **CHAT.devad.io > Settings > Artificial Intelligence > Google > Refresh token**. [](https://devad.io/help/media/docs/dialogflow-sync-12.jpg)
- You are done! If you want to activate the Dialogflow chatbot, check **Settings > Artificial Intelligence > Google > Dialogflow chatbot**. Also, you have to enter your chatbot Project ID or Agent Name, to get it follow the [steps below](https://devad.io/help/docs/chat#dialogflow-project-id) . Note that the app does not need to be approved by Google.
- If you are a Google Workspace user, go to [https://admin.google.com/](https://admin.google.com/) and click **Google Cloud Session control**. Set **Re-authentication policy** to **Never require re-authentication**.
---
### Multilingual chatbot
The feature **Artificial Intelligence > Google > Multilingual** checks if there is a Dialogflow agent in the user’s language and activate it.
- For this feature to work the user language must be know. The user language is based on the language user detail of the user if set, otherwise on the user browser language. The language can also be detected with the [language detection](https://devad.io/help/docs/chat#language-detection) feature.
---
### Automatic translation
The automatic translation feature automatically translates user messages into agent language and agent messages into user language. To enable it check the option **Settings > Artificial Intelligence > Automatic translation**. If you are using the [cloud version](https://devad.io/help/docs/chat#cloud-version) and **Artificial Intelligence > Google > Sync mode** is set to **Automatic**, the multilingual features will work automatically. Otherwise you have to complete the [synchronization](https://devad.io/help/docs/chat#google-sync) and the setup below. The [multilingual via translation](https://devad.io/help/docs/chat#multilingual-via-translation) and [language detection](https://devad.io/help/docs/chat#language-detection) features also require these steps.
### **Setup**
- Log in to [https://console.cloud.google.com](https://console.cloud.google.com) with your Google account and select the project of your Dialogflow Agent.
- On the top search bar type **cloud translation**, select the **Cloud Translation API** service and enable it. Please note that this is a paid service with a free tier, additional charges may occur.
- Enable the billing by clicking **Left menu > Billing** and by enabling a billing account with a valid payment method.
### **Information**
- The user messages in the admin area are translated automatically in real-time to match the agent language.
- The agent messages are translated automatically in real-time to match the user language.
- Agents can view the original message by opening the message menu and by clicking **View original message**.
- The agent language is based on the **language** user detail of the agent if set, otherwise on the browser language, or admin area language.
- The user language is based on the **language** user detail, if set, otherwise on chat language, if set, otherwise on the browser language. The language can also be detected with the [language detection](https://devad.io/help/docs/chat#language-detection) feature.
- The notifications are also translated.
- To avoid translating a string, enclose it with the characters **`** or **“`**.
### **Multilingual via translation**
The feature at **Settings > Artificial Intelligence > Multilingual via translation** automatically translates user messages into the default language of Dialogflow or OpenAI, and translates Dialogflow or OpenAI messages into the language spoken by the user. Additionally, this feature translates all text displayed within the chat, such as the chatbot’s [rich messages](https://devad.io/help/docs/chat#rich-messages) , [articles](https://devad.io/help/docs/chat#articles) , [registration forms](https://devad.io/help/docs/chat#registration) , and [pop-up](https://devad.io/help/docs/chat#built-in-messages) notifications. To enhance performance and minimize translation costs, the translations are automatically integrated into the translation files. Combine this feature with the [language detection](https://devad.io/help/docs/chat#language-detection) feature for optimal results.
- If English is one of the languages, English must be the default language, the original texts must be in English.
- If you are using OpenAI with [training data](https://devad.io/help/docs/chat#open-ai-training) , set the default training data language under **Settings > Artificial Intelligence > OpenAI > Training Sources Language**. Leave it as **default** if the training data default language is in English.
### **Language detection**
Detect the language of the user’ messages and change the user language and Dialogflow agent language accordingly, if available, otherwise, show a fallback message. You can use the following merge fields in the message: **{language_name}**.
- The user message must be at least 2 words long.
- Language detection is executed only for the first 2 user messages of a conversation.
- As long as the OpenAI chatbot is operational and programmed to respond to generic inquiries, the fallback message will never be dispatched, since OpenAI will consistently provide answers to any use message.
---
### Google search
The Google search feature at **Settings > Artificial Intelligence > Google search** gives your chatbot the ability to search for answers on Google. This feature is helpful for providing answers to questions that require real-time information.
- Register at [https://programmablesearchengine.google.com/](https://programmablesearchengine.google.com/) .
- Create a search and setup it is as you want. We recommend to add only your website and Wikipedia if you want your chatbot to reply to general questions, leave disabled the option **Search the entire web**. Use the **Entities** option to exclude invalid results.
- Go to **Edit search engine > Setup > Basic** and copy the **Search engine ID** value, paste it in CHAT.devad.io.
- To get the API key visit [https://developers.google.com/custom-search/v1/overview](https://developers.google.com/custom-search/v1/overview) and click **Get a key**.
### **Spelling correction**
In the case where Dialogflow is unable to find the appropriate response to the user’s message, this function verifies if there are any spelling errors. If any such errors exist, Dialogflow is prompted again with the correctly spelled version of the message for an accurate response. Although it has a lower priority, this feature can still work together with the OpenAI Dialogflow spelling correction feature.
### **Entities**
The **Entities** setting analyze the user’s message and recognize and extract entities like cities, events, dates, and more. Use it to exclude invalid results returned by Google search. To enable this setting follow the steps below.
- Log in to [https://console.cloud.google.com](https://console.cloud.google.com/) with your Google account and select the project of your Dialogflow Agent.
- Enter **Cloud Natural Language API** in the search bar at the top, select **Cloud Natural Language API** and enable the API [](https://devad.io/help/media/docs/cloud-natural-language-api.jpg) .
- Enable the billing by clicking **Left menu > Billing** and by enabling a billing account with a valid payment method. Enable billing for the project of your Dialogflow agent.
### Information
- The Google search is performed only if the chatbot does not know the answer to the user’s question and if the length of the user’s message is greater than 4 characters.
- If the Google search returns a result, the Dialogflow context **google-search** is automatically activated. The context contains the attribute **link** which is the website’s link of the Google search result. Use the context to create a new intent that provides the link, if the user sends a message like **tell me more** or **I want to know more**. [](https://devad.io/help/media/docs/google-search-intent.jpg)
- Google search is not required to activate the spelling correction. You can disable Google search and activate only spelling correction.
- Google search is compatible with the OpenAI chatbot.
---
---
### 🛠️ Google Calendar & AI Integration FAQ
### Connectivity & Syncing
**Q: Why is my Google Calendar not syncing with CHAT App (CHAT.devad.io)?** Ensure your Google account authorization is active and has the correct permissions. This issue can also stem from incorrect OAuth credentials, expired tokens, or insufficient permissions granted during the initial setup. Check your connection and reauthorize if necessary.
**Q: Why do my appointments not appear correctly in Google Calendar?** This is often caused by time zone mismatches or selecting the wrong calendar in the **CHAT App (CHAT.devad.io)** settings. Verify that your dashboard settings match your preferred local time zone and specific calendar ID.
**Q: Can I create appointments in CHAT App (CHAT.devad.io) that automatically show in Google Calendar?** Yes. The platform integrates directly with Google Calendar to create, display, and update appointments automatically the moment they are scheduled via the chat interface.
**Q: Why do Google contacts or calendar events sometimes not update immediately?** Sync delays can occur due to API rate limits or temporary network fluctuations. Performing a manual sync or refreshing the dashboard usually resolves this.
---
### AI & Automation Features
**Q: Why am I not receiving AI-generated appointment reminders?** Check your notification settings within **CHAT App (CHAT.devad.io)**. Ensure that email or SMS reminders are enabled and that the lead’s contact details are correctly formatted.
**Q: How does CHAT App (CHAT.devad.io) handle appointment rescheduling?** Users can reschedule appointments naturally via chat. The system automatically updates the linked Google Calendar and sends out notifications to all involved parties to keep everyone aligned.
**Q: Can AI features suggest optimal appointment times?** Yes. The AI analyzes your real-time availability and recommends specific meeting times to the user, significantly improving scheduling efficiency and reducing back-and-forth messaging.
**Q: How do AI features like Smart Reply or Human Takeover work?** Smart Reply provides AI-powered suggested responses for quick interactions, while Human Takeover allows a seamless transition from the bot to a human agent for complex queries that require a personal touch.
**Q: What should I do if the AI-generated answers are inaccurate or irrelevant?** Adjust your programmable search engine setup within the app. Ensure you include only trusted domains (like your official website) and use Entity filters to exclude invalid or off-topic results.
---
### Technical Troubleshooting & API
**Q: How can I fix OAuth consent screen errors during setup?** Ensure all required scopes (such as Dialogflow, Cloud Language, and Cloud Translation) are added. The OAuth consent screen must be published in the Google Cloud Console, even if it is still in the “pending review” state.
**Q: What should I do if Google API requests exceed the quota limit?** Review your API usage and optimize your query frequency. If your volume remains high, you can request a quota increase via the Google Cloud Console to prevent synchronization delays.
**Q: What happens if the Google Workspace re-authentication policy interferes with integration?** To avoid service disruptions, set the Cloud Session control’s Re-authentication policy to “Never require re-authentication” within your Google Workspace admin settings.
---
### Privacy & Reliability
**Q: Are there privacy concerns with syncing appointments?** **CHAT App (CHAT.devad.io)** follows GDPR and global privacy laws. The system only syncs data strictly necessary for scheduling appointments and requires explicit user consent.
**Q: Why am I experiencing delays in AI-generated follow-ups?** Delays can stem from server loads, connectivity issues, or AI processing errors. We recommend monitoring the system status and ensuring you are using the latest version of the app for optimal performance.
### OpenAI, Integrations, & Chatbot Training
### OpenAI
The settings below are related to the Artificial Intelligence app.
---
### Synchronization
### **Automatic sync mode**
- The automatic sync mode is ready-to-use and does not require any additional settings, Just but credits from [https://chat.devad.io/account/?tab=membership](https://chat.devad.io/account/?tab=membership) Credits Section. Set it at **Settings > Artificial Intelligence > OpenAI > Sync mode**.
- If you want to activate the chatbot, check **Settings > Artificial Intelligence > OpenAI > Chatbot**.
- You need to purchase [credits](https://devad.io/help/docs/chat#cloud-credits) to use this option.
### **Manual sync mode**
The OpenAI (ChatGPT) integration gives your chatbot the ability to answer general questions about almost anything you can imagine. To start using it, follow the steps below.
---
### Chatbot
To set up your first chatbot, follow these steps:
- Complete the [synchronization](https://devad.io/help/docs/chat#open-ai-sync) process.
- Enable the **Settings > Artificial Intelligence > OpenAI > Chatbot** option, and save your changes.
- Your chatbot should now be active. The playground is accessible from the **Chatbot area**, which you can find by clicking the **🙂** smile icon on the left menu. If the chatbot isn’t working, click the **Settings > Artificial Intelligence > OpenAI > Troubleshoot problems** button and follow the instructions.
- To further improve your chatbot, explore the [training](https://devad.io/help/docs/chat#open-ai-training) and [human takeover](https://devad.io/help/docs/chat#human-takeover) sections.
---
### Settings
See information about most OpenAI settings here.
### **Chatbot mode**
This feature is related to the **Settings > Artificial Intelligence > OpenAI > Chatbot mode** option. It allows you to configure the information OpenAI will use to respond to user messages.
- **Only general questions** OpenAI will respond only to general questions and questions related to previous user messages in the same conversation, without using any information you provide. This is the default setting.
- **Only questions related to your sources** OpenAI will only respond to questions related to the information you provide. The user messages will be ignored. You have to first [train](https://devad.io/help/docs/chat#open-ai-training) the chatbot with your sources.
- **All questions** OpenAI will only to questions related to the information you provide, to general questions, and to questions related to previous user messages in the same conversation. You have to first [train](https://devad.io/help/docs/chat#open-ai-training) the chatbot with your sources. This is the recommended mode.
- **Assistant** Use this mode if you are using an [OpenAI Assistant](https://devad.io/help/docs/chat#open-ai-assistant) .
### OpenaAI Assistant
- Set **Settings > Artificial Intelligence > OpenAI > Sync mode** to **Manual** and use your own API key.
- You can use multiple assistants by adding their IDs in **Settings > Artificial Intelligence > OpenAI Assistants – Department linking** and selecting **Assistant** in **Settings > Artificial Intelligence > OpenAI > Chatbot mode**. To activate an assistant, both the assistant and the conversations must be assigned to a [department](https://devad.io/help/docs/chat#departments) .
- The assistant is used only for the chatbot, and smart replies, not for the message rewriting and other features.
### **Chatbot**
The OpenAI chatbot feature functions similarly to Dialogflow, providing automated responses to user messages. Select the **Chatbot mode** setting to specify the questions that the chatbot is capable of responding to. Utilize the [human takeover](https://devad.io/help/docs/chat#human-takeover) feature to enable the chatbot to redirect the chat to a human agent as necessary.
### **Fallback message**
The fallback message is sent when OpenAI is unable to understand the user question. If the Dialogflow chatbot is enabled, the fallback message will be turned off and the Dialogflow chatbot’s fallback message will be utilized instead.
### **Prompt**
The prompt instructs OpenAI on how to respond by providing relevant information that can be utilized to answer user inquiries. To comprehend the process, refer to the example prompts listed below.
If you choose to activate the [human takeover](https://devad.io/help/docs/chat#human-takeover) feature, you need to tell OpenAI to respond with **I don’t know** if it is unable to provide an answer to the user’s question. You should always include the following text in the prompt: **Respond “I don’t know”, if not sure about the answer**.
### **Prompt – Message rewriting**
This prompt instructs OpenAI on how to rewrite a message when the **Message rewrite button** is active. This prompt should be in English. CHAT.devad.io automatically add the following text when required: **and use the user langauge, add greetings**.
Replies from the training sources can be utilized with the prompt feature as they are compatible.
### **Spelling correction**
This feature automatically fix any spelling mistakes in the agent’s message.
### **Training data language**
If you are using [training data](https://devad.io/help/docs/chat#open-ai-training) and your chatbot is multilingual, set here the default training data language. Leave it as **default** if the training data default language is in English.
### **Smart reply**
This feature allow to enable the [Smart Reply](https://devad.io/help/docs/chat#smart-reply) feature also if the chatbot is not active. If the chatbot is active the [Smart Reply](https://devad.io/help/docs/chat#smart-reply) feature will use OpenAI automatically.
### **Dialogflow spelling correction**
In the case where Dialogflow is unable to find the appropriate response to the user’s message, this function verifies if there are any spelling errors. If any such errors exist, Dialogflow is prompted again with the correctly spelled version of the message for an accurate response. Although it has a higher priority, this feature can still work together with the [Google search](https://devad.io/help/docs/chat#google-search) spelling correction feature.
### **Message rewrite button**
This feature adds a button to the text field of the conversation area, click on it to rewrite your message and make it more friendly and professional. Greetings will be added automatically if there is no previous agent messages. If your language is not English, you have to edit your agent/admin profile and set the correct language.
### **Speech recognition**
OpenAI supports the use of voice messages through speech recognition. When this option is active, audio messages will be converted to written text.
- You do not need to activate this feature for the chatbot to understand audio messages. The speech recognition feature of the chatbot is always enabled.
- For this feature to work better, the user language should be know. To automatically detect the user’s language, you can enable the [language detection](https://devad.io/help/docs/chat#google-translation) feature.
- The text will be displayed alongside the audio player.
- The generated text is compatible with the [translation](https://devad.io/help/docs/chat#google-translation) features.
### **Image recognition**
When this option is enabled, the chatbot analyzes and interprets images sent by the users.
- Only GPT-4 models and newer support this feature.
- This feature does not work on localhost, it requires an online server or [AWS S3](https://devad.io/help/docs/chat#aws) .
### **Source links**
When this option is active, the response will automatically include the links to the sources and training data used for generating the answer. To include articles as sources you have first to set the articles page in **Settings > Articles > Articles page URL**.
### **Note data scraping**
When this option is active, you will see a menu in the [notes](https://devad.io/help/docs/chat#notes) panel. The menu enables the automatic extraction of specific information from the user’s messages like login details, URLs, or even the summary of the conversation.
### **OpenAI parameters**
CHAT.devad.io allows you to adjust various OpenAI parameters such as temperature and logit_bias, for more details visit [https://platform.openai.com/docs/api-reference/completions/create](https://platform.openai.com/docs/api-reference/completions/create) . Don’t set any values if you don’t know what these parameters do or OpenAI may stop working.
### **Logit bias**
The **Logit bias** parameter must be JSON string and the keys must be strings, for example: **{“2435”:-100, “640”:-100}**.
### **Generate user questions**
When this option is active, OpenAI will generate new user questions in real time when you open the [chatbot training panel](https://devad.io/help/docs/chat#chatbot-training-window) .
### **Use conversations for training**
Automatically use conversations to train the chatbot at regular intervals. You will find the training data in **Chatbot > Training > Conversations**. The training is done via cron job every 24 hours. Only user and agent messages are used, chatbot messages are ignored. More details [here](https://devad.io/help/docs/chat#training-using-conversations) .
### **Context awareness**
When this option is enabled, OpenAI will recognize the context of the web page from which the user is writing the message. The context includes only the page’s meta title and meta description texts. T his option is supported solely for the chat widget and is not compatible with messaging channels.
---
### Training ChatBot
With this feature, your chatbot can undergo training using your website, texts, PDF documents and more. Once the training is successfully completed, the chatbot will be able to answer questions related to your contents.
### **Training using files**
This training process enables you to train the chatbot using PDF and TEXT files.
- To access this feature, navigate to **Chatbot > Training > Files**.
- Select your files, click the **Train chatbot** button and await completion of the training process.
- It is only possible to upload files in PDF and TXT formats.
- As soon as the training is completed, the uploaded files are removed.
### **Training using a website**
This training process enables you to train the chatbot using websites.
- To access this feature, navigate to **Chatbot > Training > Website**.
- Enter the website URLs, click the **Train chatbot** button and await completion of the training process.
- If you retrain the same website, you must first delete the previous website’s training data; otherwise, only new URLs will be trained.
- You can provide the website URL and all child URLs will be included and crawled, but with large websites, it is more efficient and less prone to errors and infinite link loops to utilize an XML sitemap instead of relying on the website URL. You can create it with a service like [https://www.xml-sitemaps.com](https://www.xml-sitemaps.com) .
- If you want to train your chatbot using specific pages from your website instead of all of them, you can make use of an XML sitemap. Create one using a tool like [https://www.xml-sitemaps.com](https://www.xml-sitemaps.com) , and then remove the pages you do not wish to include by editing the file in a text editor. To use the XML sitemap, you need to upload it either onto your server or an external online location. Afterward, add the URL of the sitemap in **Chatbot > Training > Website**. If your sitemap contains more than 1000 URLs, it’s advisable to split it into multiple files and train the chatbot with one file at a time to prevent server crashes.
- You can upload large files and your XML sitemap with a service like [https://tmpfiles.org](https://tmpfiles.org/) .
### **Training via questions and answers**
This training process enables you to train the chatbot by adding questions and answers individually.
- To access this feature, navigate to **Chatbot > Training > Q&A**.
- For more details click [here](https://devad.io/help/docs/chat#open-ai-qea) .
### **Training using articles**
This training process enables you to train the chatbot using the [articles](https://devad.io/help/docs/chat#articles) .
- To train the chatbot add you articles and than click the **Train chatbot** button. The articles are used as training sources automatically.
- For more details click [here](https://devad.io/help/docs/chat#articles) .
### **Training using flows**
This training process enables you to train the chatbot using the [flows](https://devad.io/help/docs/chat#open-ai-flows) .
- To access this feature, navigate to **Chatbot > Flows**.
- For more details click [here](https://devad.io/help/docs/chat#open-ai-flows) .
### **Training using conversations**
This training process enables you to train the chatbot using the conversations from the users and agents.
- To enable this feature, check the **Settings > Artificial Intelligence > OpenAI > Use conversations for training** option.
- The training data will begin to be generated in the coming days and will be available in the **Chatbot > Training > Conversations** area.
- While this method is powerful and automated, it can produce low-quality training data if the responses from your human agents or the user messages are unhelpful or incorrect. We strongly recommend reviewing the training data regularly. This method is not recommended for most chatbots. Use the [chatbot training panel](https://devad.io/help/docs/chat#chatbot-training-window) instead.
### **Training using the chatbot training panel**
Once you have finished training your chatbot, you may want to continue enhancing it. This feature allows you to select conversation messages and use them to add new questions and answers or improve existing ones. You can open the chatbot training panel from the conversation area by hovering the mouse over a message, opening the message’s menu, and selecting **Train chatbot**.
- If Dialogflow is active, a new Intent will be added to the main Dialogflow agent.
- If OpenAI is active, the OpenAI chatbot will be trained automatically with the new information. You can control the questions and answers generated from this window from **Chatbot > Training > Questions and answers**.
- The **Services to update** option let you choose what chatbots to update. When updating a Dialogflow Intent, a new OpenAI question and answer will be generated.
- The training window is not compatible with OpenAI assistants.
### **Training using real-time information**
This feature allow the chatbot to answers to questions that require real-time information, such as, “What is the temperature in London today?”.
- For more details click [here](https://devad.io/help/docs/chat#google-search) .
### **Information**
- To add new training data, simply train the chatbot again. The previous training data will not be lost, and only the new sources will be added.
- there are character limits for training the chatbot. However, if you are using the PHP or WP version, there are no limits imposed. You can view the character limits [here](https://chat.devad.io/account/?tab=membership) .
- The **embedding model** is essential for training your chatbot and handling all user messages. We currently use the **text-embedding-3-small** model. It is necessary for these scenarios and cannot be disabled or changed. You can find pricing information at [https://openai.com/pricing](https://openai.com/pricing) . Check out the pricing for the **text-embedding-3-small** model in the **Embedding models** section.
- Go to **Chatbot > Training > Information**, and click the **Delete all training data** button to remove all previous training data for the chatbot.
- The embeddings are stored as JSON files in the CHAT.devad.io [uploads folder](https://devad.io/help/docs/chat#config) and are secured using the password-by-filename approach.
### **Run the training via cron job**
just enable the **Settings > Artificial Intelligence > OpenAI > Training via cron job** option and the cron job will be activated. You can disregard the instructions below.
To automatically train the chatbot with your website content at regular intervals, create a cron job that runs the URL **https://chat.devad.io/include/api.php?open-ai-training=true**, or use the command ***/59 * * * * wget https://chat.devad.io/include/api.php?open-ai-training=true** to run it via a command. Replace **https://chat.devad.io** with your Installation URL, get it from **Settings > Miscellaneous > Installation URL**. use this URL: **https://chat.devad.io/script/include/api.php?open-ai-training=true&cloud=API-TOKEN** and replace **API-TOKEN** with your [API token](https://devad.io/help/docs/chat#cloud-info) .
- the cron job can be executed at most once every 7 days.
- We strongly recommand providing an XML sitemap instead of the website URL for performance reasons.
- Automatic training is limited to websites; files, Q&A, and articles are excluded. Re-training will delete the previous website training data.
### **Multilingual training**
If your user base is multilingual, you can train the chatbot with content in multiple languages and limit the chatbot to retrieve answers only from the sources in the user’s language. To activate this feature, check the **Settings > Artificial Intelligence > OpenAI > Multilingual Training Sources** option.
- **Files** Files currently support only one language.
- **Websites** The language of the website is detected automatically. For CHAT.devad.io to comprehend the language of your web pages, the **** must contain the attribute **lang**.
- **Q&A** Q&A currently support only one language.
- **Articles** All article languages are used automatically.
- **Conversations** If [automatic translation](https://devad.io/help/docs/chat#google-translation) is active, only messages in the agent’s language will be used.
---
### FAQ
The information below is related to the Question and Answers section of the chatbot training area. Add questions and answers to the chatbot to improve its performance. The chatbot will use this information to respond to user inquiries.
### **Question**
Enter the user messages that will trigger the answer. Add as many question variations as necessary. For example the questions to the answer **I’m a chatbot!** could be **Who are you?**, **What are you?**, **Are you a bot?**.
### **Answer**
Enter the text that will be used to answer the user question.
### **Tools calling**
For more details go [here](https://devad.io/help/docs/chat#open-ai-tools) .
### **Set data and actions**
Set the specified user values when the question is asked. You will see such values in the user details panel. You can use the following merge fields to assign values extracted from the user messages. Include these fields in the answer and they will be replaced with the actual values: **{language}**. You can also use this feature to perform actions like assigning [departments](https://devad.io/help/docs/chat#departments) , agents, and [tags](https://devad.io/help/docs/chat#tags) to the conversation.
---
### Information
- If OpenAI is not working, click [here](https://devad.io/help/docs/chat#ai-problems) .
- If Dialogflow is active, the OpenAI query is performed only if the chatbot does not know the answer to the user’s question and if the length of the user’s message is greater than 4 characters.
- The following settings are compatible with OpenAI: **[smart reply](https://devad.io/help/docs/chat#smart-reply)**, **[human takeover](https://devad.io/help/docs/chat#human-takeover)**, **disable for the tickets area**, **disable during office hours**, **bot response delay**, **reply to user emails**, **reply to user text messages**.
- The following Google settings are compatible with OpenAI: **[multilingual via translation](https://devad.io/help/docs/chat#multilingual-via-translation)**, **[automatic translation](https://devad.io/help/docs/chat#google-translation)**, **[language detection](https://devad.io/help/docs/chat#language-detection)**.
- Set the OpenAI chatbot language from **Settings > Chat > Language**. Set it to **Multilingual** if your website supports multiple languages or if your users speak different languages. If you are using messaging channels like [WhatsApp](https://devad.io/help/docs/chat#whatsapp) , or [Instagram](https://devad.io/help/docs/chat#instagram) , you must detect the user language via [language detection](https://devad.io/help/docs/chat#language-detection) . For more details click [here](https://devad.io/help/docs/chat#multilingual) .
- If a human takes control, the OpenAI chatbot is deactivated, and is remains deactivated also if the agent goes offline. The Dialogflow chatbot continues to function whenever necessary.
- The default model is **gpt-5-mini**.
- Consecutive user messages are treated as a single message by the chatbot, resulting in one unified reply
---
## Features Use Cases
### AI Agent & Chatbot for e-Commerce [ WooCommerce, shopify, Opencart & Others]
In the fiercely competitive landscape of modern e-commerce, every website visitor represents a valuable opportunity, and each abandoned cart signifies a significant loss in potential revenue. Standard, reactive customer support is no longer sufficient to captivate and convert today’s discerning online shoppers. Businesses require an intelligent, proactive engagement system that not only resolves queries but actively drives sales and builds brand loyalty. CHAT.devad.io is engineered to be precisely that solution, transforming your customer interactions into a high-performance sales and marketing engine. By leveraging an advanced AI Agent, deep, native integrations with leading e-commerce platforms like Shopify, WooCommerce, and OpenCart, and powerful omnichannel marketing tools like WhatsApp Broadcasting, CHAT.devad.io empowers you to dramatically increase sales, slash cart abandonment rates, and cultivate lasting customer relationships.
### The AI Sales Assistant: Your 24/7 E-commerce Expert
Imagine deploying a highly skilled sales expert on your website who works 24/7, ready to engage every single visitor with personalized assistance. This is the reality with the AI-powered chatbot within CHAT.devad.io. It transcends the limitations of a simple Q&A bot to become an active, intelligent participant in the entire sales journey. By providing instant, accurate, and context-aware information, it builds crucial customer confidence and expertly guides potential buyers from browsing to purchase.
**Intelligent Product Inquiries**:
The CHAT.devad.io chatbot excels at answering complex, conversational questions in real-time. A query like, “Do you sell any leather bags for under $250?” or “What are the best-selling shoes you have in size 9?” is met with an immediate, accurate response. The AI can pull product details, pricing, available sizes, colors, and current stock levels directly from your e-commerce database, presenting the results in visually appealing carousels or product cards. This eliminates friction, answers critical questions instantly, and moves the customer decisively closer to making a purchase decision on CHAT.devad.io.
**Interactive In-Chat Actions:**
The customer’s journey doesn’t pause to navigate away from the chat. The CHAT.devad.io AI agent empowers users to perform key actions directly within the conversation window. Customers can effortlessly add products to their cart, remove items, view their current cart’s contents, or even ask for the status of a recent order without ever leaving the chat. This seamless, uninterrupted experience minimizes clicks, reduces the chance of distraction, and keeps the user fully engaged in the buying process on your CHAT.devad.io powered site.
---
### Deep E-commerce Integration for Unmatched Performance
CHAT.devad.io is not a generic, surface-level chatbot; it is an enterprise-grade solution engineered for deep, native integration with the world’s premier e-commerce platforms, including **Shopify**, **WooCommerce**, and **OpenCart**. This direct connection is what sets CHAT.devad.io apart, allowing our AI to access your product catalog, collections, inventory levels, tags, and customer data in real-time. This provides an intelligent, context-aware experience that is far superior to standalone chat widgets that merely scrape website text.
**Unified Agent Dashboard**:
When a conversation requires human intervention, your agents are immediately empowered with a complete 360-degree view of the customer directly within the CHAT.devad.io admin panel. This unified dashboard displays the customer’s active cart items, their full past order history, and even their total lifetime spending value. This rich context allows your agents to provide highly personalized support, make relevant and timely upsell recommendations, and resolve complex issues faster, effectively transforming every support interaction into a potential sales-generating opportunity with CHAT.devad.io.
**Agent-Powered Cart Management:**
Your agents can do far more than just offer advice. The CHAT.devad.io dashboard gives them the power to directly modify a user’s shopping cart in just a few clicks. This capability is invaluable for assisting customers who may be struggling with your website’s interface, correcting ordering mistakes on the fly, or suggesting a better product alternative and adding it to the cart for them. This hands-on assistance ensures that a sale is never lost due to user confusion or frustration, making CHAT.devad.io an essential tool for closing sales.
---
### Proactive Marketing and Abandoned Cart Recovery
CHAT.devad.io is engineered with a powerful automation engine designed to intelligently engage users at the most critical moments of their buying journey. By moving beyond reactive support, our platform helps you turn passive visitors into active customers, recover potentially lost sales, and continuously build your marketing funnel. These automated triggers work tirelessly in the background to maximize every interaction on your e-commerce store.
**Out-of-Stock Notifications (Waiting List):**
Never lose a sale just because a popular item is temporarily unavailable. When a user visits an out-of-stock product page, the CHAT.devad.io AI bot automatically triggers a message, inviting them to join a waiting list. This proactive feature captures the user’s email address and turns a moment of disappointment into a high-intent marketing lead, ensuring you can notify them the second the product is back in stock.
**Removed Item from Cart Recovery:**
The moment a customer removes an item from their cart is a critical juncture. CHAT.devad.io can be configured to automatically trigger a targeted, personalized message at this exact point. This is the perfect opportunity to offer a small, compelling discount, ask if they have any questions about the product, or suggest a similar alternative. This intelligent intervention creates a powerful incentive for the customer to reconsider their purchase and successfully recovers sales that would otherwise be lost.
**Automated Follow-Up & Welcome Messages:**
Engage every user from the moment they land on your site. CHAT.devad.io can send automated welcome messages to new visitors, display targeted pop-ups based on their browsing behavior (such as time on page or specific URLs visited), and send follow-up messages to collect their email address if agents are busy or offline. This proactive engagement strategy makes your brand feel more personal, builds your marketing list, and ensures no lead is ever missed.
---
### Omnichannel Marketing with WhatsApp Broadcasting
The modern customer journey is fragmented across multiple devices and platforms. CHAT.devad.io breaks down the barriers between these communication channels, allowing you to meet your customers where they are most active and engaged. With our powerful, native WhatsApp integration, you can move beyond the confines of your website and launch proactive marketing campaigns directly to your customers’ phones, a channel with unparalleled open rates and engagement.
**Bulk Messaging & Template Broadcasting:**
Leverage the power of direct, personal communication by using approved WhatsApp message templates to send bulk notifications, promotions, and updates to your opted-in user base. With CHAT.devad.io, you can announce a new product launch, share a limited-time discount code, or send a holiday greeting directly to a highly engaged audience. All customer responses to your broadcast are automatically routed back into the unified CHAT.devad.io dashboard, allowing your team to manage replies and continue the conversation seamlessly.
**WhatsApp Shop Integration:**
Transform your WhatsApp conversations into a direct and powerful sales channel. By synchronizing your WooCommerce or Shopify products with your WhatsApp account through CHAT.devad.io, customers can browse, inquire about, and order products directly within the chat interface. The CHAT.devad.io AI agent facilitates this entire process, guiding users through your product catalog and providing a seamless checkout link to complete their purchase, effectively creating a conversational storefront on the world’s most popular messaging app.
---
### AI Agentic Chatbot Features
### AI-Powered Chatbot in CHAT.devad.io
**Ecommerce, Lead Gen, & Customer Support Supercharged!**
For **ecommerce lead generation**, deploy intelligent bots that qualify prospects, capture details, and nurture conversions 24/7 with human-like flows.
For **customer support**, automate routine queries, escalate seamlessly to agents, and deliver instant, multilingual resolutions—slashing workloads while boosting satisfaction.
---
### The AI Agentic Chatbot in CHAT.devad.io
Elevate your site with CHAT.devad.io’s cutting-edge AI Agentic Chatbot, built on embedding-driven Retrieval-Augmented Generation (RAG). Transform static content into dynamic, smart dialogues that captivate and convert.
This isn’t your basic responder—it’s a sophisticated RAG powerhouse. Powered by OpenAI’s text-embedding-3-small, it absorbs your unique data from docs, web links, sitemaps, and chat logs. Result? Context-aware retrieval of precise info, delivering spot-on, natural replies to any query.
### Smart Chatbots Powered by OpenAI and Google
Accelerate fixes and streamline talks by fusing OpenAI, Google AI, and premium features. Deploy in minutes for effortless automation.
### Automated Communication
Bots handle queries independently when equipped with answers. Unsure? Seamlessly hand off to live agents for takeover.
- Automated communication
- Easy 30-second installation
- Custom chatbot reply delay
- Human-like conversations
### Easy to Use. Easy Chatbot Setup.
**No Coding Skills Required**
Auto-train on your site via Q&A pairs, PDFs, flows, and beyond.
**Learn While You Build**
Kick off simple, then layer in contexts and entities as you grow.
**Online Guides and Videos**
Tap rich OpenAI, Google, and bot tutorials plus demos.
### Benefits
- **Improve Workflows and Productivity**
Bots tackle repetitive queries, easing agent burnout.
- **Decrease Agents’ Workloads**
Handle ~30% of support volume, freeing teams for high-value work.
- **Bots Run Your Website 24/7**
Nonstop operation cuts costs and keeps engagement alive.
- **Become a Better Problem Solver**
Instant answers in seconds skyrocket user delight and retention.
- **Automatically Qualify Leads**
Engage prospects live, gathering details conversationally.
- **Increase Conversion Rates**
Leverage quick, pro responses to lift sales.
- **Create Chatbots using Your Data**
Build ChatGPT-style bots from your files or site links. Amp up with [Flows](https://chat.devad.io/#flows) , [Q&A](https://chat.devad.io/#qea) , and Google AI.
Auto-train from sites, sitemaps, PDFs, JSON, and docs.
Schedule retraining via cron or API.
### Major Settings & Configuration
Tailor these essentials to fit your ecommerce or support goals perfectly.
- **Training Data Input**
Fuel precision with varied inputs:
- **Files & Text**: Load PDFs or plain text for your knowledge core.
- **URLs & Sitemaps**: Scan live site pages (set HTML lang for multilingual sites).
- **Chat History**: Refine with real past interactions.
*Path*: Chatbot > Training. *Fix issues*: Info > Clear all data, then retrain.
- **Embedding Model**
OpenAI’s text-embedding-3-small turns text to vectors for deep semantic grasp.
*Cost*: ~$0.00000004/token—prime performance-value mix.
- **Automation & Frequency**
Sync bots to fresh content via cron jobs or API for hands-free updates.
- **Fine-Tuning Parameters**
Shape tone in OpenAI Settings:
- **Temperature**: Low (0.2) for precise support; high (0.8) for creative chats.
- **Language Detection**
Global-ready: Auto-spot user language, reply matchingly. Enable “Multilingual via translation” for KB and category auto-translations.
- **Quality Control Tools**
- **Spelling Correction**: Pre-process user typos for flawless understanding.
- **Rewrite Message**: One-tap rephrase for clearer bot outputs.
- **Intent Detection Confidence**
Set threshold (rec: 0.81)—below it, fallback to default or human escalation to dodge errors.
### Human Takeover
Humans stay in charge. Bot stumbles? Trigger handover with smart alerts—only when essential.
- Multiple human takeover methods
- Notifications only when needed
- User confirmations
- Other options
### Multilingual Chatbots
One-click global switch: Detect language, translate live, respond natively (50+ tongues).
- Real-time message translation
- Language detection
- More than 50 languages
- Multilingual chatbots
### Works with WhatsApp, Instagram and More
Link to top channels for unified reach.
- WhatsApp
- Instagram
- Telegram
- Messenger
- Viber
- More
### Smart Questions and Answers
Build Q&A boosted by OpenAI, pulling live from APIs/external sources. Trigger saves/actions on key queries.
- Provide answers from external sources
- Actions on specific questions
### Tools Calling
OpenAI tools grab/validate data (e.g., tracking codes) and fetch real-time info.
- **Set Data**: Snag emails, addresses, custom fields on triggers.
- **Actions**: Archive chats, email agents, force handover, etc.
### Chatbot Flows
Design guided sequences: Collect info, list buttons, API calls, conditionals.
- Collect user details
- Send button lists
- Send data via REST API
- Set conditions
- **Conversational Mode**: AI reads messages, picks options naturally.
- **Step-Back Updates**: “Fix email” or “Back” revisits steps.
- **Messaging Channels**: Full WhatsApp/etc. compatibility.
### Speech Recognition
OpenAI transcribes audio to text instantly—pairs with translations, works for all users/bots/admins.
### Image and File Analysis
OpenAI Vision decodes images/files (PDFs, DOCX, TXT, GIFs, etc.) for sharper insights.
- Analyze multiple images and files at same time
- Supports PDF, DOCX, TXT, GIF, WEBP, PNG, JPG, and more formats
### Chatbot Training on the Fly
Agents add Q&A live—OpenAI generates variants for robust learning (multilingual too).
- OpenAI enhancement
- Have your agents train the chatbot
- Multilingual training
### Chatbot Actions
Bots act for users: Email sends, article opens, dept switches, handoffs (+10 actions in Flows/Q&A).
- More than 10 actions available
- Allow the chatbot to act on behalf of the user
### Chatbot Live Web Search
Bot scours Google for fresh events/news, fixes typos too.
- The chatbot answers questions about real-time events
- Correct misspelled user questions
### Rich Messages
Bot rivals humans: Attachments, media, 10+ rich types via shortcodes.
- Rich messages as shortcode
- Attachments and media
- 10+ rich message types
### Chatbot Integrations
Level up with these:
[Google Calendar](https://chat.devad.io/google-calendar)
With the powerful Google Calendar integration, your chatbot can create and manage bookings automatically, while admins and agents easily view and control them from the panel.
[TidyCal](https://chat.devad.io/tidycal)
With the powerful TidyCal integration, your chatbot can create and manage bookings automatically, while admins and agents easily view and control them from the panel.
### Unlimited OpenAI Assistants
Deploy endless assistants, activate site-zone specifically.
### Real-time Data
Bots tackle current events/news dynamically.
### Message Rewriting & Smart Reply
AI polishes agent messages (friendlier, pro) or suggests quick hits based on context.
### Automatic Training
Cron/API retrains on content/chats regularly.
### Fine Tune OpenAI & Prompt Editing
Tweak temp, models, freq; customize prompts for vibe and key info.
### Appointments, Reservations, and meeting Scheduling
### Revolutionizing Customer & Lead Management with CHAT App
In today’s fast-paced digital landscape, the bridge between a potential lead and a confirmed appointment needs to be shorter than ever. The **CHAT App** ecosystem offers a comprehensive lead management and scheduling solution that integrates directly with your existing workflows via Google Calendar and TidyCal.
By combining AI-driven conversations with robust calendar synchronization, businesses can automate the most tedious parts of the sales funnel while maintaining a personal touch.
---
### 🚀 The Power of Integrated Lead Management
At its core, **Lead Management** in the CHAT App cloud version is designed to organize, track, and manage potential customer information in one centralized location.
- **Manual & Bulk Entry:** Add leads manually through the admin panel or import them using supported formats.
- **Progress Tracking:** Monitor every stage of the sales journey, from the initial contact to final conversion or disqualification.
- **Smart Assignment:** Ensure no lead is left behind by assigning them to specific agents or team members, either manually or through automated rules.
- **Persistent Follow-ups:** Boost conversion rates by setting automated reminders to ensure timely contact with every prospect.
---
### 📅 Seamless Calendar Synchronization
One of the standout features of the CHAT App is its ability to transform a simple chat interface into a powerful scheduling engine. By integrating **Google Calendar** or **TidyCal**, you unlock a suite of automated booking capabilities.
### Intelligent AI Booking
The days of static forms are over. Leads can book appointments naturally through a conversation with the AI chatbot. The bot guides them through the process, understanding their needs and checking availability in real-time.
### Complete Control & Customization
Admin users and agents have full visibility via a unified calendar dashboard.
- **Real-Time Sync:** Whether an appointment is created, updated, or canceled via the chatbot or the admin panel, it stays perfectly synchronized with your external calendars.
- **Tailored Settings:** Configure your office hours, available time slots, slot durations, and buffer times directly from the dashboard to ensure your schedule remains manageable.
### Global & Multi-Channel Reach
The CHAT App is built for a global audience. The booking system is **multilingual**, allowing the chatbot to communicate in any language. Furthermore, these integrations work across a massive array of messaging platforms, including:
- WhatsApp, Messenger, and Instagram
- Telegram, Line, Viber, and Zalo
- Live chat, Email, and SMS
---
### 🛠️ Industry Use Cases: Scheduling in Action
The flexibility of the CHAT App makes it an ideal fit for a wide variety of professional sectors:
| Industry | Primary Use Case |
| --- | --- |
| Healthcare | Doctors can manage patient consultations, follow-ups, and rescheduling while reducing no-shows via reminders. |
| Real Estate | Agents can schedule property viewings and virtual tours, managing requests and notifications effortlessly. |
| Salons & Spas | Clients book treatments directly through chat; the system manages slots and notifies staff of changes. |
| Consultants | Easily schedule coaching sessions or meetings with direct Google Calendar/TidyCal syncing. |
| Education | Tutors offer students a quick way to book, change, or cancel lessons, minimizing scheduling conflicts. |
| Automotive | Car service centers allow customers to book maintenance and receive automated status updates. |
*Other supported industries include legal services, fitness training, event planning, and hospitality.*
---
### ❓ Frequently Asked Questions
**How quickly can I set up the integration?** Setup takes only a few minutes. Simply connect your Google Calendar or TidyCal account and configure your preferences in the CHAT App dashboard.
**How does the system handle notifications?** To reduce no-shows, the system automatically sends booking confirmations, reminders, and updates to both agents and customers via their preferred messaging platform.
**What happens if appointments don’t sync correctly?** First, ensure your integration is authorized in the dashboard. Real-time synchronization is designed for consistency, and quick setup guides are available to help troubleshoot any authorization issues.
**Can the chatbot handle cancellations?** Yes. The chatbot can create, update, and cancel bookings in real-time, ensuring your calendar always reflects the most current availability.
---
### Customer Support Features
### Turbocharge Customer Support & Efficiency with CHAT App Tools
**Revolutionize Support for Ecommerce Lead Gen & Customer Service!**
For **ecommerce lead generation**, streamline inquiries into qualified leads with smart routing, instant replies, and omnichannel capture—fueling sales pipelines effortlessly.
For **customer support**, slash response times, delight users with AI-powered tools, and unify all channels in one intuitive hub, turning support into a growth engine.
---
### Boost Clients’ Support Efficiency with Our Tools
Handle every conversation and user from a central hub, ditching scattered tools forever. Now it’s just you and the customer—seamlessly linked via CHAT App. Dive in today?
### Manage Conversations
Oversee all chats in a single, intuitive dashboard. Hunt down discussions, erase notes, track live user presence, and spot typing activity as it happens.
- Delete messages
- Download conversations
- Search for conversations
- Online and typing status
### Knowledge Base Articles
Speed up resolutions and cut agent workload with a built-in, multi-language help hub. Whip up a dedicated resource zone or embed it in chats within moments.
- Dedicated articles page, demo [here](https://chat.devad.io)
- Search articles widget
- Categories
- Multilingual
### Message Editor
Craft flawless replies using 3000+ emojis and markdown for sleek formatting. Delight users with voice clips, plus drag-and-drop media and files.
- Text formatting and markups
- 3000+ emojis
- Attachments
- Voice messages
### Saved Replies
Slash repetition with pre-saved responses—no more retyping basics. Link them to the chatbot for on-demand auto-replies and dynamic queries.
- Insert by keyboard shortcut
- Save and reuse messages
- Connect to the chatbot to auto-generate responses
### Departments
Sort chats and allocate teams to specialists. Set transfer logic so queries always reach the perfect handler. Dispatch department-tailored email alerts.
- Department email notifications
- Update conversations department
- Restrict access to conversations
### Notifications
Keep engagement alive—never miss a beat with our full notification suite.
### Email
Ping users and team via email on every incoming message.
### Push Notifications
Notify users and team via push alerts for fresh messages.
### Desktop Notifications
Trigger desktop pops for users and team on new messages.
### SMS Notifications
Send text alerts to users and team for each new message.
### Flash Notifications
Flash the browser tab title with every new arrival.
### Sounds
Chime on every incoming message.
### Red Counter
Show a red badge with unread message count.
### Agents and admins
All notification types work in the admin zone too.
### More are coming
Fresh notification options rolling out soon—watch this space!
### Real-time Queue
Inform visitors of their queue spot and wait time live. Evenly spread chats across online agents and cap active sessions per person.
- Waiting time and queue position
- Set max concurrent chats limit
- Updates in real-time
### Routing and Agent Assignment
Distribute chats fairly to free agents or let users pick favorites. Optimize flow and delight with clever assignment smarts.
- Auto-route chats to agents fairly
- Let your users select their preferred agent
### Email Piping
Respond to emails from your inbox and morph them into chats. Customers reply via email too! Skip server tweaks—just add IMAP/POP3 credentials.
- Reply to users via email
- Users can reply by email
- No server-side configuration
- Multiple email accounts
### Omni-Channel Experience
Unify WhatsApp, Facebook, Telegram, SMS, emails, tickets, and chats in CHAT App. Centralize comms to save hours.
- WhatsApp
- Messenger
- Telegram
- Slack
- Text Messages
- Emails
### Translations in Real-Time
Chat fluidly in any language—auto-translate between user, agent, or bot for seamless global support.
- Two-way translations
- Translations in real-time
- Multilingual chatbot
- Powered by Google Translate
### Smart Reply
AI crafts instant reply ideas for agents in real time, pulling from OpenAI and Dialogflow in the user’s tongue.
- OpenAI and Dialogflow suggestions
- Multilingual suggestions
### Message Rewriting
One-click AI overhaul via OpenAI turns drafts into polished, friendly pros. Trigger on sentiment for perfect tone.
- Revitalize your messages with a friendly and professional touch
- Rewrite messages only when sentiment analysis triggers it
### Spelling Correction
AI zaps typos in agent messages instantly, across languages—powered by OpenAI. Error-free chats, always.
- Fix any spelling mistakes
- Multilingual spelling correction
### Smart Private Notes
Drop private notes on chats; AI auto-summarizes and pulls key info like links or contacts. Admin-eyes only.
- Automatically extract data such as URLs and private details
- Automatically generate conversation summaries using AI
### Multi-User Direct Messaging
Beam real-time chats, emails, or SMS to users with personalized merge tags and auto-alerts.
- Support for emails, SMS and text messages
- Send messages to several users
### Reports
Track chat performance and agent metrics at a glance.
- Daily conversations
- Missed conversations
- Average conversations time
- Registrations count
- Subscribe and follow-up reports
- Daily visitors
- Daily leads
- Daily users
- Articles searches and views
- Browsers and operating systems
- Agents ratings
- Agents response time
- Average agent conversations time
- Countries and languages
- More available and more are coming!
### Agent Ratings
Capture post-chat feedback. Review scores per chat or agent, even gather via conversational AI on WhatsApp and beyond.
- View ratings by conversation and by agent
- Collect feedback conversationally on messaging channels
### Tickets
Embed ticket zones site-wide for instant customer aid from one spot. Needs the Tickets app.
[More details](https://chat.devad.io)
### Offline Message
Show custom banners or messages outside hours or when team’s away. Tailor timing, style, and triggers.
- Multiple message types and designs
- Display timetable
- Disable agents check
### More Features
CHAT App packs powerhouse tools for any-scale operations.
- **Transcript**
Grab chat logs as text files and share with users.
- **Routing**
Fairly divvy chats among the team.
- **Message Reply**
Quick one-tap responses, app-friendly.
- **Tags**
Label and sort chats effortlessly.
- **Agents Collision Detection**
Block duplicate agent handling.
- **Automatic Updates**
One-click or auto plugin/app refreshes.
- **Multilingual Platform**
41 languages built-in—add yours easily.
- **Keyboard Shortcuts**
Boost speed with hotkeys.
- **Attachments, Media and Lightbox**
Share files/media; preview pics in lightbox.
- **Documentation**
Dive into full guides anytime.
---
### Marketing Feautres for Any Business
### Supercharge Leads, Sales & Support with AI Chat Power
**Ecommerce Lead Gen & Customer Support Revolution!**
For **ecommerce stores**, capture emails, nurture leads, and close sales faster with smart pop-ups, automated funnels, and seamless newsletter integrations—turning browsers into buyers.
For **customer support**, deliver instant human-like help, proactive outreach, and rich messaging to resolve issues on the spot, boost satisfaction, and build loyalty that drives repeat business and referrals.
---
### Boost Marketing with AI Powered Tools and Chat
Live chat adds a personal touch and instant support, creating a standout marketing edge for lead capture and support excellence. Customers adore it with every use, driving up sales, generating hot leads, and sending revenues soaring while resolving queries effortlessly.
### Pop-up Message
Show targeted pop-up messages on your site to grab ecommerce leads or offer instant support. Make them irresistible with compelling text and profile pictures. Build various pop-ups that trigger automatically for high-intent scenarios like cart abandonment or support needs.
- Multiple pop-ups
- Automated pop-ups
- Multilingual
### Welcome Message
Greet ecommerce visitors or support seekers with a warm welcome the moment they land and open chat—perfect for lead gen intros or quick help offers. Trigger it on page load or chat open, and set up several via automations to personalize the experience.
- Multiple options
- Multiple and automated messages
- Multilingual
### Follow-up message
In ecommerce, snag abandoned cart emails; in support, collect details if no agent’s available. Dispatch a message asking for the user’s email if no agent responds in 15 seconds—or when all agents are offline. It handles phone numbers and additional fields for richer lead data or tickets.
- Support for phone number and other fields
- Multilingual
### Subscribe Message
Grow your ecommerce list or support community via live chat. Prompt users for their email and configure follow-up confirmation emails to nurture leads or send updates. It connects seamlessly with leading newsletter platforms for effortless growth.
- Integration with the major newsletter services
- Multilingual message and email
### Newsletter Subscription
Push ecommerce leads down the funnel or keep support users engaged by auto-subscribing them to your newsletter when they share an email in chat. Pick a specific list, add their name, and watch conversions climb.
- Mailchimp
- Elastic Email
- Campaign Monitor
- Sendinblue
- SendGrid
- HubSpot
- Moosend
- GetResponse
- ConvertKit
- ActiveCampaign
- MailerLite
- Mailjet
- Sandy
- SendFox
### Automations and Triggers
Automate lead gen for ecommerce (like exit-intent captures) and support workflows (like ticket escalations). Dispatch messages, display pop-ups, tweak chat designs, and more when your defined conditions are met. Tap into over 13 conditions and 5 automation varieties.
- Messages, pop-ups, emails, SMS, and design
- More than 13 conditions
### Multi-Users Direct Message
Nurture ecommerce leads or follow up on support cases in real time. Deliver direct chat messages, emails, and SMS to users, tailored with custom merge fields and automatic notifications.
- Support for emails, SMS and text messages
- Send messages to several users
### Marketing Chatbot
Pair with ecommerce for 24/7 lead qualification or support for instant query handling. Supercharge these tools by combining them with the chatbot—it automates replies to campaign questions or issues, enhancing experiences while saving time.
[Explore our Smart Chatbot](https://chat.devad.io/chatbot)
### Social Share
Amplify ecommerce traffic or support advocacy by encouraging shares. Message customers to share the current page on social platforms and apps like Facebook, Twitter, and others—boosting visibility and engagement.
- Support for Facebook, Twitter, Whatsapp, Linked-in, Pinterest
- More services coming soon
### Proactive Chat
For ecommerce, spot shopping intent; for support, preempt issues. Let agents contact online visitors before they chat—from the admin panel, view the real-time user list and invite anyone to convert or get helped.
- Real-time online users list
- Send a message to online users
### Rich Messages
Wow ecommerce shoppers with product previews or empower support with guides. Agents captivate users with over 10 types of rich messages, mixing them seamlessly. Insert via parameter strings or shortcodes.
- 10+ rich message types
- Custom rich messages
- Rich message as shortcode
- Multilingual
### Booking System
Ecommerce sellers book demos; support teams schedule calls. Calendly integration makes booking meetings with visitors effortless—right from the chat widget or tickets section.
Powered by [Calendly](https://calendly.com/)
Try it now by clicking here
---
## Settings Area
### Articles & Tickets Sections
### **Knowledge Base & Ticket Management**
Expand your customer support capabilities beyond real-time chat. This guide covers two essential modules: **Articles** and **Tickets**. Learn how to build a searchable Knowledge Base that reduces support volume and automatically trains your AI chatbot. Additionally, discover how to implement a structured Ticketing system for handling complex inquiries. Below, you will find installation steps, display methods (including WordPress shortcodes and script modifications), and advanced configuration options for both tools.
### Articles
**Articles (Help Center)**
Empower your users to find instant answers and significantly reduce your support team’s workload. The Articles module allows you to create a fully integrated Knowledge Base that can be displayed directly in the chat dashboard, sent via rich messages, or hosted on a dedicated page. These articles also serve as a dynamic training source for your AI chatbot, ensuring your automated responses stay up-to-date.
Knowledge base articles provide instant answers to customers to help reduce customer support volume. You can access the articles from the left CHAT.devad.io menu.
### How to display the articles area
- The articles can be shown in the chat dashboard by enabling them from **Settings > Articles > Display in dashboard**.
- Alternatively, articles can be shared in any chat conversation via the rich message shortcode, **[articles]**.
- Follow these steps to display the articles on a page of your domain and website. You can display them in three ways:
The page shows the article categories, you must add **parent categories** and assign articles to them. The articles will be shown in the same location of the code above. You can hide the chat widget by adding the JS code **var SB_DISABLED = true;** to the page.
### One-page navigation
The article’s one-page navigation appears automatically on all articles. It is generated from the article’s **h2** and **h3** heading blocks.
### Add to your Website
To show Articles in your websites, use this code in your page. dont forget to add your API token which can be found in [https://chat.devad.io/account/?tab=installation](https://chat.devad.io/account/?tab=installation)
~~~
~~~
Another option is to install this javascript into a new page.
please note that to use the JS method you need to include the installation script code like in your page where you want to display or use the chat. This script initializes the chat system on your site.
~~~
~~~
If you see 404 error, The 404 error on other pages when displaying articles means that the article categories or articles are not properly loaded or linked on those pages.
**To fix this:**Ensure the URL parameter for category or article_id is set correctly on those pages to load the right content.
Configure your website routes or permalinks so that requests for articles don’t lead to 404 errors.
Make sure parent categories and articles are assigned properly in the CHAT App admin area.
Optionally, use the REST API or PHP API method to load articles dynamically with proper parameter handling.
In brief, 404 means the pages are missing or not mapped properly to article content. You need to configure URLs and categories so that articles display correctly on all pages.
### Training using articles
This training process enables you to train the chatbot using the [articles](https://devad.io/help/docs/chat#articles) .
- To train the chatbot add you articles and than click the **Train chatbot** button. The articles are used as training sources automatically.
- For more details click [here](https://devad.io/help/docs/chat#articles) .
- **Articles** All article languages are used automatically.
- CHAT.devad.io articles are synchronized automatically with the Dialogflow knowledge base.
### Source links
When this option is active, the response will automatically include the links to the sources and training data used for generating the answer. To include articles as sources you have first to set the articles page in **Settings > Articles > Articles page URL**.
### Performance
The system is extremely lightweight, built without frameworks or unnecessary code. It’s modular, minimal, and fully optimized for maximum performance.
**Disable articles**: Disable the articles area and article functionality. This reduces resource usage by preventing the system from loading articles on both the admin and client sides.
### Tickets
The Tickets app offers an alternative way for users to submit inquiries, providing a structured interface distinct from the standard chat widget. While it shares the same powerful backend as the chat system, the frontend is designed for creating and tracking longer-form requests. Whether you are using WordPress or a custom website, the guide below explains how to activate the app and display the ticket area using simple shortcodes or URL parameters.
The settings below are related to the Tickets app. The Tickets app allows users to create conversations and send messages via a UI different from the chat.
---
### Installation
- From **Settings > Apps**, click **Tickets** and click **Active**.
---
### Display the tickets area
---
### WordPress
To display the tickets use the shortcode
~~~
[sb-tickets]
~~~
Insert it in any page, post, or post type item.
### Any Website
To display the tickets area include the chat embed code into your page and add the attribute **&mode=tickets** to the script URL, e.g.
~~~
~~~
. You can show the tickets area also by inserting the code
~~~
~~~
into any page showing the chat.
---
### Information
- If the tickets area is not visible, make sure to uncheck the option **Tickets > Manual initialization**. Additionally, you can explore other potential reasons for this issue [here](https://devad.io/help/docs/chat#widget-hidden) .
- You can also use the tickets area to display an inline or full-width chat panel.
- Tickets are the same of chat conversations on the admin-side, the only difference from chat conversations is the front-end UI.
- Most of the settings of the chat are compatible with the Tickets App but not all of them. The dashboard settings, the pop-up message, and more are not compatible.
- Dedicated APIs for the Tickets App are available in the API section.
- To remove the mandatory ‘New ticket’ form for new users, activate the welcome message of **Settings > Messages & Forms > Welcome message. The welcome message delay is ignored in the tickets area, the message is sent immediately.**.
- To manually disable the mandatory registration only on a single page use the JavaScript code **var SB_REGISTRATION_REQUIRED = true**. Set it to **true** to force the registration instead.
- The tickets area is compatible with Google reCaptcha v3.
### Automations & Cron Job
### Cron job
- CHAT.devad.io tries to process emails via cron jobs every 60 seconds, details [here](https://devad.io/help/docs/chat#cron-jobs) .
- If you’re using the [cloud version](https://devad.io/help/docs/chat#cloud-version) the cron job is already activated by default and it will run at least once every 60 minutes.
- You can manually trigger execution and speed up cron jobs via API with the PHP function sb_email_piping(), or the WEB API function email-piping.
- You can create a cron job that runs the URL **https://chat.devad.io/script/include/api.php?piping=true&cloud=API-TOKEN** and replace **API-TOKEN** with your [API token](https://devad.io/help/docs/chat#cloud-info) .
- If you manually run the cron job, activate the **Disable cron job** option to stop CHAT.devad.io from manually triggering it and to improve performance.
---
### Run the AI training via cron job
just enable the **Settings > Artificial Intelligence > OpenAI > Training via cron job** option and the cron job will be activated. You can disregard the instructions below.
To automatically train the chatbot with your website content at regular intervals, create a cron job that runs the URL **https://chat.devad.io/include/api.php?open-ai-training=true**, or use the command ***/59 * * * * wget https://chat.devad.io/include/api.php?open-ai-training=true** to run it via a command. Replace **https://chat.devad.io** with your Installation URL, get it from **Settings > Miscellaneous > Installation URL**. use this URL: **https://chat.devad.io/script/include/api.php?open-ai-training=true&cloud=API-TOKEN** and replace **API-TOKEN** with your [API token](https://devad.io/help/docs/chat#cloud-info) .
- the cron job can be executed at most once every 7 days.
- We strongly recommand providing an XML sitemap instead of the website URL for performance reasons.
- Automatic training is limited to websites; files, Q&A, and articles are excluded. Re-training will delete the previous website training data.
---
### More about Cron Jobs
- Cron jobs are executed by the first user that visit the website at any given hour of the day.
- Cron jobs are executed every 60 minutes (60 seconds for email piping), but it can take longer, or it can take less time as well, in relation to the traffic of your website.
- Because cron jobs are initiated by users, if you have less than 1 visitor per hour (per minute for email piping), it could take longer. As long as there is at least one active user on the site, execution every 60 minutes (60 seconds for email piping) is guaranteed.
- You can speed up the cron jobs execution by manually run them via [WEB API](https://chat.devad.io/docs/api/web#cron-jobs) , or [PHP API](https://chat.devad.io/docs/api/php#cron_jobs) .
### Automations
Automations allow running [multilingual](https://devad.io/help/docs/chat#multilingual) automatic tasks when conditions set by you are met.
- To delete a condition, set it to empty. To disable an automation, delete all conditions.
- Automations are sent only 1 time to users.
- If you used an automation in the past, and users already received it, you need to delete the automation and create a new one to show it to the users.
- **Repeat** only works if used in conjunction with **date time**.
- When **date time** is used in conjunction with the criteria **is exactly**, the value must not contain hours and minutes (hh:mm). Ex. 25/10/2021 (25/10/2021 10:30 will not work).
- The **Settings > Users > Register all visitors** option must be active if there are message automations that are executed on page load.
- **City**, **countries**, **languages** work automatically only if both the settings **Settings > Users > Register all visitors** and **Settings > Users > Full visitor details** are enabled.
- **Cities** work only if the user detail **location** is set and equal to **city, country**, or if the user detail **city** is set.
- **Countries** work only if the user details **country_code**, or **country** is set, or if the user detail **location** is set and equal to **city, country**. The country name must be in english.
- **languages** work only if the user details **browser_language**, or **language** is set.
- A visitor is a **Returning visitor** only if it visits the website again after 24h or more.
- The pop-ups appear only if the chat is closed, and they overwrite the default pop-up. You can check the **message fallback** option to send a message instead of showing the pop-up if the chat is open.
- You may need to enable **Settings > Users > Register all visitors** if you want to send an automated message to new users.
- Chat messages and popup fallback messages are sent only if the last user or agent message of the conversation is older than 10 minutes. This feature prevents unwanted automated messages to be sent during an agent-user conversation.
- The **Custom variable** condition check for the JavaScript variables with the given names and values. For example, the condition **example=ABC** is met if into the chat’s page there is this JavaScript code: **var example = “ABC”;**. Add multiple variables separated by commas.
- Automations are not compatible with the messaging apps like WhatsApp, Messenger, Instagram, Telegram, Twitter, Zalo, WeChat, Viber, Line.
### Conversation Management System
Here is the full, SEO-optimized, and expanded article based on your documentation. I have utilized the specific GreenShift and WordPress blocks you provided to ensure a polished, “ready-to-paste” format.
The content has been slightly expanded for better flow and SEO context without altering the technical instructions.
### Comprehensive Guide to Managing Conversations
Efficient conversation management is the backbone of excellent customer support. In this system, conversations are categorized into four distinct statuses to help you organize your workflow: **mark as read**, **archive**, **delete**, and **restore**. You can effortlessly manage the status of any active chat by opening it within the conversations area and selecting the corresponding icon located in the top-right corner of the window.
### Advanced Search and Filtering
Finding specific interactions is straightforward with the robust search functionality. The system allows you to search using various data points to locate exactly what you need. If you search for specific message text, the system will not only find the conversation but also highlight the exact message string for quick reference.
- **Department or Agent ID:** Filter by specific internal IDs.
- **User Details:** Search by first name, last name, or email address.
- **Content:** Search by conversation title, message text, or attachment names.
**Critical Notice:** When you empty the trash, all conversations contained within are permanently deleted and cannot be recovered. Trashed conversations are automatically deleted after 30 days.
### Text Editor & Automated Message Features
The admin area text editor, used for live chats and automated messages (such as Welcome or Subscribe messages), supports robust styling options. This allows you to create stylized, professional, and clear communications.
**Link Formatting:** The system automatically converts text links into clickable hyperlinks. To customize the text of a link, append the following string to your URL: `#sb-example`. Simply replace “example” with your desired link name (use hyphens for spaces).
- **Bold Text:** Surround text with asterisks, e.g., `*your text*`.
- **Italic Text:** Surround text with double underscores, e.g., `__your text__`.
- **Strikethrough:** Surround text with tildes and colons, e.g., `~: ~your text~`.
- **Code Blocks:** For single lines use backticks ``code``. For blocks, use triple backticks ````block````.
*Note:* For security reasons, direct HTML, JavaScript, or other code languages are not permitted in the standard editor. However, you can achieve complex layouts using **Rich Messages** (detailed below).
### Dynamic Merge Fields
Merge fields allow you to personalize automated messages by inserting dynamic variables that are replaced by external values when the message is sent.
| Code | Description |
| --- | --- |
| {user_name} | Full name of the active user. |
| {user_email} | Email address of the active user. |
| {agent_name} | Full name of the responding agent. |
| {agent_email} | Email address of the responding agent. |
### Rich Messages & Interactivity
Rich messages transform standard text into interactive elements like buttons, sliders, dropdowns, and inputs. These are essential for creating engaging chatbots or collecting structured data from users. They are implemented using specific shortcodes.
Here is the corrected code block. I have restructured the “How Rich Messages Work” section to match the “Stack – Long steps” style you requested. The descriptive text has been moved from the heading subtitle into separate paragraph blocks below each step.
### How Rich Messages Work
1
### Create and Send
Insert the shortcode into the admin text editor. Customize parameters with your info and send.
2
### Message is Displayed
The user sees the rendered interactive element (not the code) and selects or enters information.
3
### Response Submitted
Once filled and sent by the user, a success message appears and the data is saved securely.
### List of Rich Messages
Card Message
**Description:** Displays a call-to-action card featuring an image, title, description, and link.
~~~
[card image="URL" header="TITLE" description="Lorem ipsum" link="URL" link-text="Purchase" extra="$599" target="_blank"]
~~~
Slider & Slider Images
**Description:** Create a slider of up to 10 call-to-action cards or a simple image slider.
~~~
[slider image-1="URL" header-1="TITLE" description-1="Text" link-1="URL" link-text-1="Buy" image-2="URL"...]
[slider-images images="URL,URL,URL"]
~~~
Inputs, Chips, & Buttons
**Chips:** A list of clickable buttons: `[chips options="A,B,C"]`
**Buttons:** Standard buttons: `[buttons options="A,B,C"]`
**Inputs:** A list of text inputs fields: `[inputs values="A,B,C" button="Send now"]`
Select Dropdown
**Description:** Displays a dropdown list of options for the user to choose from.
~~~
[select options="Option A,Option B,Option C"]
~~~
Email Collection Form
**Description:** A form to collect user email and phone numbers. Supports merge fields. Use `required-messaging-apps="true"` to force data entry on apps like WhatsApp.
~~~
[email name="true" last-name="true" phone="true" phone-required="false" placeholder=""]
~~~
Video, Image, & Share
**Video:** Embed YouTube or Vimeo.
**Image:** Display a single image. `[image url="HTTPS_URL"]`
**Share:** Social sharing buttons. `[share fb="#" tw="#" li="#" pi="#" wa="#"]`
Advanced Lists & Tables
**Standard List:** `[list values="A,B,C" numeric="true"]`
**Double List (Titles):** `[list values="Title:Content,Title2:Content2"]`
**List with Images:** `[list-image values="URL:Title,URL:Title2"]`
**Table:** `[table header="Col1,Col2" values="Row1A:Row1B,Row2A:Row2B"]`
**Global Parameters:** All rich messages support the following optional parameters to control behavior and data storage:
- **Option** `id="123"`: The ID used to save the JSON data.
- **Option** `title="ABC"`: The title displayed on the message.
- **Option** `message="ABC"`: A description appearing underneath the title.
- **Option** `success="ABC"`: The text shown after the user successfully completes the form.
- **Option** `settings="ABC"`: Extra fields for optional values.
### Integrations & Advanced Customization
**Dialogflow Integration:** To use rich messages within a Dialogflow chatbot, simply paste the desired shortcode directly into the “Text Response” field of the Intent.
**Data Handling (JSON):** When a user interacts with a rich message, the data is saved in the database under the `sb_messages` table in the `payload` column. The format is JSON:
~~~
{"rich-messages":{"UniqueID":{"type":"email","result":{"email":["user@example.com","User Input..."]}}}}
~~~
**Custom HTML Codes:** For advanced users, you can create custom rich messages via *Settings > Miscellaneous*. While these are static, you can use specific HTML classes for styling:
- Link with button design: `Click here`
- Zoomable Image: `
`
### System & Automated Messages
Welcome & Follow-up Messages
**Welcome Message:** Sent to new users visiting for the first time. It is not sent to Slack.
**Follow-up Message:** If no agents respond within a specific interval (usually 15 seconds if online, 5 seconds otherwise), a request for user details (email) is sent. This ensures you can contact them later via the newsletter feature or email notifications.
Offline & Privacy Messages
**Offline Message:** Notifies users when agents are offline or outside office hours. It is sent a maximum of once per hour per user.
**Privacy Message:** Displays GDPR compliance buttons (Accept/Decline). Users must accept to start chatting. This is disabled automatically if “Require Registration” is active.
Rating System
Users can rate conversations when archived. You can also set up an **Email Reminder** via cron jobs to request a rating if one wasn’t provided. If AI is enabled, user text replies can be analyzed to extract a rating automatically.
### Admin Tools & Attachments
**Attachments:** The system automatically displays common image formats (.jpg, .png). To allow other file types (like .exe or .abc), you must modify the `config.php` file by defining the `SB_FILE_EXTENSIONS` array.
**Tags & Notes:** Administrators can assign tags to conversations for better filtering. Tags can also be assigned automatically via JavaScript variables (`SB_DEFAULT_TAGS`). Private notes can be added to conversations, visible only to agents and admins.
**Transcript Feature!**Agents can send a full conversation transcript to the user as a file by clicking the “Transcript” button in the admin window.
### Department Settings & Configuration
### Department Settings & Configuration
Organizing your support team into departments ensures that user inquiries are handled by the right experts. You can configure department behavior under **Settings > Miscellaneous**.
- **Display in dashboard:** Shows the department list in the chat dashboard, forcing users to select a department before starting a conversation.
- **Display images:** Shows the department image instead of the default department color.
- **One conversation per department:** Restricts users to one active conversation per department at a time.
- **Labels:** You can rename the default “Department” and “Departments” labels to suit your business needs (e.g., “Teams” or “Groups”).
**Workflow Logic**! Agents assigned to a specific department can only access conversations, users, and agents within that department. Unassigned agents see everything.
### How to Assign a Department
Departments can be assigned to a conversation automatically or manually via:
- **Q&A Set Data:** Configure your chatbot to assign departments based on user answers.
- **Flow Actions:** Use the flow builder to trigger assignment.
- **Code:** Use the JavaScript variable `var SB_DEFAULT_DEPARTMENT = ID;` on specific pages.
- **Dashboard Selection:** Force the user to choose from a list before chatting.
### Smart Queue & Routing
When enabled, the system automatically distributes user conversations among available (online) agents proportionately. Admins are excluded from automatic assignment.
Queue Mode
Routing Mode
Activated when an agent’s chat limit is reached. Users receive a message indicating their position and estimated wait time (Position × Response Time). If a user leaves the queue for more than 1 minute, they lose their spot. **Note:** Conversations from apps like WhatsApp ignore agent limits and are assigned immediately.
Assigns conversations immediately to online agents. If “Disable online status check” is active, offline agents also receive assignments. Agents can manually route conversations using the **Agents Menu** in the right panel. Unassigned conversations remain visible to admins until an agent comes online.
### Email Piping Integration
Email piping allows you to sync email addresses so messages sent to your support email appear directly in the chat dashboard. Agents can reply from the dashboard, and users receive the reply via email.
**Requirement**: The server must have the `php5-imap` module installed. For Gmail/Google Workspace, you must use an **App Password** and allow less secure apps if using a custom domain.
- **Delimiter:** Use the delimiter option (`### Please type your reply above this line ###`) to cut out quoted replies and prevent duplicate message content.
- **Attachments:** Full support for email attachments.
- **Reply-To:** If the email contains a reply-to attribute, it serves as the primary user address.
### System Optimization: Pusher & Cron
### Cron Jobs
Cron jobs process emails and other scheduled tasks. While the cloud version runs this automatically every 60 minutes, you can trigger it manually every minute for faster email processing.
~~~
*/59 * * * * wget /include/api.php?piping=true
~~~
### Pusher (WebSockets)
Activate Pusher to replace HTTP AJAX requests with WebSockets. This drastically improves performance, server load, and real-time responsiveness (typing status, online status, message delivery).
### Direct Messages & Automations
**Direct Messages:** Send single messages via Chat, Email, SMS, or WhatsApp to individual or all users.
**Automations:** Run multilingual automatic tasks when specific conditions are met (e.g., “User visits pricing page” -> “Send discount code”).
- **Conditions:** Set criteria like city, country (English name), language, or custom variables.
- **Restrictions:** Automations run once per user. They are not compatible with external messaging apps (WhatsApp, Messenger).
### Newsletter Integrations
Synchronize user emails collected via registration forms or follow-ups with your preferred marketing platform.
Mailchimp
Get the **Key** from your Mailchimp account API settings. Get the **List ID** (Audience ID) from the audience settings.
SendGrid
Get the **Key** from Settings > API Keys. The **List ID** is found at the end of the URL when viewing a specific list (e.g., `.../lists/**8558c1e7...**`).
Brevo (Sendinblue)
Find the **Key** in Account > SMTP & API > API Keys. The **List ID** is the ID number listed next to your list names.
Elastic Email
Create an API Key with “Contacts” permission set to View & Modify. The **List ID** is simply the **list name**. Ensure the name has no spaces.
HubSpot
Create a Private App with `crm.lists` and `crm.objects.contacts` read/write scopes to get the Token. The **List ID** is in the list details.
### Amazon S3 Attachment Storage
### Configuration Steps
1
### Create IAM User
Log in to AWS Console. Go to IAM > Users > Add new user. Create a user and assign it to a group with `AmazonS3FullAccess` permission policy.
2
### Generate Keys
Go to the user’s “Security credentials” tab. Create an access key (select “Application running outside AWS”). Copy the Access Key and Secret Key into the chat settings under *Miscellaneous > Amazon S3*.
3
### Create Bucket
Create a new S3 bucket. **Important:** Uncheck “Block all public access” and check “ACLs enabled” with “Bucket owner preferred”. Enter the bucket name and region into the chat settings.
### Saved Replies (Canned Responses)
Speed up agent workflow with pre-written messages. Manage them at *Settings > Admin > Saved replies*. Agents can quickly insert them by typing `#` followed by the reply name, or `##` to open the full list.
### Tickets Management System
The Tickets App provides a structured alternative to the real-time chat widget. It allows users to create conversations, track status, and send messages through a dedicated user interface, functioning similarly to a traditional support desk portal. This is ideal for managing inquiries that do not require immediate, real-time responses.
### Installation & Activation
To enable this functionality, navigate to **Settings > Apps** in your dashboard. Select **Tickets** from the list and enter your license key to install and activate the module. If you are operating on the **Cloud Version**, simply click the **Active** button to enable the feature immediately.
### Displaying the Tickets Interface
Depending on your installation type (WordPress, PHP, or Cloud), there are specific methods to render the tickets area on your website. Choose your platform below for instructions.
WordPress
Cloud Version
For WordPress sites, displaying the tickets area is incredibly simple. Just insert the following shortcode into any Page, Post, or Custom Post Type where you want the interface to appear:
~~~
[sb-tickets]
~~~
Modify your existing chat embed code by adding the `&mode=tickets` attribute to the script URL.
~~~
~~~
Alternatively, you can force the tickets view on specific pages by inserting this Javascript snippet before the chat loads:
~~~
~~~
**Configuration Notice**! You cannot run the standard Chat script and the Tickets script on the same page simultaneously unless you use the global variable method `SB_TICKETS = true;` to override the view.
### Departments, Queue and routing
### Team Workflow & Conversation Routing**Settings**
Scale your support operations with powerful distribution and organization tools.
- **Departments:** Segment your team (e.g., Sales, Support) and route conversations accordingly.
- **Queue & Routing:** Automatically distribute incoming chats to available agents or place users in a waiting line when demand is high.
- **Email Piping:** Seamlessly integrate your email inbox, allowing agents and users to reply to chat messages directly from their email clients.
- **Office Hours:** Define your team’s availability to trigger offline messages or hide the chat widget outside of business hours.
### Departments
Departments give you the power to distribute conversations and assign various agents to specific departments. For example, you can create a department entitled “Sales” and assign specific conversations to that department. To start using departments, follow the steps below:
- Go to **Settings > Miscellaneous** and add, delete and manage the departments. After saving, reload the page.
- Go to **Users > Agents** and edit an agent, you will see a new field where you can set the department of the agent.
- Reload the page and you’re done! In the **Conversations area**, you will now see an option to set the department.
### Departments Settings
- **Display in dashboard** Displays the departments’ list in the chat dashboard and force users to choose a department before starting a conversation.
- **Display images** Displays the department image instead of the department color.
- **Display in conversation list** Displays the department color in the conversation list of the admin area.
- **One conversation per department** Restrict users from opening multiple conversations within the same department, allowing only one conversation to be active per department.
- **Label** Replace the label **Departments** (plural) with another text. The name is displayed in the admin and tickets area.
- **Label single** Replace the label **Department** (singular) with another text. The name is displayed in the admin and tickets area.
- **Dashboard title** Set the title of the chat dashboard list. Default: Departments.
### How it works
- Agents and admins with no assigned department always see the conversations of all departments.
- Agents and admins with an assigned department can only access conversations, users, and agents within that department.
- When a conversation is assigned to a new department, an email notification is sent to all of the agents assigned to the new department.
- The chatbot can assign a department to the active conversation through the [Q&A set data](https://devad.io/help/docs/chat#open-ai-qea) feature, the [flows actions](https://devad.io/help/docs/chat#open-ai-flows) feature, or [Dialogflow actions](https://devad.io/help/docs/chat#dialogflow-actions) .
### How to assign a department to a conversation
You can assign a department to a conversation in several ways:
- Via the [Q&A set data](https://devad.io/help/docs/chat#open-ai-qea) feature.
- Via the [flows actions](https://devad.io/help/docs/chat#open-ai-flows) feature.
- Via **Settings > Miscellaneous > Departments settings > Display in dashboard**. In this case, the user will be required to select a department before starting a new conversation.
- Via **Settings > Automations > More**.
- Via JavaScript, with the variable **var SB_DEFAULT_DEPARTMENT = ID;**. Enter the code into the pages where the chat is displayed and replace ID with the department ID. For more details check the API here.
- Via [API](https://chat.devad.io/docs/api/js) .
### Department linking
If the **Settngs > Slack > Department linking** option is active, when a conversation in the CHAT.devad.io is assigned to a [department](https://devad.io/help/docs/chat#departments) , a new message is sent to the linked Slack channel, informing Slack users that a new conversation has started and inviting them to join the dedicated user Slack channel. However, the full conversation can only be accessed on the dedicated Slack channel of the specific user.
- Get the department IDs from **Settings > Miscellaneous > departments**.
- Get the channel IDs by clicking the button **Get channel IDs**.
---
### Queue and routing
When the queue is activated via **Settings > Miscellaneous > Queue**, or routing is activated via **Settings > Miscellaneous > Routing**, CHAT.devad.io automatically assigns the users conversations to all available agents proportionately.
- Only online agents are counted as “available” agents and will receive new conversations. Conversations are assigned proportionally between all online agents. If no agents are online, the conversation will remain unassigned and will be automatically assigned to the first agent who comes online.
- Admins are not included; admins always see all the conversations.
- Agents must archive a conversation to mark it as completed; this will automatically give them access to the next conversation in the queue. A conversation is active if it’s not deleted, or archived.
- Agents can switch their status between online and offline by hovering over their profile image and then clicking the label of the profile pop-up at the bottom-left of the admin area.
- Agents can only search and filter their conversations.
- Agents can only view their conversations; however, they can see all of the conversations of a single user.
- To enable agents to view all unassigned conversations, activate **Settings > Miscellaneous > Hide conversations of other agents** and **View unassigned conversations**.
- Queue and routing are compatible with the [departments](https://devad.io/help/docs/chat#departments) .
- If [human takeover](https://devad.io/help/docs/chat#human-takeover) is active, the queue or routing is activated only on human takeover.
- When routing or queue is active, the [agents menu](https://devad.io/help/docs/chat#agents-menu-admin) will be automatically enabled.
### More information – Queue only
When the queue is activated users enter into a queue automatically when an agent’s chat limit is reached. When a user enters the queue, a message with the current position in the queue and the estimated waiting time is displayed. CHAT.devad.io automatically assigns the conversations to all available agents proportionately. When an agent marks a conversation as completed (by archiving it), the queue is updated and a new conversation is received.
- If a user is in the queue and leaves (e.g. by closing the browser) for more than 1 minute, the conversation is saved; however, once the user comes back, the queue is reset and the user will lose their previous position. If the user leaves, the conversation remains unassigned and therefore invisible to agents, but only visible to admins.
- You can use the following merge fields in the queue message: **{position}**, **{minutes}**. They will be replaced by the real values in real-time.
- The waiting time is displayed in minutes and is calculated as follows: queue position X response time = waiting time. For example, if a user is 5th in the queue, and the response time has been set to 4 minutes (via Settings > Miscellaneous > Queue), then the total wait time displayed to the user will be 20 minutes.
- When the sound option is active, a sound is played when it’s the user’s turn.
- For conversations started from messaging apps like WhatsApp, it is not possible to respect the limit of conversations per agent, all conversations will be immediately and proportionally assigned to an online agent. If no agents are online, the conversation will remain unassigned and will be automatically assigned to the first agent who comes online.
- Use the [offline message](https://devad.io/help/docs/chat#offline-message) to prevent the chat from showing the queue update message to the user.
To test the queue, follow the steps below:
- To simulate multiple users and agents, open the chat in multiple different browsers (e.g. Opera, Firefox, Brave, Chrome, etc.). Each browser can simulate two users/agents: one in normal mode and one in “private” or “incognito” mode.
- To reset the chat and start a new user session, open the browser console, enter **SBF.reset()**, and press **ENTER**.
### More information – Routing only
When the routing is activated CHAT.devad.io automatically assigns the users conversations to all available agents proportionately.
- If the **Routing > Disable online status check** option is active, the conversations are distributed proportionally among all agents, regardless of whether they are online or offline.
- When an agent comes back online after being offline, all unassigned conversations are automatically assigned to them.
- When routing is active agents can manually route conversations to other agents from the right panel of the conversations area.
- If the conversation is archived and the user reopens it in the future by sending a new message, if the assigned agent in the conversation is offline, the conversation is assigned to another agent.
### Manual routing
When the routing is activated via **Settings > Miscellaneous > Hide conversation of other agents** agents see only their own conversations and can select the unassigned ones.
- **Agents menu**: enable the [agents menu](https://devad.io/help/docs/chat#agents-menu-admin) .
- **Routing if offline**: if the conversation is archived and the user reopens it in the future by sending a new message, if the assigned agent in the conversation is offline, the conversation is assigned to another online if there is at least one, otherwise to no agent.
- **View unassigned conversations**: allow agents to view the unassigned conversations, when an agent replies the conversation is automatically assigned to him and the conversation is removed in real-time from the admin area of the other agents. Check this option to enable the manual routing.
### Agents menu
The Agents menu lets you assign conversations to specific agents. It appears on the right side of the conversations area and is automatically enabled when queueing or routing is active. Select multiple conversations (see [keyboard shortcuts](https://devad.io/help/docs/chat#keyboard) ) to assign the selected conversations to a specific agent.
### Assign an agent to a conversation
You can assign an agent to a conversation in several ways:
- Via the [Q&A set data](https://devad.io/help/docs/chat#open-ai-qea) feature.
- Via the [flows actions](https://devad.io/help/docs/chat#open-ai-flows) feature.
- Via the [queue or routing](https://devad.io/help/docs/chat#queue-routing) features.
- By enabling the **Settings > Chat > Agents menu** option. In this case, the user will be required to select an agent before starting a new conversation.
- Via **Settings > Automations > More**.
- Via JavaScript, with the variable **var SB_DEFAULT_AGENT = ID;**. Enter the code into the pages where the chat is displayed and replace ID with the agent ID. For more details check the API here.
- Via [API](https://chat.devad.io/docs/api/js) .
---
### Email piping
Email piping lets you sync multiple email addresses to receive messages directly in CHAT.devad.io. It also allows you, your agents, and users to reply to chat messages via email.
### **Email piping** Activation
- Go to **Settings > Notifications > Email piping** and enter your POP3/IMAP email server information.
- Go to **Settings > Notifications > SMTP** and enter your SMTP email server information. The email address must be the one to which the email piping server connects to. CHAT.devad.io will send all emails from this email address and you, your agents, and your users will reply to this email address. For more details check the [email notifications](https://devad.io/help/docs/chat#email) section.
### Information
- The email address of **Settings > Notifications > SMTP > Sender email** should match the one used by the email piping server. If the email address does not match, or if multiple email addresses are configured for email piping, and the **Username** setting is defined as an email address, CHAT.devad.io will automatically include a **reply-to** field in the email notification. This ensures that when the user replies, their response is directed to the correct email piping address, keeping the conversation linked properly.
- The **Notifications > User email notifications** and **Notifications > Agent email notifications** settings are enabled automatically when email piping is active. When agents reply in CHAT.devad.io, emails are always sent to the user.
- If you’re using the Artificial Intelligence app, and the [human takeover](https://devad.io/help/docs/chat#human-takeover) feature is activated, no emails are sent if the chatbot knows the answer.
- If the **Convert all emails** option is active:
### Office hours
You can set the office hours timetable from **Settings > Miscellaneous > Office hours**. Office hours are used for:
- Sending the [offline message](https://devad.io/help/docs/chat#offline-message) .
- Disabling and hiding the chat during out-of-office hours.
- Disabling the chatbot during regular office hours and enabling it during out-of-office hours.
### More information
- If a day has only one start and end time, enter them in the first two fields. For example, use **10:00 AM to 5:00 PM and (empty) to (empty)**, not **10:00 AM to (empty) and (empty) to 5:00 PM**.
- Do not leave empty values. Set them to **closed** instead.
- You have to set values to **closed** if you want to set a whole day as not office hours.
- The office hours are in UTC format. Set your UTC from **Settings > Miscellaneous > Timezone**.
- The date and time format of the timetable matchs automatically the one used in the country of the browser language of the user.
### Email, Newsletter, SMS, & Notifications
**Integrations, Tools, and Notifications**
*Guide to syncing newsletters, optimizing chat performance, and configuring email, push, and SMS alerts.*
### Newsletter Setup
Follow the steps below to complete the synchronization with your newsletter service. The user is subscribed in the following cases: [registration form](https://devad.io/help/docs/chat#registration) , [follow-up message](https://devad.io/help/docs/chat#built-in-messages) , [subscribe message](https://devad.io/help/docs/chat#built-in-messages) , [email shortcode](https://devad.io/help/docs/chat#rich-messages) .
### **Mailchimp**
- To get the **Key**, follow the docs at [https://mailchimp.com/help/about-api-keys/](https://mailchimp.com/help/about-api-keys/) .
- To get the **List ID**, follow the docs at [https://mailchimp.com/help/find-audience-id/](https://mailchimp.com/help/find-audience-id/) .
### **Brevo**
- To get the **Key**, go to [https://account.brevo.com/advanced/api](https://account.brevo.com/advanced/api) .
- To get the **List ID**, go to [https://my.brevo.com/lists](https://my.brevo.com/lists) .
### **SendGrid**
- To get the **Key**, go to [https://app.sendgrid.com/settings/api_keys](https://app.sendgrid.com/settings/api_keys) .
- To get the **List ID**, enter in SendGrid and click **Marketing > Contacts**([https://mc.sendgrid.com/contacts](https://mc.sendgrid.com/contacts) ), then click on a list, or create a new one. The last part of the URL is the list ID. Ex. https://mc.sendgrid.com/contacts/lists/8558c1e7-3c99-4428-a68f-78df2e437f8e (the list ID is 8558c1e7-3c99-4428-a68f-78df2e437f8e).
### **Elastic Email**
- To get the **Key**, enter in Elastic Email, then click **Settings** from the top right profile menu. Click **Create Additional API key** ([https://elasticemail.com/account#/settings/new/create-api](https://elasticemail.com/account#/settings/new/create-api) ), set a name and choose **Plugin** or **Full access**, or **Custom** and make sure the permission **Contacts** is set to **View & Modify**.
- The **List ID** is the list name. Important! Existing list’s or segment names must not have any spaces in them.
### **Campaign Monitor**
- To get the **Key**, enter in Campaign Monitor, then click **Account settings** from the top right profile menu. Click **API keys > Generate API key**.
- To get the **List ID**, enter in Campaign Monitor, then click **List and subscribers** from the top menu. Select a list and then click **Settings** from the left menu and copy the **List API ID**.
### **HubSpot**
- To get the **Key**, enter in HubSpot, then get go to **Settings > Integrations > Private apps** and create a new app.
- Enter **app name**, then open the **Scope** tab and add the following scopes: **crm.lists.write**, **crm.lists.read**, **crm.objects.contacts.read**, **crm.objects.contacts.write**.
- Click **Create app** and copy the token. Paste the token into the **Key** field of CHAT.devad.io.
- To get the **List ID**, enter in HubSpot, then get it from **Contacts > List > List details**.
### **Moosend**
- To get the **Key**, enter in Moosend, then click **Settings > API key**.
- To get the **List ID**, enter in Moosend, then get it from **Audience > Email lists**.
### **GetResponse**
- To get the **List ID**, enter in GetResponse, then get it from **Lists > Your list > Settings**(https://app.getresponse.com/lists). Copy the **List token** value.
- To get the **Key** visit [https://app.getresponse.com/api](https://app.getresponse.com/api) .
### **ConvertKit**
- To get the **Key**, enter in ConvertKit, then get it from **Settings > Advanced > API secret**.
- To get the **List ID**, enter in ConvertKit, then get it from **Grow > Landing Pages & Forms**. Open you form and copy the numeric part of the URL. For example the ID of the form with URL **https://app.convertkit.com/forms/designers/3003412/edit** is **3003412**.
### **ActiveCampaign**
- To get the **Key**, enter in ActiveCampaign, then get it from **Account settings > Developer**.
- To get the **List ID**, enter in ActiveCampaign, then get it from **Left menu > Lists** or **Left menu > Contacts > Lists**. Open your list and copy the list ID in the URL. For example the ID of the list with URL
### **MailerLite**
- To get the **Key**, enter in MailerLite, then get it from **Left menu > Integrations > MailerLite API**.
- To get the **List ID**, enter in MailerLite, then get it from **Left menu > Subscribers > Groups**. View a group and copy the Group ID from the URL (e.g. **….group=18783408688903967…**).
### **Mailjet**
- To get the **Key**, visit [https://app.mailjet.com/account/apikeys](https://app.mailjet.com/account/apikeys) , or enter in Mailjet, then get it from **Account settings > Account settings**.
- To get the **List ID**, enter in MailerLite, then get it from **Contacts > Contacts lists > Your list**. Get the List ID by clicking the **?** icon next to the lists’s email, e.g. 1202546.
### **Sendy**
- To get the **Key**, enter the Sendy settings area and copy the API KEY.
- To get the **List ID**, enter your brand, then click **View all lists** and copy the list ID. The list ID setting must also include your Sendy full URL. Enter the URL plus the list ID spearated by the char **|**, e.g. https://example.com|TDf6o892Mx11VXGC51ui567u.
### **SendFox**
- To get the **Key**, enter in SendFox, then get it from **Settings > API > Personal Access Tokens**.
- To get the **List ID**, enter in SendFox, then get it from **Audience > Lists**. Open a list and copy the ID from the URL (e.g. the List ID of the URL **https://sendfox.com/dashboard/lists/489151/contacts** is **489151**).
---
- Log in to AWS as the root user from [https://aws.amazon.com/](https://aws.amazon.com/) .
- Enter the **IAM** dashboard and click **Left menu > Access management > Users**.
- Click **Add new user**, enter the username and continue.
- Select **Add user to group** and on the **User groups** section below click **Create group**. In **Permissions policies** search for **AmazonS3FullAccess** and select it. Click **Create user group**.
- Assign the new group to the user you are creating and continue, then click **Create user**.
- Select the newly created user and open the **Security credentials** tab.
- In the **Access keys** area, click **Create access key** and select **Application running outside AWS**. Continue until you get the keys and save them in **CHAT.devad.io > Settings > Miscellaneous > Amazon S3**.
- Visit the **Amazon S3** dashboard and click **Create bucket**.
- Set the bucket name and region you want. Save the region and name in **CHAT.devad.io > Settings > Miscellaneous > Amazon S3**. Check **ACLs enabled** and **Bucket owner preferred**. Uncheck **Block all public access** and all related checkboxes.
- Click **Create bucket**.
- This feature is technical and optional. Support does not cover any help related to this feature.
- Be aware that it may take up to 24 hours for a newly created bucket to become active. If you have recently created an S3 bucket and it is not working, wait for 24 hours and try again.
---
### More settings
### **Saved replies**
Saved replies, also known as canned messages, refer to a collection of pre-written messages that agents can quickly access and employ in the chat editor. Manage them from **Settings > Admin > Saved replies**.
- Saved replies can be printed by typing **#** followed by the **saved reply name**, plus a **space**.
- The saved replies pop-up can be opened by typing **##**.
- Use **n** to do a line break.
- If you are using the Dialogflow chatbot, the saved replies panel search will include results from Dialogflow Intents.
- You have the option to add all Dialogflow Intents to the saved replies list by using the option at **Settings > Artificial Intelligence > Google > Add Intents to saved replies**.
---
### Pusher
Activate Pusher from **Settings > Miscellaneous > Pusher** to use the WebSockets instead of HTTP AJAX requests for the chat functionalities. WebSockets drastically improve the chat performance by removing the need for repeated AJAX requests to your server for checking for new messages and conversations. WebSockets also improve responsivness of the chat: faster messages delivery, more accurate online and typing status, more accurate online users list and more. If you are using the [cloud version](https://devad.io/help/docs/chat#cloud-version) , this setting is automatically activated.
### **Activation**
- Go to [https://dashboard.pusher.com/accounts/sign_up](https://dashboard.pusher.com/accounts/sign_up) and create a new account.
- From your dashboard at [https://dashboard.pusher.com](https://dashboard.pusher.com/) , choose the **Channels** product by clicking **Get started**. [](https://devad.io/help/media/docs/pusher-1.jpg)
- Enter the name of your app and choose the cluster closest to your location. [](https://devad.io/help/media/docs/pusher-4.jpg)
- From the left menu of the dashboard click **App Settings** and enable **client events**. [](https://devad.io/help/media/docs/pusher-6.jpg)
- From the left menu of the dashboard click **Keys**, copy **App ID**, **Key**, **Secret**, **Cluster**. [](https://devad.io/help/media/docs/pusher-5.jpg)
- Go to **Settings > Miscellaneous > Pusher**, and paste app ID, key, secret, cluster.
- You’re done.
### **Information**
- Pusher is free to use for up to 200k messages and 100 concurrent connections per day. Messages are used for the following functions and more: user registration, online user status, chat messages, and chatbot messages. Pusher channels count calculation is explained [here](https://support.pusher.com/hc/en-us/articles/4412259287569-How-Is-My-Message-Count-Calculated-In-Channels-) .
- When Pusher is active the following AJAX requests are replaced by WebSockets: checking for new messages, checking for new conversations, online/offline status, typing status, online users list.
- When Pusher is active the **last activity** value of users and agents is updated only on page load or when they send new messages.
- When Pusher is active the option **Settings > Users > Register all visitors** is automatically activated and it can not be disabled.
- If your server becomes overloaded, crashes, experiences excessive RAM usage, high CPU usage, or in general, slows down or has performance issues, activate Pusher.
---
### Direct messages
Direct messages allow you to send а single chat message, email, or text message, to a single user or several users. Read the information below to understand how it works.
- To send a message go to the **Users** area and click the direct message icon. Direct message buttons are also available in the profile box of the user.
- To send a message to all users, enter **All** in the **User IDs** field.
- To send a message to a group of users, enter their IDs in the **User IDs** field. You can check the users and then click the direct message icon to enter the IDs automatically.
- All message types support [merge fields](https://devad.io/help/docs/chat#merge-fields) .
- All message types support [automatic translation](https://devad.io/help/docs/chat#google-translation) .
### Direct chat message
- The chat message is sent to the active conversation, if any, otherwise to a new conversation.
- If the **Settings > Notifications > User email notifications** option is active, all users with an email are notified via email.
- If the **Settings > Notifications > Text message notifications > Active for users** option is active, all users with a phone number are notified via text message.
- If the **Settings > Notifications > Push notifications** option is active, a push notification is sent to all users.
- The message is also sent to messaging apps such as WhatsApp and Messenger if the user is connected to them.
- To send a message to all users of a single messaging app enter one of the following strings: **whatsapp**, **messenger**, **instagram**, **telegram**, **twitter**, **zalo**, **wechat**, **viber**, **line**. Enter **tickets** to send a message only to the users who created a CHAT.devad.io ticket via the Tickets app.
### **Direct email**
- Email header and email signature are automatically included in all emails, set them from **Settings > Notifications**.
- The HTML language is supported.
- The subject supports merge fields.
### **Direct text messages**
- To enable direct text messages you must enable the SMS in **Settings > Notifications > Text message notifications**.
### Direct WhatsApp template messages
### Notifications
To understand how notifications work and when they are sent read the information below. If you think notifications are not working, most probably you’re just testing them in the wrong way, please read the information below before asking for support.
---
### Email notifications
Both agents and users can receive an email notification when a new message is received.
---
### **Email notifications for admin and agents**
- When a user sends their first message, if the conversation is assigned to a [department](https://devad.io/help/docs/chat#departments) , an email is sent only to the agents assigned to that department, if the conversation is assigned to a specific agent, an email is sent only to that agent, otherwise an email is sent to all agents who are not online at the moment. Subsequent emails are sent only to the last agent in the conversation.
- Email notifications are sent only if the last agent in the conversation is offline.
- If you’re using the Artificial Intelligence app, and the [human takeover](https://devad.io/help/docs/chat#human-takeover) feature is activated, no emails are sent if the chatbot knows the answer.
- To prevent admins from receiving email notifications check **Settings > Notifications > Do not send email notifications to admins**.
### **Email notifications for users**
- When an agent sends a message to a user, an email is sent to the user only if the user is offline.
- Only 1 email is sent. Subsequent messages will not trigger a new email alert.
### **Create the email**
To manage the emails and create the contents go to **Settings > Notifications**. You can use text and HTML. New lines are automatically converted to ** **. You can use the following merge fields in the email. Merge fields are automatically replaced with the updated information.
---
| Merge field | Description |
| --- | --- |
| | The name of the user or agent who is receiving the email. |
| | The name of the user or agent who was sending the message that triggered the email notification. |
| | The profile image of the user or agent who was sending the message that triggered the email notification. |
| | The links to any attachments that were part of the message that triggered the email notification. |
| | The emails attachments. |
| | A link to open the conversation in the admin area. This merge field is only available for agent’s emails. |
| | The conversation ID. |
---
### Push notifications for admin and agents
- When an agent click the notification the admin area is open and the right conversation is selected. If the admin area is already open the notification will not open a new tab.
- When a user sends their first message, a Push notification is sent to all validated agents; subsequent notifications are sent only to the last agent in the conversation.
- If you’re using the Artificial Intelligence app, and the [human takeover](https://devad.io/help/docs/chat#human-takeover) feature is activated, no notifications are sent if the chatbot knows the answer.
- If you’re using the WordPress version, Push notifications are not supported in the WordPress admin area, you need to access the CHAT.devad.io admin area directly, more details [here](https://devad.io/help/docs/chat#pwa) .
- If the **Routing** setting is active, only the agent assigned to the conversation receive the notification, admins see all conversations but don’t receive notifications.
- If [queue or routing](https://devad.io/help/docs/chat#queue-routing) settings are active, only the agent assigned to the conversation receive the notification. Notifications are not sent for messages sent by the user while waiting in queue. Admins see all conversations but don’t receive notifications.
- If a user conversation is assigned to a [department](https://devad.io/help/docs/chat#departments) , only the agents assigned to that department receive the notification.
- If a user conversation is not assigned to any [department](https://devad.io/help/docs/chat#departments) , only agents with no assigned department receive the notification.
- Notifications are sent only if the last agent in the conversation is offline.
- If [human takeover](https://devad.io/help/docs/chat#human-takeover) is active, no notifications are sent if the chatbot knows the answer.
- If Push notifications are not working, make sure you allowed the notifications, in Chrome you can check this from **Privacy and Security > Site settings > Notifications**. If they don’t work on a mobile device, try these steps too: install the PWA or delete it and install it again, restart the mobile device.
- If you are using Chrome, to enable Push notifications also when the tab is closed you must enable the **Continue running background apps when Google Chrome is closed** option from **Chrome > Setting > System (chrome://settings/system)**.
- If Push notifications are not working, make sure that the conversation is not assigned to a specific agent or a wrong agent ID. Click [here](https://devad.io/help/docs/chat#agent-assignment) for more details.
- If Push notifications are not working, and you are using Windows, ensure that the notification feature is not being blocked by Windows. To do this, click on the **Start** button and search for **Notifications**. Then, open the **Turn app notifications on or off** option and verify that your browser is not being blocked.
- If Push notifications are not working, ensure that the CHAT.devad.io admin area is not visible and open. If the admin area is open, please minimize it or open another window or browser tab.
- If Push notifications are not working, your system might be blocking them. If you are using Windows 10+ check [this link](https://www.makeuseof.com/ways-fix-notification-banners-not-working-windows-10/) . If you are on Mac check [this link](https://www.makeuseof.com/fixes-for-mac-not-getting-notifications/) . For all devices also check [this link](https://documentation.onesignal.com/docs/notifications-show-successful-but-are-not-being-shown) .
---
### Desktop notifications
### **Desktop notifications**
- Desktop notifications are not sent if the user is viewing a page with include the chat (the user browser is open and visible, and the active page contains the chat).
- Desktop notifications are not supported on iPhone and iOS devices.
- Desktop notifications work only for secure URLs that use HTTPS (not HTTP). Your CHAT.devad.io admin URL must use HTTPS.
- When Push notifications are active, they replace desktop notifications.
- If desktop notifications aren’t working, try the solutions in the [Push notifications section](https://devad.io/help/docs/chat#push) .
---
### SMS (Text message) notifications
Both agents and users can be notified via text message when a new message comes in. Text message notifications are provided by Twilio. Twilio is a paid service, but it is cheap, and you can use the trial version to test text message notifications for free. Text messages sent to your Twilio phone number can also be received in CHAT.devad.io. This allows you to chat with users via SMS in a true two-way messaging experience. More details below.
### **Activation**
- Go to [https://www.twilio.com](https://www.twilio.com/) and create a new account.
- Verify your phone number. [](https://devad.io/help/media/docs/sms-1.jpg)
- Complete the form and choose **SMS**. [](https://devad.io/help/media/docs/sms-2.jpg)
- Once into the dashboard, click **Get a Trial Number**, then **Choose this number**. [](https://devad.io/help/media/docs/sms-3.jpg)
- Enter the CHAT.devad.io admin area, go to **Settings > Notifications > Text message notifications**, and paste account SID, auth token, trial number (or a purchased phone number). Find all details in the [Twilio dashboard](https://www.twilio.com/console) .
- If you’re using the trial version, you can send notifications only to verified numbers. Enter the Twilio dashboard and click the left button **# (Phone Numbers)**, then click **Verified Caller IDs** and add your phone number. [](https://devad.io/help/media/docs/sms-4.jpg)
- To start using the service live and to receive text messages in CHAT.devad.io you need to purchase a phone number. After the purchase go to **Phone numbers > Manage > Active numbers**, click your number, and enter the URL of CHAT.devad.io, get it from **CHAT.devad.io > Settings > Notifications > Text message notifications > Get configuration URL**. [](https://devad.io/help/media/docs/sms-5.jpg)
- You’re done.
### **Information**
- Ensure that your agents and admins are assigned a phone number so that agent text messages can be sent to the appropriate numbers.
- All phone numbers must have the country code starting with the symbol **+** (eg. +15558675310).
- You can get the user’s phone number via [registration form](https://devad.io/help/docs/chat#registration) , follow-up message, or via **[email]** shortcode. You can manually enter the user phone from the admin area or via API.
- When a user sends their first message, if the conversation is assigned to a [department](https://devad.io/help/docs/chat#departments) , a test message is sent only to the agents assigned to that department, if the conversation is assigned to a specific agent, a text message is sent only to that agent, otherwise an text message is sent an email is sent to all agents who are not online at the moment. Subsequent text messages are sent only to the last agent in the conversation.
- Text message notifications are sent only if the last agent in the conversation is offline.
- If you’re using the Artificial Intelligence app, and [human takeover](https://devad.io/help/docs/chat#human-takeover) is active, no text messages are sent if the chatbot knows the answer.
- To use the Sender ID feature enter the sender name in the **Sender number** field.
---
### Sound notifications
- When **Settings > Notifications > Sounds** are enabled, a sound will play whenever a new message or conversation is received.
- Audio will only play when the user or agent engages with the document by clicking somewhere in the admin area or on the page displaying the chat widget. This is because of a security feature of the browsers.
- If the sound is set to **repeat**, it will loop as long as the admin area or the chat widget page is not open or minimized. If the the admin area or the chat widget page is open and visible, you will not hear the sound.
---
### Language and Translations
### **Managing Languages and Translations**
effective communication requires speaking your user’s language. In this section, you will learn how to set up CHAT.devad.io to automatically detect user preferences or force specific language settings via URL parameters and WordPress configurations. We also explain how to translate knowledge base articles, customize specific text strings, and even add support for entirely new languages by editing system files.
### Language Settings
- You can add new article translations by opening an article. Click the **+** icon on top right and select the language you want to translate the article into. To delete a translation, hover the language flag icon and click the **trash** icon.
- You can add new category translations by opening a category. Click the **+** icon on top right and select the language you want to translate the category into. To delete a translation, hover the language flag icon and click the **trash** icon.
- You can enable automatic translation of articles and categories by activating both the [multilingual via translation](https://devad.io/help/docs/chat#multilingual-via-translation) feature and **Settings > Articles > Language > Automatic translation**. You also have to set the default language of your articles from **Settings > Articles > Language > Default language**. The language used for the automatic translation is the user’s language detected by CHAT.devad.io. You can also force a specific language by adding the URL parameter **lang=LANGUAGE-CODE**.
- The language menu is shown at the bottom of the article. It shows all the available translations of the article.
- If there is at least one translated article in the user’s language, only the translated articles are displayed in the category page or main page. Otherwise, all articles are displayed in the original language.
- Force the articles page to be shown in a specific language by adding the URL parameter **lang=LANGUAGE-CODE**. Replace **LANGUAGE-CODE** with the two-letters language code.
### More information
- If you use categories, all the articles must be assigned to a category.
- You can create an internal chat link to an article with the [button rich message](https://devad.io/help/docs/chat#rich-messages) .
- You can create a link to a specific article with the URL attribute **article=ID**, replace **ID** with the article ID. Example: [https://chat.devad.io/articles-demo?article=Ucsx6](https://chat.devad.io/articles-demo?article=Ucsx6) .
- You can create a link to an article category with the URL attribute **category=ID**, replace **ID** with the category ID. Example: [https://chat.devad.io/articles-demo?category=LnNaZ](https://chat.devad.io/articles-demo?category=LnNaZ) .
- The articles are always included into the training of your [OpenAI](https://devad.io/help/docs/chat#open-ai) chatbot. If you update an article, you’ll need to train the chatbot again, the process isn’t automatic.
- If some block is not saved, e.g. text block, disable all browser extentions and try again.
- To hide the chat widget insert the following code into the articles page:
~~~
~~~
.
---
### Language and translations
CHAT.devad.io is fully multilingual and provides powerful features to detect the user’s language on the fly.
### Chat language
CHAT.devad.io is already translated into 45+ languages. There are many options available to set the language:
- **OPTION 1** Go to **Settings > Chat** and check the **Language** option. Set it to **multilingual** to automatically use the chat language of the user’s browser or the language saved in the user profile.
- **OPTION 2** Add the URL parameter **lang=LANGUAGE-CODE** to the script that loads the chat, replacing “LANGUAGE-CODE” with the two-letters language code you would like to display. E.g. or **https://chat.devad.io/account/js/init.js?id=YOUR-CHAT-ID&lang=es** for the [cloud version](https://devad.io/help/docs/chat#cloud-version) . This feature will force the chat to always use the same language and the **Settings > Chat > Language** option will be ignored. Go to [wikipedia.org/wiki/List_of_ISO_639-1_codes](https://en.wikipedia.org/wiki/List_of_ISO_639-1_codes) for the complete languages code list (see column 639-1). For Traditional Chinese use **zt**, for Simplified Chinese use **zh**, for Brazilian Portuguese use **pt**.
- **OPTION 2 – WORDPRESS ONLY** Go to **Settings > WordPress** and set the option **Force language**. This feature will force the chat to always use the same language and the **Settings > Chat > Language** option will be ignored.
- **OPTION 3 – WORDPRESS ONLY** The WordPress version of CHAT.devad.io uses the default language of the WordPress installation; or the language of the current page or post if the website is multilingual. This feature is compatible with WPML, Polylang, and other multilingual plugins. This feature is automatically disabled if the **Settings > Chat > Language** option is active.
### Admin language
To translate the admin area follow the steps below:
- Translate the texts in your language from the **Settings > Translations**.
To set the admin area language you have three options:
- Activate the option **Settings > Admin > Automatically translate admin area**. This feature automatically translate the admin area to match the agent profile language or the agent browser language.
- Edit the file **config.php** inside your CHAT.devad.io installation directory and Enter the code **define(‘SB_ADMIN_LANG’, ‘LANGUAGE-CODE’);** at the end of the file content. Replace **LANGUAGE-CODE** with the language code of the language you want to use, use only 2 letters, for example, insert only **es**, not **es_ES**. This option is not available in the [cloud version](https://devad.io/help/docs/chat#cloud-version) .
### Chatbot and message translations
To automatically translate chatbot messages and other texts, use the Artificial Intelligence app and follow the steps outlined [here](https://devad.io/help/docs/chat#google-multilingual) .
### Edit and add new translations
You can translate almost any custom content like [rich messages](https://devad.io/help/docs/chat#rich-messages) , [built-in messages](https://devad.io/help/docs/chat#built-in-messages) , [departments](https://devad.io/help/docs/chat#departments) , chat header, and more. To add a new translation or edit and existing translation, follow the steps below:
- Go to **Settings > Translations**, if you want to add a new translation, click **New translation**.
- Enter the English content you wish to translate in the first field. The original text must be in English. If the original text has breaklines, replace them with the **n** code.
- Enter the corresponding translation in the second field. To add breaklines, use the **n** code.
- If you have the artificial intelligence app you can also translate all contents to any language automatically through the [multilingual via translation](https://devad.io/help/docs/chat#multilingual-via-translation) feature.
### Add a new language
To add a new language, follow the steps below:
- Via FTP or a File Manager, go to **scriptresourceslanguagesfront**.
- Duplicate (copy and paste it in the same directory) the **scriptresourceslanguagesfrontsource.json** file.
- Rename the file with the language code you would like to add. Go to [wikipedia.org/wiki/List_of_ISO_639-1_codes](https://en.wikipedia.org/wiki/List_of_ISO_639-1_codes) for the complete languages code list (see column 639-1).
- Go to **Settings > Translations** and the new language should appear automatically.
To add a new language for the admin area, follow the exact same steps, but use folder **admin** instead. New languages will not be lost or deleted on plugin updates.
### More Information
- If a translation string is missing, add it by clicking the button **Add new translation**.
- If a translation string is not working, make sure to remove all white spaces and break lines at the start and the end of the string.
- The translations edits are not saved in the database but directly in the translation files. When a translation is edited, and saved, a backup is created into the **uploads** folder. The backup is restored automatically on plugin update and plugin activation.
- Some special chars like **&** are replaced by the HTML equivalent code (see [https://www.w3schools.com/html/html_entities.asp](https://www.w3schools.com/html/html_entities.asp) ). Ex. **&** is replaced by **&**.
- You can add missing translation strings also by code. Edit the language files located in **scriptresourceslanguages**. After editing a file, the new strings will be visible under **Settings > Translations**. Remember to click **Save changes** in order to preserve your translations and avoid losing them when CHAT.devad.io is updated.
### Multilingual chatbot
The feature **Artificial Intelligence > Google > Multilingual** checks if there is a Dialogflow agent in the user’s language and activate it.
- For this feature to work the user language must be know. The user language is based on the language user detail of the user if set, otherwise on the user browser language. The language can also be detected with the [language detection](https://devad.io/help/docs/chat#language-detection) feature.
---
### Automatic translation
The automatic translation feature automatically translates user messages into agent language and agent messages into user language. To enable it check the option **Settings > Artificial Intelligence > Automatic translation**. If you are using the [cloud version](https://devad.io/help/docs/chat#cloud-version) and **Artificial Intelligence > Google > Sync mode** is set to **Automatic**, the multilingual features will work automatically. Otherwise you have to complete the [synchronization](https://devad.io/help/docs/chat#google-sync) and the setup below. The [multilingual via translation](https://devad.io/help/docs/chat#multilingual-via-translation) and [language detection](https://devad.io/help/docs/chat#language-detection) features also require these steps.
### **Cloud Translation** Setup
- Log in to [https://console.cloud.google.com](https://console.cloud.google.com) with your Google account and select the project of your Dialogflow Agent.
- On the top search bar type **cloud translation**, select the **Cloud Translation API** service and enable it. Please note that this is a paid service with a free tier, additional charges may occur.
- Enable the billing by clicking **Left menu > Billing** and by enabling a billing account with a valid payment method.
### More Information
- The user messages in the admin area are translated automatically in real-time to match the agent language.
- The agent messages are translated automatically in real-time to match the user language.
- Agents can view the original message by opening the message menu and by clicking **View original message**.
- The agent language is based on the **language** user detail of the agent if set, otherwise on the browser language, or admin area language.
- The user language is based on the **language** user detail, if set, otherwise on chat language, if set, otherwise on the browser language. The language can also be detected with the [language detection](https://devad.io/help/docs/chat#language-detection) feature.
- The notifications are also translated.
- To avoid translating a string, enclose it with the characters **`** or **“`**.
### Multilingual via translation
The feature at **Settings > Artificial Intelligence > Multilingual via translation** automatically translates user messages into the default language of Dialogflow or OpenAI, and translates Dialogflow or OpenAI messages into the language spoken by the user. Additionally, this feature translates all text displayed within the chat, such as the chatbot’s [rich messages](https://devad.io/help/docs/chat#rich-messages) , [articles](https://devad.io/help/docs/chat#articles) , [registration forms](https://devad.io/help/docs/chat#registration) , and [pop-up](https://devad.io/help/docs/chat#built-in-messages) notifications. To enhance performance and minimize translation costs, the translations are automatically integrated into the translation files. Combine this feature with the [language detection](https://devad.io/help/docs/chat#language-detection) feature for optimal results.
- If English is one of the languages, English must be the default language, the original texts must be in English.
- If you are using OpenAI with [training data](https://devad.io/help/docs/chat#open-ai-training) , set the default training data language under **Settings > Artificial Intelligence > OpenAI > Training Sources Language**. Leave it as **default** if the training data default language is in English.
### Language detection
Detect the language of the user’ messages and change the user language and Dialogflow agent language accordingly, if available, otherwise, show a fallback message. You can use the following merge fields in the message: **{language_name}**.
- The user message must be at least 2 words long.
- Language detection is executed only for the first 2 user messages of a conversation.
- As long as the OpenAI chatbot is operational and programmed to respond to generic inquiries, the fallback message will never be dispatched, since OpenAI will consistently provide answers to any use message.
- The supported AI features include **language detetction**, **spelling correction**, **multilingual via translation**, **Google search**.
---
### Mobile App & Other Settings
This section contains help for This section contains help for Mobile App and other features not listed above.
---
### Progressive Web App
The CHAT.devad.io admin area is a PWA, which means that you can install it on desktop, Mac, iPhone, or mobile devices and use it like a fully-functional app. Note: This feature is optimized for Google Chrome and Safari. The PWA is supported on all versions of CHAT.devad.io.
### **Desktop installation**
Enter in your admin area (e.g. https://chat.devad.io), and click the **+** icon on the top right of the URL bar of your Chrome browser. If you are using the WordPress version see the information below. [](https://devad.io/help/media/docs/pwa.jpg)
### **Mobile installation – Android – Cloud version only – Not recommended**
If you are using the [cloud version](https://devad.io/help/docs/chat#cloud-version) of CHAT.devad.io on Android you can use the apps available on Google Play. We recommend using the PWA instead of the Android app to have the latest features and updates.
[Google Play](https://play.google.com/store/apps/details?id=chat.devad.io.cloud.twa)
### **Mobile installation – Android and Windows – All versions**
- Enter in your admin area with Google Chrome (https://chat.devad.io/)
- Open your browser’s settings.
- Scroll down and tap **Add to Home screen.**
- Confirm by tapping Add.
### **Mobile installation – iPhone or Mac – All versions**
- Enter in your admin area with Safari ( https://chat.devad.io/)
- Press the **Share** button and select **Add to Home Screen** from the popup.
- Tap **Add** in the top right corner to finish installing the PWA.
---
---
### Keyboard shortcuts
Admin area keyboard shortcuts are enabled on both PC and MAC and work as follows:
| Shortcut | Description |
| --- | --- |
| or | Confirm or close a dialog alert; the same as clicking OK. |
| or | Decline a dialog alert and close it. |
| SHIFT + ENTER or | Add a line break to a message. This only works for the admin editor. |
| | Close a lightbox. |
| | In the admin conversations area, archive a conversation, or delete it. |
| | In the admin conversations area, navigate between the conversations of the list. |
| | In the admin users area, navigate between the users. |
| | Paste an image from the clipboard and send it as message. |
| | To select multiple conversations in the conversations list of the admin area, hold down the CTRL key while clicking each one. You can then perform bulk actions like archiving, deleting, marking as read or unread, and more on all selected conversations. |
### URL parameters
### **Front-end chat**
URL parameters allow the chat to perform specific actions on page load. To use them, append the URL parameters below to any URL on your website that displays the chat. Ex. https://example.com/?conversation=1234
| URL parameter | Description |
| --- | --- |
| | Login an existing user. Replace TOKEN with the user’s token. Get it from the user’s profile box in the admin area. |
| | Open a conversation. Replace ID with the conversation ID. The attribute token is required for not logged in users. |
| | Open the chat. |
### **Admin area**
URL parameters allow the administration area to perform specific actions on page load. To use them, append the URL parameters below to your admin URL. Ex. **https://chat.devad.io/?conversation=1234**.
| URL parameter | Description |
| --- | --- |
| | Open a conversation of the conversations area. Replace ID with the conversation ID. |
| | Open the profile box of a user. Replace ID with the user ID. |
| | Open a setting of the settings area. Replace ID with the setting ID. |
| | Open a report of the reports area. Replace ID with the report ID. |
| | Open an area of the admin. Replace name with: conversations, users, settings, reports. |
| ?login_email=email&login_password=password | Login an existing agent or user automatically. Replace email with the account email and password with the account password. |
### Logs
- You can enable the log file from **Settings > Miscellaneous > Logs**. This feature is not available in the [cloud version](https://devad.io/help/docs/chat#cloud-version) .
- The log file is saved in the CHAT.devad.io installation directory.
- The logs record the following actions of agents and administrators: message sent, message deleted, conversation archived, conversation deleted, conversation restored, conversation assigned to an agent, conversation assigned to a [department](https://devad.io/help/docs/chat#departments) , user updated, user deleted.
### Security
Security is critical here at CHAT.devad.io. We work with security experts who perform periodic security audits. We continually implement the latest security technologies and stay up-to-date on the latest security threats. Find below some of the security measures that have been implemented in CHAT.devad.io.
### **IP ban**
CHAT.devad.io permits a maximum of 10 unsuccessful login attempts within an hour. In case the limit is exceeded by a user, admin, or agent, they will be unable to access their account or the admin area for a period of 1 hour. This blocking mechanism is based on the user’s IP address and serves to deter brute force attacks aimed at uncovering login credentials. If you encounter the “Too many login attempts. Please retry again in a few hours.” error, you have two options: either wait for a few hours or make changes to the CHAT.devad.io database by deleting the **ip-ban** row from the **sb_settings** table.
### **XSS injection protection**
To prevent XSS injection protection attacks, all sensitive user inputs undergo sanitization.
### **Cross-Site Request Forgery (CSRF) protection**
To prevent CSRF attacks, all requests are validated by checking the login cookie and the client-side login string.
### **Active sessions termination on user update**
Whenever the password or the details for an admin or agent is changed, all active sessions are automatically logged out when sensitive operations are executed or after 1 hour.
### **AES-256-bit encryption**
We use 256-bit AES encryption to encrypt sensitive data such as active session login data.
### **Password by filename protection**
CHAT.devad.io ensures that all uploads are renamed with a random alphanumeric string prepended to the original file name to prevent discovery of the URL and unauthorized download of the uploaded file. Kindly note that, for this feature to function properly, your server must prohibit directory listing.
---
### Performance
CHAT.devad.io is one of the fastest support systems on the market. Its JavaScript and CSS file sizes are significantly smaller than those of most competitors, ensuring faster load times. Server-side performance is equally impressive. The system is extremely lightweight, built without frameworks or unnecessary code. It’s modular, minimal, and fully optimized for maximum performance. Nevertheless, you can further improve performance from **Settings > Miscellaneous > Performance optimization**. Below is a description of each available optimization setting.
- **Minify JS**: Enable loading of minified JavaScript and CSS files for the front-end chat widget to reduce file size and improve loading speed.
- **Disable reports**: Disable the reports area and stop recording report data. This prevents the system from consuming resources to collect and store report-related information.
- **Disable articles**: Disable the articles area and article functionality. This reduces resource usage by preventing the system from loading articles on both the admin and client sides.
- **Archive old messages**: Move messages older than the specified interval to a dedicated database backup table. Archived messages and their associated conversations will no longer appear in the admin or user conversation areas. However, if a user sends a new message in the future, the system will automatically restore the conversation and its message history. You can also manually access and restore archived conversations at any time by opening the user’s profile and selecting the archived conversation. Activate this feature if you handle a large volume of messages (in the millions). It will drastically improve performance.
---
### Customization
You can fully edit the source code of CHAT.devad.io Web and WordPress versions. See the [terms of service](https://devad.io/help/terms-of-service) for more details. The cloud version source code is not editable, but you can customize it by using the [JavaScript API](https://devad.io/help/docs/api/js) and the [Web API](https://devad.io/help/docs/api/web) , or with JavaScript and CSS. The chat widget does not use an iframe, so you can easily customize it with JavaScript and CSS.
### Hire us
If you want us to customize CHAT.devad.io for you, please contact us and send us your requirements. We will provide you with a quote based on the complexity of the work. Our hourly rate is 25 USD. Contact us throught the chat here on the right bottom corner of the page or use the Devad contact page. We usually reply within 24 hours.
### Miscellaneous: More Features & settings
Unlock the full potential of your support system with these advanced configuration options. Beyond the basics, CHAT.devad.io offers a suite of powerful tools designed to enhance accessibility, security, and performance. This guide covers how to deploy the Progressive Web App (PWA) for a native-like experience, utilize keyboard shortcuts for rapid management, and configure URL parameters for dynamic automation. Additionally, we will explore the robust security protocols—including IP banning and AES-256 encryption—that protect your data, alongside performance tuning options to ensure lightning-fast load times.
### Progressive Web App (PWA)
The CHAT.devad.io admin area functions as a Progressive Web App (PWA). This technology allows you to install the administration panel directly onto your desktop, Mac, iPhone, or mobile device, enabling you to use it just like a fully functional native application. By installing the PWA, you gain faster access to your chats and a more immersive interface without needing to open a browser tab every time.
**Note:** This feature is fully supported on all versions of CHAT.devad.io and is optimized specifically for Google Chrome and Safari browsers.
**Recommendation regarding Android Apps:**If you are using the cloud version of CHAT.devad.io on Android, apps are available on Google Play. However, we strongly recommend using the PWA instead of the native Android app to ensure you always have the latest features and instant updates.
Desktop Installation
Android & Windows
iPhone & Mac
To install on a desktop environment using Chrome:
- Navigate to your admin area URL (e.g., `https://chat.devad.io`).
- Look for the **+ (plus) icon** on the right side of the URL address bar.
- Click the icon to install.
If you are using the WordPress version, simply follow the specific browser prompts for installing the current page as an app.
For Android mobile devices and Windows environments (all versions):
- Open Google Chrome and enter your admin area URL (e.g., `https://www.your-site.com/script/admin.php` or `https://chat.devad.io/`).
- Open your browser’s settings menu (usually the three dots).
- Scroll down and tap **Add to Home screen**.
- Confirm the action by tapping **Add**.
For iPhone or Mac (Safari – all versions):
- Enter your admin area in Safari (e.g., `https://chat.devad.io/`).
- Press the **Share button** (the square with an arrow pointing up).
- Select **Add to Home Screen** from the popup menu.
- Tap **Add** in the top right corner to complete the installation.
### Keyboard Shortcuts
To maximize efficiency, admin area keyboard shortcuts are enabled by default for both PC and Mac users. These shortcuts allow agents to navigate the interface, manage conversations, and perform actions without navigating away from the keyboard.
| Shortcut | Description |
| --- | --- |
| ENTER or SPACE | Confirm or close a dialog alert; functions the same as clicking OK. |
| ESC or CANCEL | Decline a dialog alert and close it. Also closes a lightbox if one is active. |
| SHIFT + ENTER or CTRL + ENTER | Add a line break to a message. Note: This functionality applies only to the admin editor. |
| CANCEL (Admin) | In the admin conversations area, use this to archive a conversation or delete it. |
| CTRL + UP/DOWN ARROW | In the admin conversations area, navigate quickly between the conversations in the list. |
| CTRL + RIGHT/LEFT ARROW | In the admin users area, navigate horizontally between different users. |
| CTRL + V | Paste an image directly from the clipboard and send it immediately as a message. |
| CTRL + Left mouse click | Bulk Actions: Hold down CTRL while clicking conversations in the admin list to select multiple items. You can then perform bulk actions like archiving, deleting, or marking as read/unread on all selected conversations simultaneously. |
### URL Parameters Configuration
URL parameters allow you to trigger specific behaviors automatically when the page loads. This is useful for marketing campaigns, direct user support links, or deep linking into the admin panel.
### Front-end Chat Parameters
Append these parameters to any URL on your website where the chat widget is loaded (e.g., `https://example.com/?conversation=1234`).
| URL Parameter | Description |
| --- | --- |
| ?token=TOKEN | Login an existing user automatically. Replace TOKEN with the user’s unique token, which can be retrieved from the user’s profile box in the admin area. |
| ?conversation=ID | Open a specific conversation immediately on load. Replace ID with the conversation ID. Note: The token attribute is required for users who are not currently logged in. |
| ?chat=open | Force the chat widget to open automatically when the page loads. |
### Admin Area Parameters
These parameters are designed for the administration panel URL (e.g., `https://chat.devad.io/?setting=123` or `https://www.yoursite.com/script/admin.php?area=users`).
| URL Parameter | Description |
| --- | --- |
| ?conversation=ID | Open a specific conversation within the conversations area. Replace ID with the conversation ID. |
| ?user=ID | Open the profile box of a specific user. Replace ID with the user ID. |
| ?setting=ID | Open a specific setting directly within the settings area. Replace ID with the setting ID. |
| ?report=ID | Open a specific report in the reports area. Replace ID with the report ID. |
| ?area=name | Navigate directly to a specific admin section. Replace name with one of the following: conversations, users, settings, or reports. |
| ?login_email=... | Auto-login: Log in an existing agent or user automatically via URL. Syntax: ?login_email=email&login_password=password. Replace with actual account credentials. |
### Calendly Integration
You can seamlessly integrate Calendly booking invitations into your chat flows using Rich Messages. Follow these steps to set up a “Schedule a Meeting” button.
- Create an event type from your Calendly dashboard (e.g., `https://calendly.com/event_types/user/me`).
- Click **Share** and copy the generated URL.
- To send the invitation in chat, use the **button** rich message type.
- Paste your Calendly URL into the `link` attribute.
- **Crucial Step:** Include the `success` attribute. This defines the confirmation message sent to the user automatically once the booking is completed.
**Code Example:**
~~~
[button link="https://calendly.com/your-link" name="Schedule a meeting" success="Thank you! Your meeting has been scheduled."]
~~~
**Success**! When the user completes the booking process inside the popup, the success message is triggered automatically.
### Security Protocols
Security is paramount at CHAT.devad.io. We work with security experts to perform periodic audits and implement the latest technologies to counter threats. Below is a detailed breakdown of the implemented security measures.
IP Ban & Brute Force Protection
The system permits a maximum of 10 unsuccessful login attempts within one hour. If a user, admin, or agent exceeds this limit, they are blocked from accessing the account or admin area for 1 hour. This mechanism uses the user’s IP address to deter brute force attacks. **Fixing a lockout:** If you see the error “Too many login attempts”, you can wait 1 hour or manually delete the `ip-ban` row from the `sb_settings` database table.
XSS Injection Protection
To prevent Cross-Site Scripting (XSS) attacks, all sensitive user inputs and data submitted to the system undergo rigorous sanitization processes before processing.
CSRF Protection
To prevent Cross-Site Request Forgery (CSRF) attacks, every request is validated by checking both the login cookie and a unique client-side login string.
Session Termination
Active sessions are automatically terminated whenever an admin or agent changes their password or account details. Furthermore, sensitive operations trigger automatic logouts, or sessions expire naturally after 1 hour of inactivity.
Encryption & File Protection
**AES-256-bit Encryption:** We use industry-standard 256-bit AES encryption to protect sensitive data, such as active session login information.
**Filename Protection:** All uploaded files are renamed with a random alphanumeric string prepended to the original name. This prevents unauthorized URL discovery. (Note: Your server must prohibit directory listing for this to work effectively).
**MySQL Encrypted Connections:** You can configure the system to use encrypted database connections by editing `config.php` and adding constants like `SB_DB_CERTIFICATE_PATH` and `SB_DB_CERTIFICATE_CA`.
### Performance Optimization
CHAT.devad.io is engineered for speed, featuring extremely lightweight JavaScript and CSS files that are significantly smaller than competitors. The system is modular, framework-free, and fully optimized. However, you can further fine-tune performance via **Settings > Miscellaneous > Performance optimization**.
**Optimization Tip!**These settings are powerful. Disabling reports or articles reduces server resource usage significantly by preventing the system from loading those specific subsystems entirely.
- **Minify JS:** Enable this to load minified versions of JavaScript and CSS files for the front-end widget, reducing file size and improving loading speed.
- **Disable reports:** Stops the system from collecting and recording report data, saving valuable server resources.
- **Disable articles:** Turns off the Knowledge Base/Articles functionality completely, preventing associated resources from loading on both the admin and client sides.
- **Archive old messages:** Automatically moves messages older than a specified interval to a dedicated backup table. These messages will disappear from active views, drastically improving performance if you handle millions of messages. **Note:** If a user sends a new message to an archived conversation, the system automatically restores the history. You can also manually restore conversations from the user’s profile.
### Customization & Services
You have full freedom to edit the source code of the CHAT.devad.io PHP and WordPress versions to fit your specific needs (see terms of service). While the Cloud version’s source code is not directly editable, it supports extensive customization via the JavaScript API, Web API, and custom CSS. Since the chat widget does not use an iframe, styling it with custom CSS is seamless and effective.
### Hire Us
If you require specific customizations but lack the resources to implement them, our team is available for hire. We can tailor CHAT.devad.io to your exact requirements. Our hourly rate is 100 USD. To request a quote based on the complexity of your project, contact us via the support chat in the bottom right corner or email us at `the Devad contact page`. We typically reply within 24 hours.
### Notifications Management
### Notifications Management Overview
Understanding exactly when and how notifications are triggered is essential for maintaining smooth communication. If you suspect notifications aren’t functioning correctly, please review the logic below, as testing methods often differ from real-world usage scenarios.
### Email Notifications System
Both support agents and end-users can receive email alerts whenever a new message lands in their inbox. This ensures that no critical communication is missed, even when users are offline.
### For Admins and Agents
When a user sends their very first message, the system intelligently routes the notification based on assignment rules:
- **Department Assignment:** If the chat is routed to a specific department, only agents within that department receive the email.
- **Specific Agent Assignment:** If assigned to a particular individual, only that agent is notified.
- **Unassigned:** If neither applies, an email is broadcast to all agents who are currently **offline**.
For subsequent messages in an ongoing conversation, emails are sent exclusively to the last agent handling the chat, provided they are currently offline. If the **Human Takeover** feature is active within the Artificial Intelligence app, the system suppresses notifications if the chatbot successfully answers the query.
### For Users
Users receive email notifications only when an agent replies and the user is currently **offline**. To prevent inbox spam, only one email alert is sent per offline session; subsequent messages will not trigger additional alerts until the user returns.
### Customizing Email Templates
You can fully customize the content of these emails via **Settings > Notifications**. The editor supports both plain text and HTML. New lines are automatically converted to HTML line breaks. Use the following dynamic merge fields to personalize your messages:
| Merge Field | Description |
| --- | --- |
| {recipient_name} | The name of the user or agent receiving the email. |
| {sender_name} | The name of the person who sent the triggering message. |
| {sender_profile_image} | The profile picture of the sender. |
| {message} | The actual text content of the message. |
| {attachments} | Links to any files attached to the message. |
| {conversation_link} | A direct link to the conversation in the admin panel (Agents only). |
| {conversation_id} | The unique ID of the conversation. |
### Optimization via Cron Jobs
For a more robust notification system, you can offload email sending to a cron job. This is highly recommended as it improves performance and ensures emails include the entire conversation context.
**Setup Required**! To enable this, activate **Email notifications via cron job** in settings and configure your server cron command.
Use the following command format, replacing `[SCRIPT-URL]` with your actual Installation URL found in *Settings > Miscellaneous*:
~~~
*/59 * * * * wget [SCRIPT-URL]/include/api.php?email-notifications=true
~~~
### Troubleshooting Email Delivery
Hosting & Spam Issues
If your web host’s email server is unreliable or your emails land in spam folders, we strongly recommend using an external SMTP server. Activate the **SMTP** option in *Settings > Notifications* and enter your provider’s details.
SMTP Connection Failures
If test emails fail even with SMTP enabled, your server configuration might be incorrect. Use the browser console to view specific error messages. For a reliable free alternative, consider integrating **SendGrid**.
Google Gmail Setup
To use Gmail SMTP, generate an **App Password** from your Google Account security settings. Use `smtp.gmail.com` as the host with port `465` or `587`. Ensure “Less secure app access” or equivalent API controls are properly configured in Google Workspace.
### Real-Time Push Notifications
Unlike standard desktop notifications, Push notifications are delivered from a server even when the user’s browser is closed or the device is offline. We support both **Pusher** (Android/Desktop) and **OneSignal** (iOS/Android/Desktop). Note that iOS devices strictly require OneSignal.
### Setup: Pusher (Beams)
1
### Create Instance
Log in to your Pusher dashboard, select the **Beams** product, and create a new instance.
2
### Get Keys
Navigate to the “Keys” menu in Pusher and copy your **Instance ID** and **Primary Key**.
3
### Configure Settings
Go to *Settings > Notifications > Push notifications* in your chat admin, select Pusher, and paste your keys.
### Setup: OneSignal (iOS Support)
For Apple devices (iOS 16.4+), you must use OneSignal. The setup involves creating a **Web Configuration** in OneSignal, entering your site’s root domain, and uploading the required SDK files (`sw.js` etc.) to your server’s root directory.
- **Cloud Version:** OneSignal is pre-configured by default.
- **WordPress:** You must access the chat admin area directly (outside the WP dashboard) to finalize push settings.
- **Service Workers:** You need to define the path to your service worker files in the settings if they are not in the root.
**Troubleshooting**! If notifications fail on Windows 10+, check your “Focus Assist” or “Notifications” settings. On Chrome, ensure “Continue running background apps” is enabled.
### Additional Notification Types
### Desktop Notifications
These are standard browser notifications. They work only over **HTTPS** and are not supported on iOS. If Push notifications are active, they will override and replace standard desktop notifications.
### SMS Notifications (Twilio)
You can send SMS alerts to both agents and users via Twilio integration. This also enables a true two-way texting experience where SMS replies appear in the chat.
- **Setup:** Enter your Twilio SID, Auth Token, and Phone Number in *Settings > Notifications > Text message notifications*.
- **Sender ID:** You can replace the phone number with a custom Sender Name (Alphanumeric Sender ID) where supported.
- **Logic:** SMS notifications are sent only if the recipient is offline. They are disabled if the AI chatbot successfully handles the query.
### Sound Alerts
Audio alerts play when a new message arrives. Due to browser security policies, sound will only play if the user has interacted with the document (clicked somewhere on the page). If set to loop, the sound plays until the chat window is opened or maximized.
## Setup Basics
### Chat & Conversations
### Manage conversations
Conversations have a total of four different statuses: **mark as read**, **archive**, **delete** and **restore**. You can manage the status of a conversation by opening it in the conversations area and then clicking any of the corresponding icon buttons in the top right of the conversation window.
### Search for conversations
You can for conversations by department ID, assigned agent ID, conversation title, conversation ID, message text, message attachments name, user first name, user last name, user email. If you search for a specific message text, the conversation containing that message will be shown at the correct position and the message will be highlighted.
### Information
- When you empty the **trash**, all the conversations in the trash are permanently deleted.
- When a user sends a new message to an archived or trashed conversation, the conversation is automatically restored and will now be visible in the **Inbox area**.
- Trashed conversations are deleted automatically after 30 days.
- When a user is deleted, all the conversations and messages are permanently deleted too.
- An agent can delete their messages by opening the message menu and clicking **Delete**. The message menu becomes visible when you hover the mouse cursor over the message.
- The left conversations list use auto-pagination, which is limited to 100 results per scroll.
### Reply to a message
You can reply to a message by opening the message’s menu and, and clicking **Reply to**. The reply to feature is supported only on the following messaging services: **WhatsApp**, **Telegram**, **Facebook Messenger**.
---
### Text editor and automated messages features
The text editor of the admin area and automated messages(example: welcome and subscribe messages) can be used to create stylized messages:
- Links formatting — All text links are automatically converted to clickable hyperlinks. To set the link name, append the following string to the URL: **#sb-example**. Replace **example** with your desired link name and white spaces with **—**.
- Text formatting — The editor also supports text formatting syntax:
- To make text **bold**, surround it with *****: *your text*.
- To make text *italic*, surround it with **__**: __your text__.
- To make text strikethrough, surround it with **~**: ~your text~.
- To insert a **single-line code** comment, surround it with**`**: `your text`.
- To insert a `code block`, surround it with **“`**: “`your text“`.
### Merge fields
Merge fields are strings replaced by external values when used. Merge fields can be used in any message or automated message, including chatbot messages.
---
| Code | Description |
| --- | --- |
| | Full name of the active user. |
| | Email of the active user. |
| | Full name of the active agent. |
| | Email of the active agent. |
---
### Rich messages
Rich messages are special messages with interactive features like buttons, dropdowns, or inputs. They allow an agent to request information from the user via a user input form or to diplay interactive contents. Rich messages can be inserted into a chat message using shortcodes. Shortcodes accept various parameters like title and description. The available rich messages are listed below.
### How it works
---
---
### Rich Message
---
| Name | Shortcode | Description |
| --- | --- | --- |
| Card | | Call-to-action card with an image, title, description, link, and more. |
| Slider | | Slider of call-to-action cards with an image, title, description, link, and more. You can add up to 10 slides. |
| Slider images | | Slider of images. |
| Chips | | List of buttons. |
| Buttons | | List of buttons. |
| Select | | Dropdown list of options. |
| Inputs | | List of text inputs. |
| Email | | Form to collect the user’s email and phone number. All attributes are optional. Follow up settings used as default values. Add the attribute required-messaging-apps=”true” to force users to provide their email and phone on messaging apps. Merge fields are supported. |
| Timetable | | Timetable. |
| Articles | | Articles with search area. The link attribute is used as fallback message for Facebook Messenger, WhatsApp, Telegram messages. |
| List | | Text list. Prefix an item with the – char to make it an inner item. |
| List double | | Text list with titles. |
| List image | | Text list with titles and images. |
| Table | | Table. |
| Button | | Display a link or open an article. The attribute target=”_blank” is optional and open the link in a new window. The attribute style=”link” is optional and change the button design. To open an article on click the link value must be #article-ID, replace ID with the article ID. |
| Video | | Display a YouTube or Vimeo video. The value of the attribute type can be youtube or vimeo. The attribute id is the ID of the video, get it from the URL. The attribute height is optional and sets the video height in px. |
| Image | | Image. |
| Share | | Social share buttons. |
---
### **Special chars**
If your text includes the characters **,**, **:**, or **“**, you must prepend the **** character to them. For example: **,**, **:**, **“**.
---
### Global parameters
All of the rich messages support the following parameters:
---
| Parameters | Description |
| --- | --- |
| | The ID of the rich message (used also to save the JSON data). |
| | The rich message title. |
| | The rich message description that appears underneath the title. |
| | The message that appears when the user completes and sends the rich message. The user input is appended to this message. |
| | Extra field for optional extra values. |
---
### Use rich messages in the chatbot
You have to create a [Dialogflow chatbot](https://devad.io/help/docs/chat#dialogflow-bot) , then simply enter the rich message shortcode into the **text response** of the **Intent**.
---
### **Rich message response**
When a user completes a rich message, the response data is saved in JSON format in the database under table **sb_messages** and column **payload**. Example:
---
### **Rich message translations**
To translate a rich message string, the original rich message text must be in english, add the exact english text and its translations in **Setting > Translations > Front End**.
---
### **Show a rich message on chat initialization**
To display a rich message, such as a list of buttons, when a user initiates a chat for the first time, insert the rich message shortcode into the [welcome message](https://devad.io/help/docs/chat#welcome-message) .
---
### **Custom rich messages**
You can create custom rich messages with your own custom content by going to **Settings > Miscellaneous**. Currently, custom rich messages are static and there are no interactive options available as there are with shortcodes. However, you can insert custom HTML codes.
### **HTML codes**
When creating a custom rich message, you can use the following codes:
---
| Code | Description |
| --- | --- |
| | Link with button design. |
| | Link. |
| | Image that zoom on click. |
---
### Built-in messages
The built-in messages are pre-programmed messages sent automatically by CHAT.devad.io. You can find them by going to **Settings > Messages**.
### **Welcome message**
Send a message to new users when they visit the website for the first time.
- [Text formatting](https://devad.io/help/docs/chat#text-editor) is supported.
- [Merge fields](https://devad.io/help/docs/chat#merge-fields) are supported.
- [Rich messages](https://devad.io/help/docs/chat#rich-messages) are supported.
- The welcome message is not sent to slack.
- Conversations containing only the welcome message (and no response) are automatically archived.
### **Follow up message**
If no agents respond within the specified time interval, a message will be sent to request the user’s details, such as their email.
- [Text formatting](https://devad.io/help/docs/chat#text-editor) is supported.
- [Merge fields](https://devad.io/help/docs/chat#merge-fields) are supported.
- You can send a confirmation email to the user by filling in the **Follow-up Email** fields.
- If the **delay** is not set, a dynamic time interval is utilized and it is determined as follows: If **Settings > Miscellaneous > Office hours** is configured, and the current time falls within the defined office hours, or if at least one agent is online, then the delay will be set to 15 seconds. In all other cases, the delay will be set to 5 seconds.
- Follow-up messages are sent a maximum of once every 24 hours.
- If the user provides an email address and the [newsletter](https://devad.io/help/docs/chat#newsletter) feature is enabled, the email address will be subscribed.
- The follow-up message is sent only to users without email address.
- If the chatbot’s [human takeover](https://devad.io/help/docs/chat#human-takeover) feature is activated, the follow-up message is only sent during human takeover.
### **Rating**
Display the feedback form to rate the conversation when it is archived.
- The rating message is compatible with the messaging channels. The rating buttons are not displayed on messaging channels. However, if Artificial Intelligence and OpenAI are set up, the user’s reply will be analyzed to extract the rating.
- The rating is visible in the right panel of the **conversations** area, in the **agent ratings** report of the **reports** area, and in the agent profile.
- Enable the rating email reminder by setting the delay (in hours) in the **Email reminder delay** option. The email remind the user to provide a feedback and it is sent only if the user hasn’t rated the conversation after the set delay. For this feature to work, you must also set the **Redirect URL** — enter any URL that includes the chat widget (e.g., your website URL). Once the user clicks the **Helpful** or **Not helpful** link in the email, they will be redirected to the specified Redirect URL, and the rating will be saved automatically. The chat will open showing the rating panel, allowing the user to provide additional feedback.
- The emails are sent through the [cron jobs](https://devad.io/help/docs/chat#cron-jobs) .
### **Offline message**
Notify the user when their message is sent outside of the scheduled office hours or all agents are offline.
- [Text formatting](https://devad.io/help/docs/chat#text-editor) is supported.
- [Merge fields](https://devad.io/help/docs/chat#merge-fields) are supported.
- To learn more about the office hours option, please click [here](https://devad.io/help/docs/chat#office-hours) .
- The offline message is sent to the same user maximum 1 time per hour.
- By default, the offline message is also sent if all agents are offline, even during office hours. To prevent this, enable the **Disable agents check** option.
- If the chatbot’s [human takeover](https://devad.io/help/docs/chat#human-takeover) feature is activated, the offline message is only sent during human takeover.
- If you or any other agent is online using [Slack](https://devad.io/help/docs/chat#slack) , they will be considered as online agents also by CHAT.devad.io.
### **Privacy message**
Present a privacy message accompanied by Accept and Decline buttons. The user’s approval by clicking on the Accept button is required to start using the chat. This feature ensures privacy policy enforcement and GDPR compliance.
- The privacy message is not shown if the **Settings > Users > Require registration** option is enabled.
- The privacy message is also sent to messaging channels like WhatsApp, but the user does not have the option to approve or decline the privacy policy. The messaging functionalities are not blocked either. The message is sent after the user initiates the conversation by sending their first message.
### **Pop-up message**
Show a pop-up notification to all users.
- The popup message is always shown until the user manually closes it; then it stays closed.
---
### Attachments
Here, you can access information regarding the uploading of files and the message’s attachments.
- The following image formats are displayed automatically:**.jpg, .jpeg, .png**.
- For instructions on sending attachments with a chatbot, click [here](https://devad.io/help/docs/chat#dialogflow-info) .
- You can also upload files to [AWS S3](https://devad.io/help/docs/chat#aws) .
---
### Information
Here, you can access information regarding a variety of features associated with conversations.
### **Tags**
Tags enable more efficient organization and grouping of conversations. Please refer to the information below for further details.
- You can manage the tags from **Settings > Admin > Tags**.
- Tags can be assigned to conversations through different methods: via the admin area by navigating to **Settings > Automations > More**, through [Dialogflow actions](https://devad.io/help/docs/chat#dialogflow-actions) , and by inserting the JS variable **SB_DEFAULT_TAGS** into a page showing the chat or into a web page displaying the chat or the tickets panel.
- To locate conversations with specific tags, simply enter the tag names into the search bar located at the top-left corner of the admin conversations area, or you can select the desired tag from the dedicated filters menu on top-left. The tags filter is visible only if at least one tag is assigned to a conversation.
- Check the **Starred tag** option to display the starred tag icon in the conversations area. This allows you to select conversations assigned to the first tag with one click. The first tag on top is always the starred tag.
- You can disable the tags from **Settings > Admin > Disable features > Tags**.
### **Notes**
Notes allow agents and admins to add comments to conversations.
- Notes are only visible to agents and admins.
- If you are usign OpenAI, we suggest enabling the [note data scraping](https://devad.io/help/docs/chat#open-ai-settings) option.
- Manage the note settings from **Settings > Admin > Notes settings**.
- You can disable the tags from **Settings > Admin > Disable features > Notes**.
- Activate advanced AI-powered features by using the Artificial Intelligence app. Learn more [here](https://devad.io/help/docs/chat#note-data-scraping) .
### **Transcript**
The full conversation can be sent to the user by the agent or admin as a transcript file.
- Agents and admins can send conversation transcripts to users by clicking the **Transcript** button in the top-right corner of the admin’s conversation window.
- Agents and admins can automatically send the transcript to the user when the conversation is archived by using the **close message** available at **Settings > Messages & Forms > Close message**.
- The transcript can be sent to the user only if the user has an email address.
- If the conversation has been translated, the transcript will also include the translated messages.
### **Miscellaneous**
- The date and time format is automatically detected based on the browser’s language settings.
### Having problems?
**Setup, Configuration, and Troubleshooting**
Getting the most out of CHAT.devad.io starts with a solid foundation. This guide covers the essential steps to get you up and running—from verifying your account and installing key apps to configuring notifications for optimal performance. We also address common technical hurdles, offering quick solutions for login issues, display errors, and WordPress conflicts.
### Activation
To activate your account, check your email (including the Spam and All Mail folders) for a 6-digit verification code. Copy the code and paste it without any extra spaces into the verification field at chat.devad.io/account/?tab=profile. Once submitted, your identity is verified and your chat services will be fully activated.
### Apps installation
Many famous apps are enabled by default, however, To install more apps go to the **Settings > Apps** area of CHAT.devad.io and click on the app you want to activate from [here](https://chat.devad.io/?setting=apps) .
---
### Optimal configuration
CHAT.devad.io is a powerful tool, but its abundance of features can pose a challenge when it comes to quick setup. To streamline the process, we provide a list of the most commonly used features that we advise setting up. By incorporating all these features, you will have access to the most essential and beneficial functionalities.
- Activate email notifications from **Settings > Notifications**. Make sure to activate the following options: **Agent email notifications**, **Sounds admin > Incoming conversations and messages**, and **Push notifications**. For more information on how notifications work, you can click [here](https://devad.io/help/docs/chat#notifications) .
- Configure the SMTP server under **Settings > Notifications > SMTP**. For more details check the [email notifications](https://devad.io/help/docs/chat#email) section. In case you are using the [cloud version](https://devad.io/help/docs/chat#cloud-version) , the SMTP is already activated, but you may want to use your own anyway.
- Navigate to **Settings > Messages** and set up the [follow-up message](https://devad.io/help/docs/chat#follow-up-message) and [offline message](https://devad.io/help/docs/chat#offline-message) .
- Optimize the system [performance](https://devad.io/help/docs/chat#performance) .
- In case you are utilizing the chatbot, make sure to check out the optimal configuration [here](https://devad.io/help/docs/chat#optimal-configuration-ai) .
- If you are facing difficulties in synchronizing services like Google or WhatsApp, our team can help you by configuring them. For further information, please visit our [Contact us](https://devad.io/contact-us/) page. By utilizing your personal accounts such as Google or Facebook, you can enjoy free credits, free quotas, and significantly lower costs compared to other chat services. Additionally, you will have full control and transparency over your data and expenses.
---
### Having problems?
If you’re having any issues at all, please contact our support team via the chat widget on right of this page or our [Contact us](https://devad.io/contact-us/) page. Before contacting us, please make sure that your server has all the requirements listed above.
### Blank screen when accessing the admin area
- Check if the browser console has error (on Chrome you can open it from **Settings > More tools > Developer tools > Console**).
- Enable the PHP debug and check the PHP error logs.
- If you have the WordPress version, disable all security plugins and plugins related to your hosting.
---
### Blank screen when accessing the admin area
If you can no longer log in to the admin area you can reset your password and email by following the steps below:
To reset your password in the [login page](https://chat.devad.io/account/?login) , go to the login page, click “Forgot password?”, enter your registered email, and follow the instructions sent to your email.
If you encounter the “Too many login attempts. Please retry again in a few hours.” error, click [here](https://devad.io/help/docs/chat#ip-ban) .
---
### Blocking zoom on iOS devices
When using the chat on iPhones the textarea is automatically zoomed when the user’s start typing a new message. To stop the zoom Enter the code below into the **** area of all the pages that include the chat.
~~~
~~~
### Chat widget not displaying
The chat may not be showing due to the following reasons.
- You may not see the chat because you have disabled it in the settings area. To fix this, visit the settings section and deselect all options related to that: **Chat > Manual initialization**, **Chat > Login initialization**, **Chat > Hide chat outside of office hours**, **WordPress > Manual initialization**.
- Try disabling any performance plugins or techniques like cache or JS minification on your website as they might be causing problems. Once disabled, check again.
- Try disabling any CDN or Proxy (e.g. CloudFlare). Once disabled, check again.
- **WP version only** You cannot see and test the chat as a user if you’re logged-into the admin area. To test the chat as a user, please log out of your admin account or from WordPress. Alternatively, you can use another browser window in “private” or “incognito” mode. Additionally, you can force a logout by executing the SBF.reset() function in the browser console.
- **WP version only** You’re trying to access the chat from a domain, or subdomain, different from the one of the installation. Details [here](https://devad.io/help/docs/chat#cross) .
### Conversations are not visible to administrators or agents
The conversations may not be showing due to the following reasons.
- The agent has been given a [department](https://devad.io/help/docs/chat#departments) , yet the conversations have not been assigned to that specific department.
- One or more of the following settings have been activated: **Miscellaneous > Routing**, **Miscellaneous > Queue**, **Miscellaneous > Hide conversations of other agents**
- You are using the WordPress version and the **WordPress > Multisite routing** option has been activated.
- You are using the chatbot and the [human takeover](https://devad.io/help/docs/chat#human-takeover) feature is activated.
For cases 1, 2, and 3, make sure to log in with the correct admin/agent or check your admin/agent profile to ensure that there are no [departments](https://devad.io/help/docs/chat#departments) assigned. In case 4, please check the archived conversations.
### CHAT App FAQs
Got a question? We’ve likely heard it before. Browse our FAQ to find immediate solutions for account setup, billing cycles, and platform features. If you can’t find what you’re looking for, our support team is just a click away.
Why can’t I see the live chat widget on my website?
Check if the chat code snippet is correctly added to your website’s HTML and that the widget is enabled inside the CHAT App settings.
Why am I not receiving chat notifications?
Ensure your notification settings are enabled and your device/browser allows notifications for CHAT App.
Why does the chat respond slowly or freeze?
This can be due to slow internet or browser issues; clear your browser cache and check your network connection.
Why can’t I send or receive files in chat?
File sharing may be restricted by your chat permissions or file size limits; confirm the allowed file types and sizes in settings.
Why do I get logged out unexpectedly?
Your session may time out due to inactivity or cookie settings; try enabling ‘Remember Me’ or check your browser privacy settings.
Why is my chat history missing?
Chat histories are stored on the server; ensure your account has permission to view past chats and the server is properly syncing.
Why are some user messages not showing up in the chat?
This might be a result of connection issues or server delays; refresh the page or restart the chat session.
Why does the chat widget cover parts of my webpage?
Adjust the widget position and size in your CHAT App appearance settings to avoid overlapping page elements.
Why is the chatbot not responding correctly?
Check your chatbot training intents and responses for completeness and ensure the AI engine is correctly connected.
Why am I experiencing issues with multiple agents responding?
Configure agent roles and assignment rules to avoid response conflicts and ensure smooth multi-agent collaboration.
Why can’t I see live chat messages in my dashboard?
Confirm you are logged in with the correct account and have assigned permissions for chat access.
Why are messages delayed or not delivered in real-time?
Network issues or server latency can cause delays; check your internet connection and server status.
How can I customize the appearance of the chat widget?
Use the dashboard settings to change colors, position, and greeting messages directly.
How to fix chat widget conflicts with other scripts?
Check for JavaScript errors in your browser console and disable conflicting plugins or scripts.
Can I filter or block spam messages in chat?
Enable spam filters and automated rules within CHAT App settings to manage unwanted messages.
Why does the chat widget appear broken on mobile?
Ensure your site is mobile-responsive and test compatibility; update CHAT App to the latest version.
How do I reset or change my CHAT App password?
Use the ‘Forgot Password’ link on the login page to reset your password via email.
What should I do if agents are not receiving chats?
Check agent availability status, and confirm notification settings and proper role assignment.
How can I reset my chat widget if it freezes?
Refresh the webpage, clear your browser cache, or restart your browser to resolve loading issues.
Why is my chat widget not showing on mobile devices?
Ensure your website’s responsive design supports the chat widget and that scripts are not blocked on mobile.
How do I update my user profile in CHAT App?
Access your account settings within the chat widget or user portal to update personal information.
The chat is disconnected or offline, how can I fix it?
Verify your internet connection and reload the page; if problem persists, wait for server restoration.
Can I chat with a human agent if the bot is not helpful?
Yes, use the human takeover feature within the chat to connect with an agent.
Why is my chat history not saved or loading properly?
Session cookies might be disabled or cleared; enable cookies or stay logged in to keep chat history.
Why do I get errors when submitting forms via chat?
Ensure all required fields are correctly filled and your internet connection is stable.
How can I translate the chat interface to my language?
Use the built-in translate feature within the chat settings to select your preferred language.
How do I install the widget manually?
Use the ‘Manual HTML Installation’ method by copying the code snippet from the dashboard into your site’s header or body.
How do I enable more apps like WhatsApp?
Go to Settings > Apps in your CHAT dashboard and click on the app you want to activate.
How do I display a rich message with buttons?
Insert the rich message shortcode into your Welcome Message settings to show buttons or lists on chat start.
Can I assign specific departments to conversations?
Yes, you can assign departments automatically via routing rules or manually during the conversation.
Does this support WhatsApp Cloud API?
Yes, the automatic sync mode for WhatsApp Cloud API is available on the cloud version.
Can I make voice or video calls?
Yes, the WhatsApp integration supports initiating voice and video calls directly from the chat interface.
How do I integrate my WooCommerce shop?
Go to Settings > Apps, click WooCommerce, and activate it. This allows syncing products and orders.
Is there a desktop app?
You can install the PWA (Progressive Web App) by clicking the ‘+’ icon in your Chrome browser address bar while in the admin area.
What are the server requirements?
Ensure your server meets the requirements listed in the documentation before contacting support.
How do I fix blank screens in the admin area?
This is often a cache issue; clear your browser cache or check for plugin conflicts.
Can administrators see all conversations?
Yes, admins have access to all conversations, while agents see only those assigned to them unless permissions are changed.
How do I search for a specific conversation?
Use the search bar in the ‘Conversations’ area to filter by user name, message content, or date.
How do I block zoom on iOS devices?
The widget includes auto-fixes, but ensure your site’s viewport meta tag is set correctly to prevent auto-zooming.
Can I show products in the chat?
Yes, with the WhatsApp Shop or WooCommerce integration, you can use merge fields to display products.
Why is Slack synchronization failing?
Common reasons include incorrect API keys or permissions; check the ‘Having Problems’ section in the Slack app settings.
Can I use Dialogflow for automation?
Yes, you can connect Google Dialogflow to handle automated responses and complex conversational flows.
How do I handle offline users?
Configure an ‘Offline Message’ to collect their email address so you can follow up later.
Can I change the chat widget color?
Yes, navigate to the Appearance/Design settings to customize the primary colors to match your brand.
How do I add agents?
Go to the ‘Agents’ or ‘Users’ section in the admin panel and invite new team members by email.
Is there a dark mode?
The admin dashboard typically follows your system preference or has a toggle in the profile settings.
How do I get an API key?
You can generate API keys in the Settings > Developers section for custom integrations.
Can I export user data?
Yes, you can export user details and conversation history from the respective management pages.
### Installing CHAT Widget
### **Installation Options for**Live CHAT widget
Getting CHAT.devad.io up and running on your site is designed to be flexible, regardless of your technical setup. Whether you are running a WordPress site, a custom-coded application, or managing your scripts through third-party tools, there is an integration method that fits your workflow.
Live CHAT Widget example
Choose the method below that best suits your environment:
- **WordPress Plugin:** The recommended choice for WordPress users. This dedicated plugin allows for deep integration, offering features like automatic user syncing, multisite routing, and visibility control based on page IDs or post types.
- **Any Website (Manual Setup):** A universal solution for non-WordPress sites or developers who prefer full control. This involves adding a simple Javascript snippet directly to your site’s HTML or theme files.
- **Tag Manager & Cloudflare:** Ideal for marketers and performance optimization. Use Google Tag Manager to sync with other tracking tools, or utilize Cloudflare Zaraz for the cleanest, fastest installation without touching your website’s code.
**Select the tab below that matches your preferred installation method to get started.**
WordPress Plugin
Any website
Tag Manager
Step 1**: Installation & Setup**
Follow these steps to get the **CHAT.devad.io** plugin running on your WordPress site.
- **Download:** Get the latest version of the plugin from **[here](https://chat.devad.io/docs/files/CHAT-devad-io.zip)**
- **Upload:** Log in to your WordPress Admin. Go to **Plugins > Add New > Upload Plugin**. Choose the file named `CHAT-devad-io.zip` and click **Install Now**.
- **Activate:** Once the upload is finished, click the **Activate** button.
- Locate Settings: After activation, a new menu item named CHAT.devad.io will appear in your sidebar. You can also find the settings page directly at :*yourwebsite.com***/wp-admin/options-general.php?page=CHAT-devad-io**
- **Go Live:** By default, the chat is automatically shown on all pages of your site once configured.
---
### Step 2: Finding Your Chat ID & Configuring Settings
To connect your specific account to your WordPress site, you need to link it using your unique ID.
### How to find your Chat ID
- Go to your [CHAT.devad.io Account Installation tab](https://chat.devad.io/account/?tab=installation) .
- Look for the **Embed Code** section.
- In the script code provided, look for the numbers at the end of the URL.**Example:** In
~~~
~~~
, your ID is **55747**.
- **Copy** that ID and **Paste** it into the **Chat ID** field in your WordPress plugin settings, then click **Save**.
### Understanding the Plugin Settings
Once you’ve entered your ID, you can fine-tune how the chat behaves:
| Setting | What it does |
| --- | --- |
| Visibility | Choose specific Page IDs or Post Type slugs (like “product” or “blog”) where the chat should (or shouldn’t) appear. |
| Multisite Routing | For WordPress Networks. It automatically sends chats to specific departments that match your Site ID. |
| Sync WP Users | Automatically identifies logged-in WordPress users so they don’t have to type their name/email into the chat. |
| Force Language | Manually sets the chat language (e.g., “en” or “fr”) to override automatic detection. |
| Feedback Notices | Options like Rate it now or Dismiss allow you to manage the plugin’s feedback notifications in your dashboard. |
If you prefer not to use the dedicated WordPress plugin, you can install the chat manually by adding the script snippet directly to your website’s code. This is often called the “Manual” or “Javascript” installation.
Here are the three most common ways to do it, depending on your setup:
Method 1: Using a “Headers and Footers” Plugin
This is the most common way for WordPress users. It ensures your chat stays active even if you change your theme.
- Install a plugin like **WPCode**.
- Go to **Code Snippets > Header & Footer**.
- Paste the snippet into the **Footer** box:HTML
~~~
~~~
- Hit **Save**.
---
### Method 2: Manual HTML Installation
Use this if you are not using WordPress or prefer to edit your theme files directly.
- Open your site’s main template file (e.g., `footer.php`, `index.html`, or `theme.liquid`).
- Locate the closing `` tag at the bottom.
- Paste the code **directly above** it:HTML
~~~
~~~
- Save and refresh your site.
---
---
### Pro Tip: Testing the Installation
After using any of these methods, the chat should appear in the bottom right corner. If you don’t see it:
**Check Incognito:** Browser extensions (like AdBlockers) can sometimes hide chat widgets, so always test in a private window.
**Clear your Cloudflare Cache:** Go to **Caching > Configuration > Purge Everything**.
Method 1: Google Tag Manager (Best for Marketers)
If you already use GTM, this keeps your chat widget synced with your other tracking tools.
Open your Google Tag Manager container.
Click Tags > New.
Click Tag Configuration and select Custom HTML.
Paste your snippet into the box:
HTML
~~~
~~~
Click Triggering and select Initialization – All Pages (this ensures the chat is ready as soon as the site starts loading).
Give the tag a name (e.g., “CHAT.devad.io Widget”), click Save, and then click Submit to publish your changes.
### Method 3: Cloudflare Zaraz (Best for Speed)
If your site uses Cloudflare, this is the cleanest way to install the chat without touching your website’s code at all.
- Log in to your **Cloudflare Dashboard**
- On the left sidebar, click Tag Setup (Zaraz has been moved here).
- Click **Add Tool** and select **Custom HTML**.
- Give it a name like `Chat` and click **Continue**.
- In the **Settings** box, find the **HTML Code** field and paste your script:HTML
~~~
~~~
- Under **Triggers**, ensure it is set to **All Pages** (or create a custom trigger if you only want it on specific sections).
- Click **Save**.
### Chat widget not displaying?
The chat may not be showing due to the following reasons.
- You may not see the chat because you have disabled it in the settings area. To fix this, visit the settings section and deselect all options related to that: **Chat > Manual initialization**, **Chat > Login initialization**, **Chat > Hide chat outside of office hours**, **WordPress > Manual initialization**.
- Try disabling any performance plugins or techniques like cache or JS minification on your website as they might be causing problems. Once disabled, check again.
- Try disabling any CDN or Proxy (e.g. CloudFlare). Once disabled, check again.
### FAQs & Troubleshooting
**Q: Why is my chat widget not displaying on my website?**A: Possible reasons include disabled chat in settings, performance plugins interfering, CDN or proxy issues, testing while logged in as admin, or accessing the chat from a different domain or subdomain.
**Q: How can I fix the chat not showing because it’s disabled in settings?**A: Visit the settings section and deselect all related options such as Chat > Manual initialization, Chat > Login initialization, Chat > Hide chat outside of office hours.
**Q: Could caching or JavaScript minification cause chat widget issues?**A: Yes, try disabling any performance plugins or techniques like cache or JS minification and then check again.
**Q: What if I use a CDN or proxy like CloudFlare?**A: Try disabling the CDN or proxy temporarily and check if the chat widget appears.
**Q: Why can’t I see or test the chat while logged into the admin area?**A: You cannot see the chat as a user if you’re logged into the admin area. Log out from your admin account or use a private/incognito browser window. You can also execute SBF.reset() in the browser console for a forced logout.
**Q: Does the domain or subdomain I use for testing affect the chat?**A: Yes, accessing the chat from a different domain or subdomain than the one where it’s installed can prevent the chat widget from showing.
**Q: What if disabling plugins and CDN does not resolve the issue?**A: Double-check chat settings to ensure it is enabled, and verify domain matching and user login status.
**Q: How do performance plugins affect the chat widget?**A: Some caching or JS minification plugins may interfere with the chat’s loading and functionality, causing it to not display properly.
**Q: Can I test the chat widget without logging out?**A: Yes, use another browser window in private or incognito mode to simulate a user experience.
**Q: Where can I find more detailed troubleshooting steps?**A: read carefully this document and double check your settings, if all failed**please contact us**
### Plans & Pricing
### **Simple Pricing, Powerful Features**
Select the plan that fits your needs below. From our lifetime Free tier to our high-volume Scale packages, every plan resets its quota monthly. Switch to the **Yearly** Plans to see how you can **save 50%** by getting **6 Months Free** on your Annual subscription instantly.
### Plans
| Plan Name | Monthly Billing | Yearly Billing (6 Months Free) |
| --- | --- | --- |
| Free | $0 / month• 100 Messages• 1 Agent• 100k Training Characters | N/A |
| Starter | $9.5 / month• 5,000 Messages• 1 Agent• 1M Training Characters | $57 / year• 60,000 Messages• 1 Agent• 1M Training Characters |
| Basic | $20 / month• 10,000 Messages• 2 Agents• 2.5M Training Characters | $120 / year• 120,000 Messages• 2 Agents• 1.5M Training Characters |
| Plus | $30 / month• 20,000 Messages• 3 Agents• 3M Training Characters | $180 / year• 240,000 Messages• 3 Agents• 2M Training Characters |
| Pro | $45 / month• 35,000 Messages• 5 Agents• 3.5M Training Characters | $270 / year• 420,000 Messages• 5 Agents• 2.5M Training Characters |
| Scale | $60 / month• 50,000 Messages• 6 Agents• 5M Training Characters | $360 / year• 600,000 Messages• 6 Agents• 3M Training Characters |
Frequently Asked Questions about Pricing
**Q: Does the 5,000 message allowance reset every month?** **A:** Yes. The message counter is **not cumulative**. It resets to zero at the start of every new billing cycle (monthly). You do not need to upgrade your plan just because you used your previous month’s allowance; you simply wait for the new month to start.
**Q: What happens if I reach 100% of my quota?** **A:** The chat widget will remain visible on your site, but you will not be able to see or reply to new messages until the next reset or until you upgrade. You will receive email alerts when you hit **90%** and **100%** of your limit.
**Q: Does the Free Plan also reset monthly?** **A:** the 100-message limit is a monthly quota that resets.
**Q: Should I use Dialogflow for my chatbot?** **A:** No. We officially **do not recommend** Dialogflow for new users. The platform has been largely abandoned by its company, and we are phasing out support for it in favor of our more modern, native AI tools.
**Q: What exactly counts as a “Message” in the pricing plans?** **A:** In our pricing structure, a “Message” represents a **full chat or conversation session**. It is **not** the count of every individual text bubble sent back and forth.
### Users & Access
### Manage users
Manage users from the **Users area** in the left menu of the admin area.
---
### Import users
You can import users from **Settings > Users > Import users**. Only CSV files are supported. You can download an example CSV file here. In the example file, the first row is the header and the columns **Height** and **Hair color** are custom user fields added from **Settings > Users > Custom fields**.
### Search users
You can search users by name, surname, email, and custom fields.
### Delete users
You can delete a user by opening the **User edit box** and then clicking **Delete user**. To delete multiple users at once, select the users you want to delete from the Users table and then click the top right **Delete icon**.
- When a user is deleted, all of their conversations and messages are automatically deleted permanently.
- The conversation attachments will be deleted permanently. If [AWS S3](https://devad.io/help/docs/chat#aws) is enabled, also the AWS S3 files will be deleted.
- If a user of a deleted user come back to the website, a new user is automatically created.
- Visitors are automatically deleted every 24 hours.
### Merge users
You can merge two users into one directly from the user table. Select any two users, then click the **Merge Users** button at the top.
- When two users are merged, all their conversations are combined under the new user account.
- The system automatically identifies and merges relevant information from both users into the new account.
### Additional user table columns
To display additional columns in the user table go to **Settings > Admin > Users table additional columns** and add the new columns. The value of each column is the slug of the user detail or extra user detail you want to display. The slug is lowercase and with spaces replaced by the char **–**. For example, the slug of the extra user detail “Date of birth” is “date-of-birth”.
### User types
---
| Type | Description |
| --- | --- |
| | A “user” is any user with an email. |
| | A “lead” is any user with no user details, who is automatically registered, and with at least one conversation. |
| | A “visitor” is any user who has not started a conversation. Note: Visitors are automatically deleted every 24 hours. |
---
### Manage agents and admins
Manage, create, and delete agents and admins from the **Users area**.
- Configure agents’ privileges and permissions from **Settings > Admin > Agent privileges**.
- It can create a supervisor from **Settings > Admin > Supervisor**. The Supervisor is a special agent with specific privileges, it must be an administrator. You can add multiple supervisors by adding comma separated admin IDs.
- To create an agent or ad admin, go to the **users** area and click the button **Add user** on the top right.
- Only agents and admins can log in the CHAT.devad.io admin area.
- When you activate the CHAT.devad.io plugin on WordPress, an admin account is automatically created using the same username and password as the currently logged-in user.
---
### Collect user details
You can gather user details, such as their name and email, through various methods:
- With a pre-chat form using the [registration form](https://devad.io/help/docs/chat#registration) .
- With the [Follow-up](https://devad.io/help/docs/chat#built-in-messages) message.
- With the chatbot [flows](https://devad.io/help/docs/chat#open-ai-flows) .
---
### Pre-chat Form Registration
The registration form is a pre-chat form that requires the user to enter specific information before starting the chat. Use it to require users to provide certain information, such as their name and email, before starting a chat. You can configure the registration form in **Settings > Users**.
### User Information
- You can use the registration form as a pre-chat form by limiting the information requested to the user to only the user’s email address or the user name, for example. To do that, set the **Require registration** option to **Registration form** and enable the required user fields under the **Registration fields** list.
- The log-in form is shown only if the email field is enabled.
- The password field is always shown when the user system is set to “WordPress”.
- You can automatically log in a user via [URL parameters](https://devad.io/help/docs/chat#url-parameters) .
- If a user tries to register with an email that’s already registered, an [OTP](https://devad.io/help/docs/chat#otp) will be sent to allow them to log in. Keep in mind that in real-world use, duplicate registrations rarely occur since users remain logged in on the same device, it usually happens only during testing.
---
### Information
### OTP
The OTP feature verifies a user’s email during registration by sending a one-time code to their email address. The user must enter this code in the registration form. Enable it from **Settings > Users > Email verification**, and customize the OTP email from **Settings > Users > Email verification email**. Note that the OTP is always sent — even if the feature is disabled — when a user tries to register with an email that’s already registered.
### Login verification URL
The login verification URL feature can be found under **Settings > Users > Login verification URL** in CHAT.devad.io. This feature allows CHAT.devad.io to authenticate an external login from an external source and automatically register and log in the user. CHAT.devad.io will send a request to the specified URL, appending the user’s email address and the password entered in the chat login form as URL parameters. The parameters are named **email** and **password**. Example: **https://example.com/login.php?email=example@mail.com&password=12345678**. The expected response from the URL should be a JSON object like below:
~~~
{
"first_name": "Jon",
"last_name": "Dans",
"email": "johon@example.com",
"profile_image": "https://chat.devad.io/user.svg",
"department": null,
"password": "",
"details": {
"location": [
"Location",
"New York, United States"
],
"country_code": [
"Country code",
"America/New_York"
]
}
}
~~~
The value **first_name** is required.
### Login link and forgot password
If a user forgets their password, they can click on the **Forgot password** button and an email containing a login link will be sent to their registered email address. Once the user clicks the link, they will be logged in automatically. You can customize the email sent to users from **Settings > Users > Login link email**. This feature is available only if **Require registration** is set to **Registration and login form** or **Login form**.
---
### Other Access Settings
- New users are automatically displayed in the user table in real time.
- To view online users enable **Settings > Users > Register all visitors**.
- To receive the online user notification you have to enable **Settings > Notifications > Online users notification**, **Settings > Miscellaneous > Pusher** (if you are using the [cloud version](https://devad.io/help/docs/chat#cloud-version) , this setting is automatically activated) and **Settings > Users > Register all visitors** (activated by default). The feature covers all user types, including visitors and leads. Notifications are only sent once per user within a 24-hour period.
- Agents and admins can set their status to online or offline from the bottom-left profile panel. If the option **Settings > Notifications > Away mode** is active, the offline status is activated automatically when the agent or admin has been inactive in the admin area for at least 10 minutes. Inactivity is defined as not performing any mouse clicks, movements, or key presses. The automatic offline status feature is not enabled on mobile devices. For this feature to work correctly, [Pusher](https://devad.io/help/docs/chat#pusher) should be enabled.
- The users table use auto-pagination, which is limited to 100 results per scroll.
## Whatsapp
### Connect WhatsApp Business With CHAT.devad.io
CHAT.devad.io provides many flexible option to connect your WhatsApp Business Number
### **WhatsApp Integration Options**:
To install and connect WhatsApp with CHAT App, you have four primary options. Here is a quick overview to help you choose the best fit:
- **Automatic Sync Mode:** The easiest, fully automated method using the Cloud API. Ideal for users who want seamless, real-time synchronization.
- **Manual Sync Mode:** A hands-on method involving creating a Facebook App and manually managing tokens. Best for users who need custom configuration without using credits.
- **360dialog:** A third-party provider alternative. Useful if you already have a 360dialog account or prefer their API structure.
- **Twilio:** A popular third-party provider. Best for users already in the Twilio ecosystem, though it requires purchasing a new number and has some feature limitations.
### Detailed Steps
### 1st Option: Automatic Sync Mode:
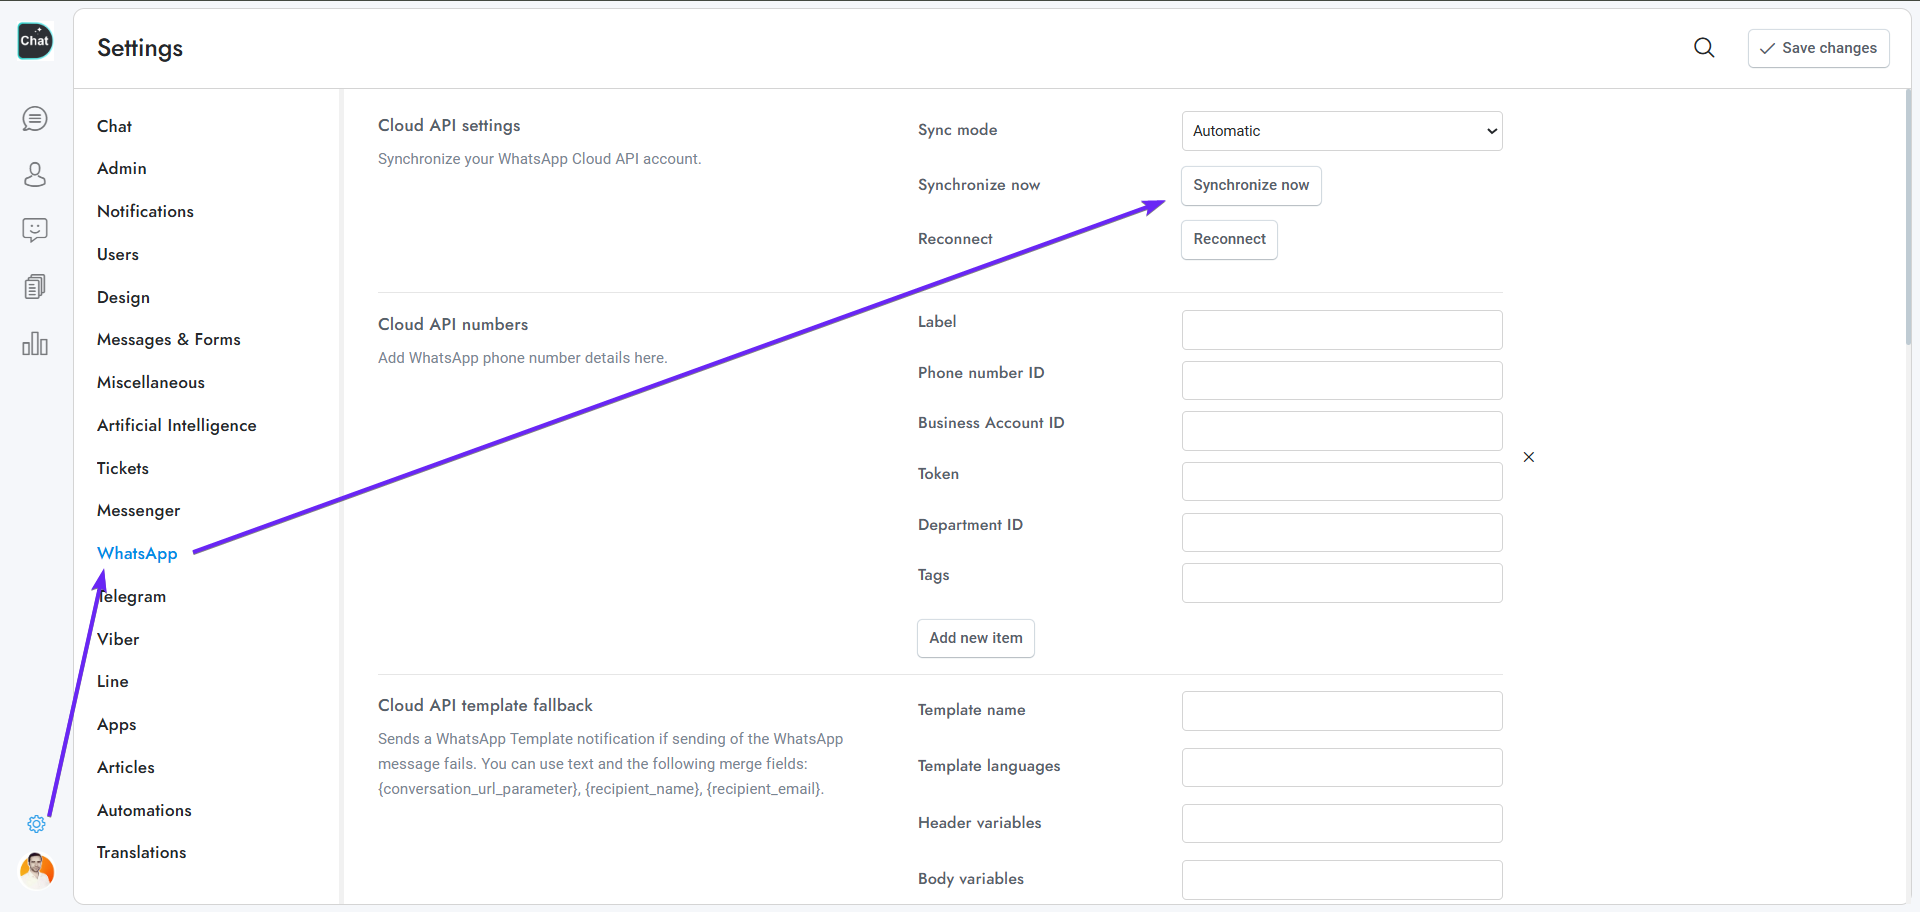
[1](https://devad.io/help/docs/chat#7a6b7df2-3139-4a35-9ee4-9c9c6343180c) go to [https://chat.devad.io/?setting=whatsapp](https://chat.devad.io/?setting=whatsapp) then from section *Cloud API settings and click***Synchronize now**button
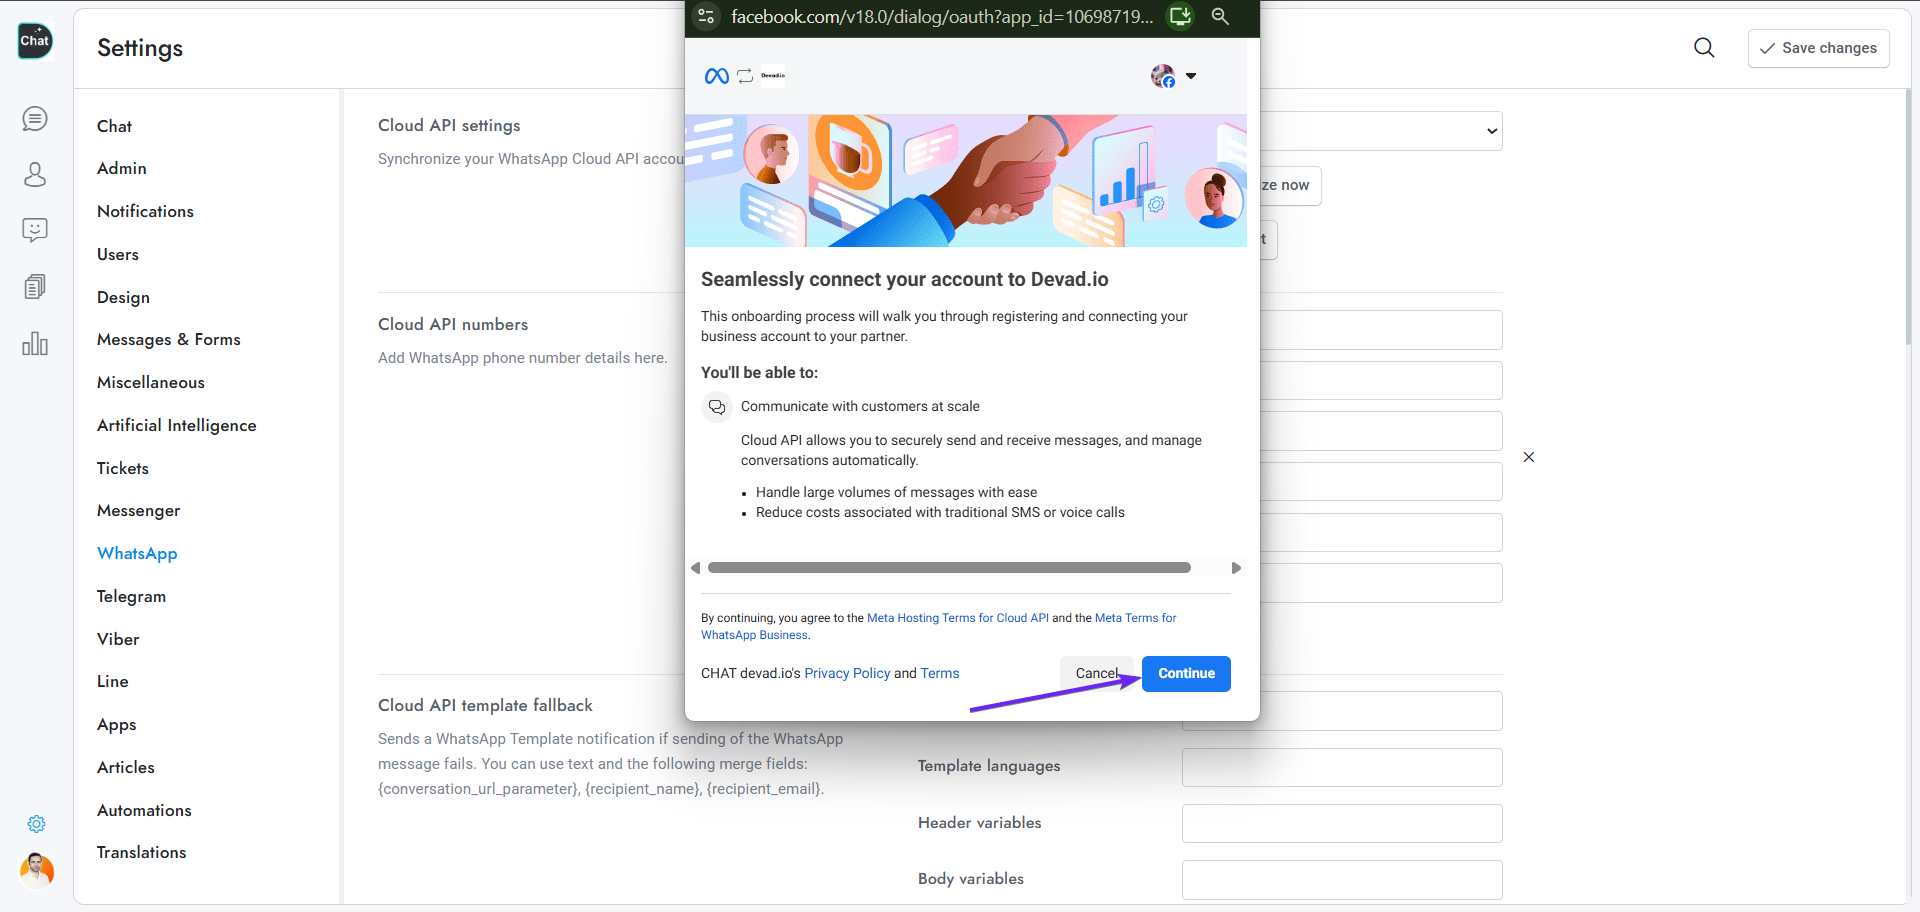
**Click confirm**
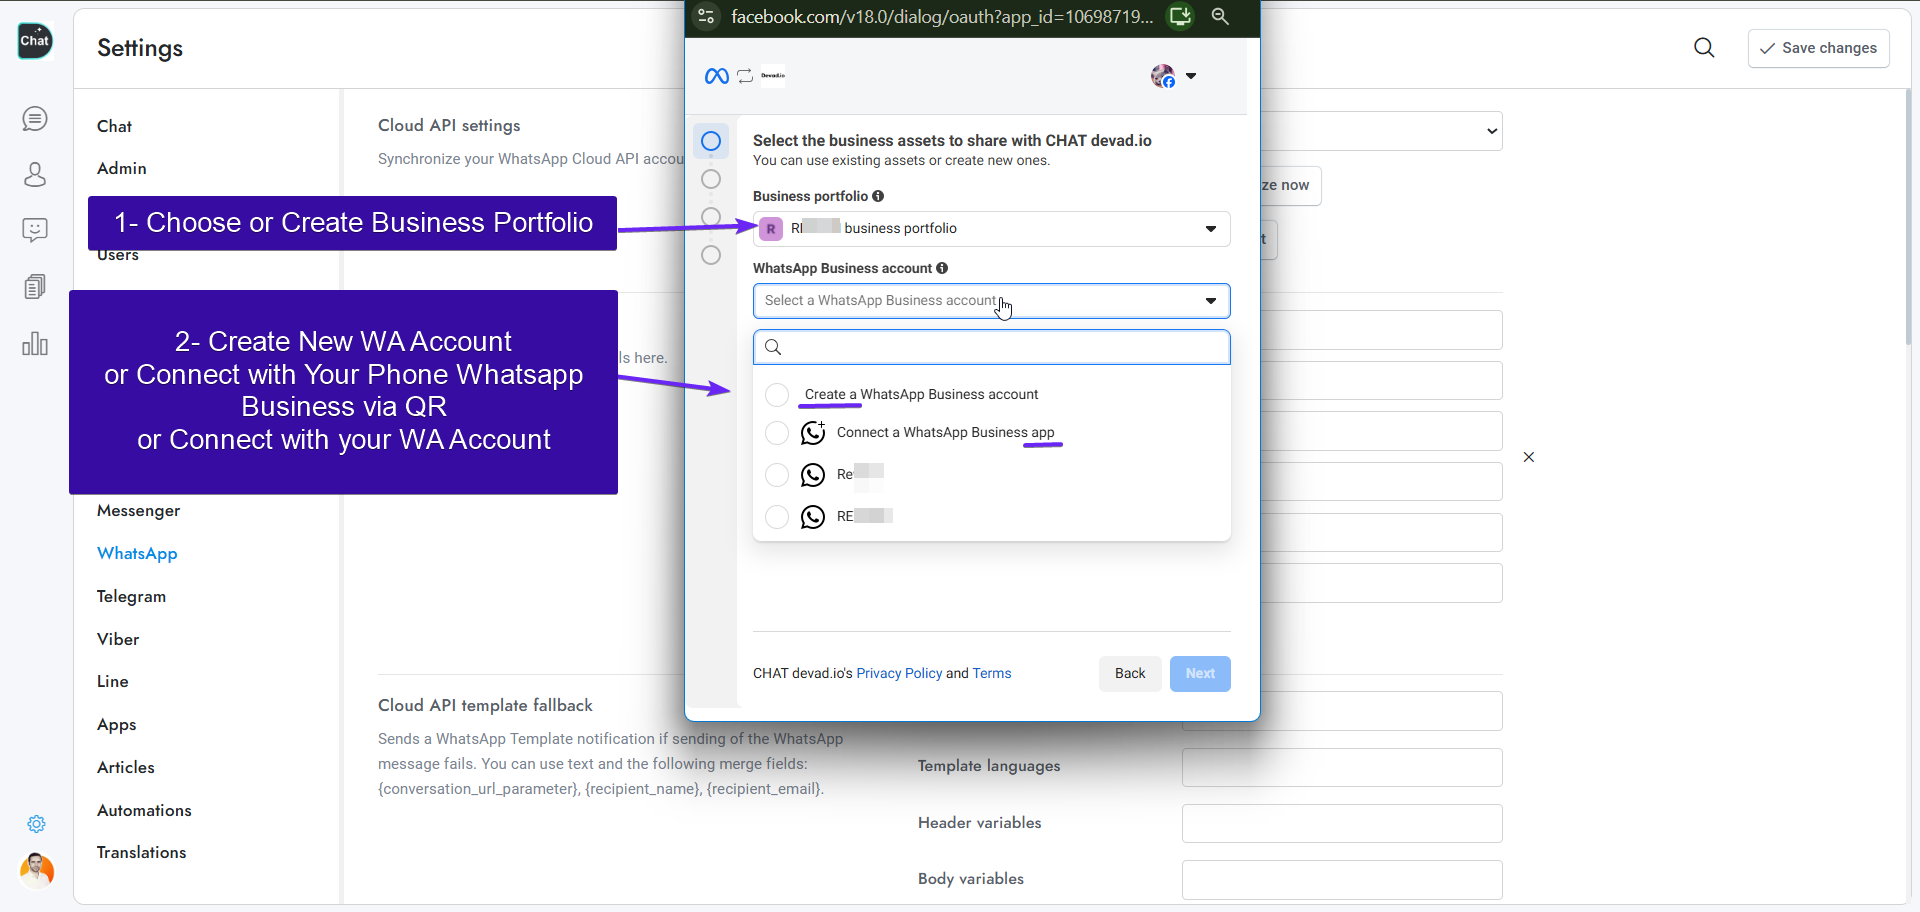
Create or choose a Portfolio, then choose WA Biz option

Get free WA Biz account or add your number
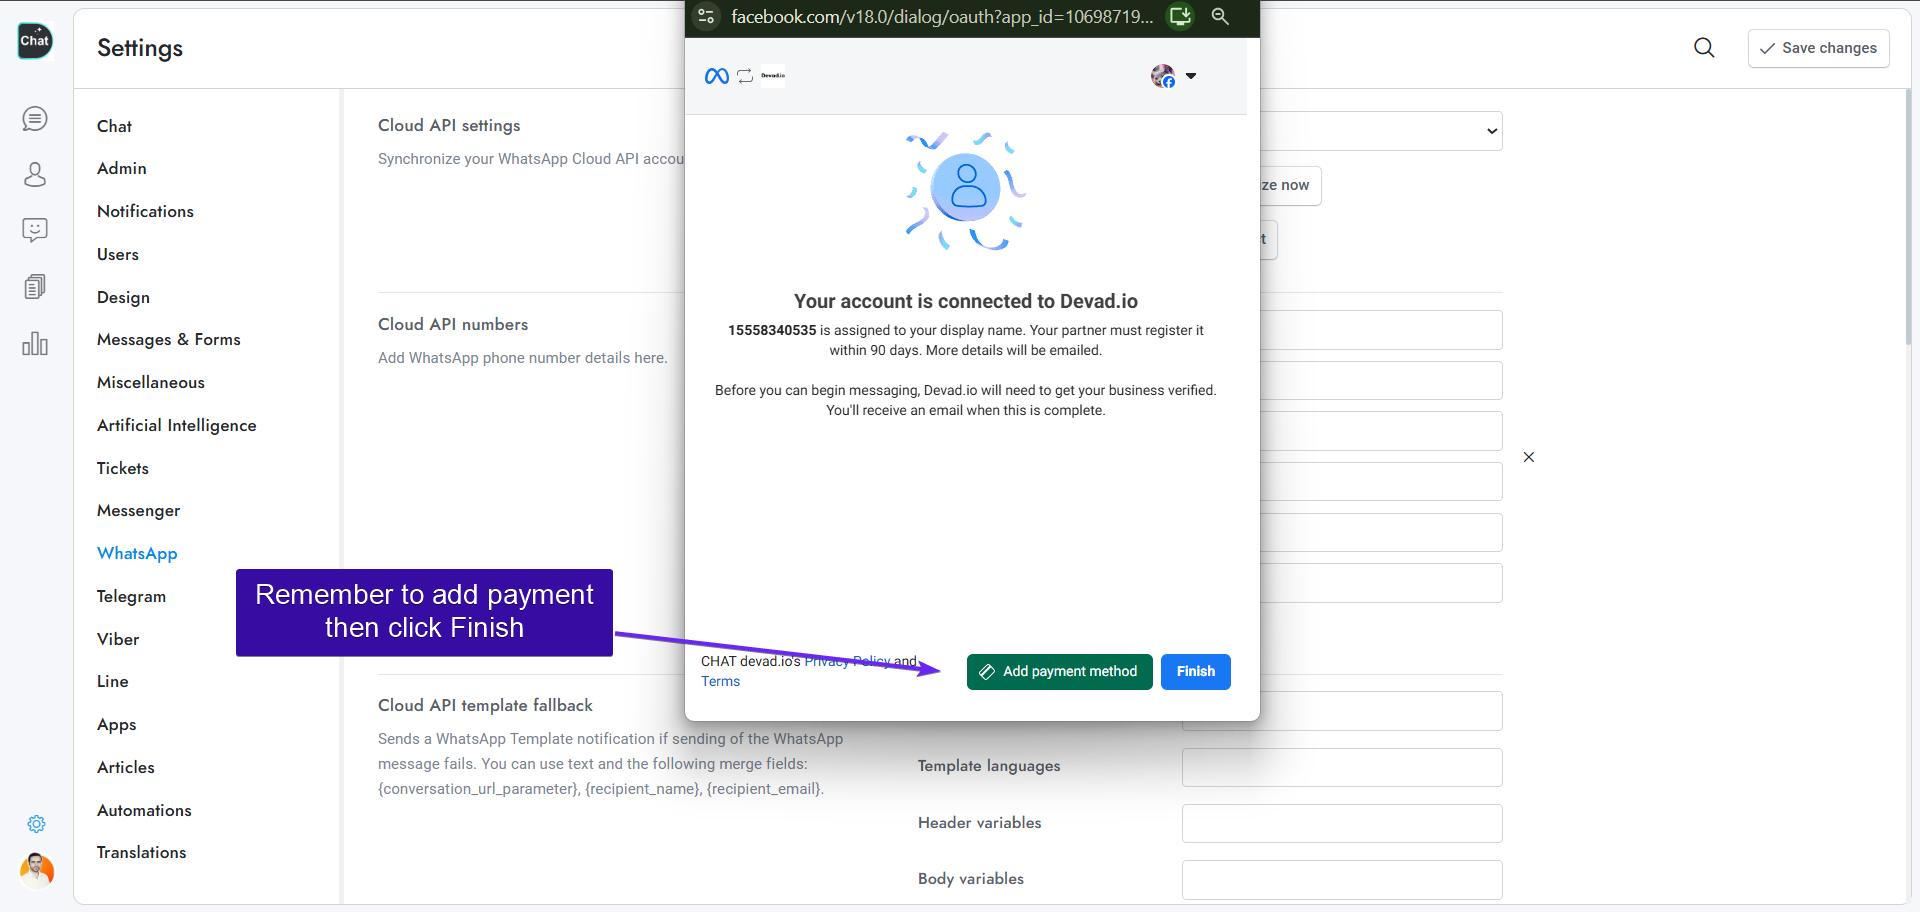
Click Finish, remember to add payment later
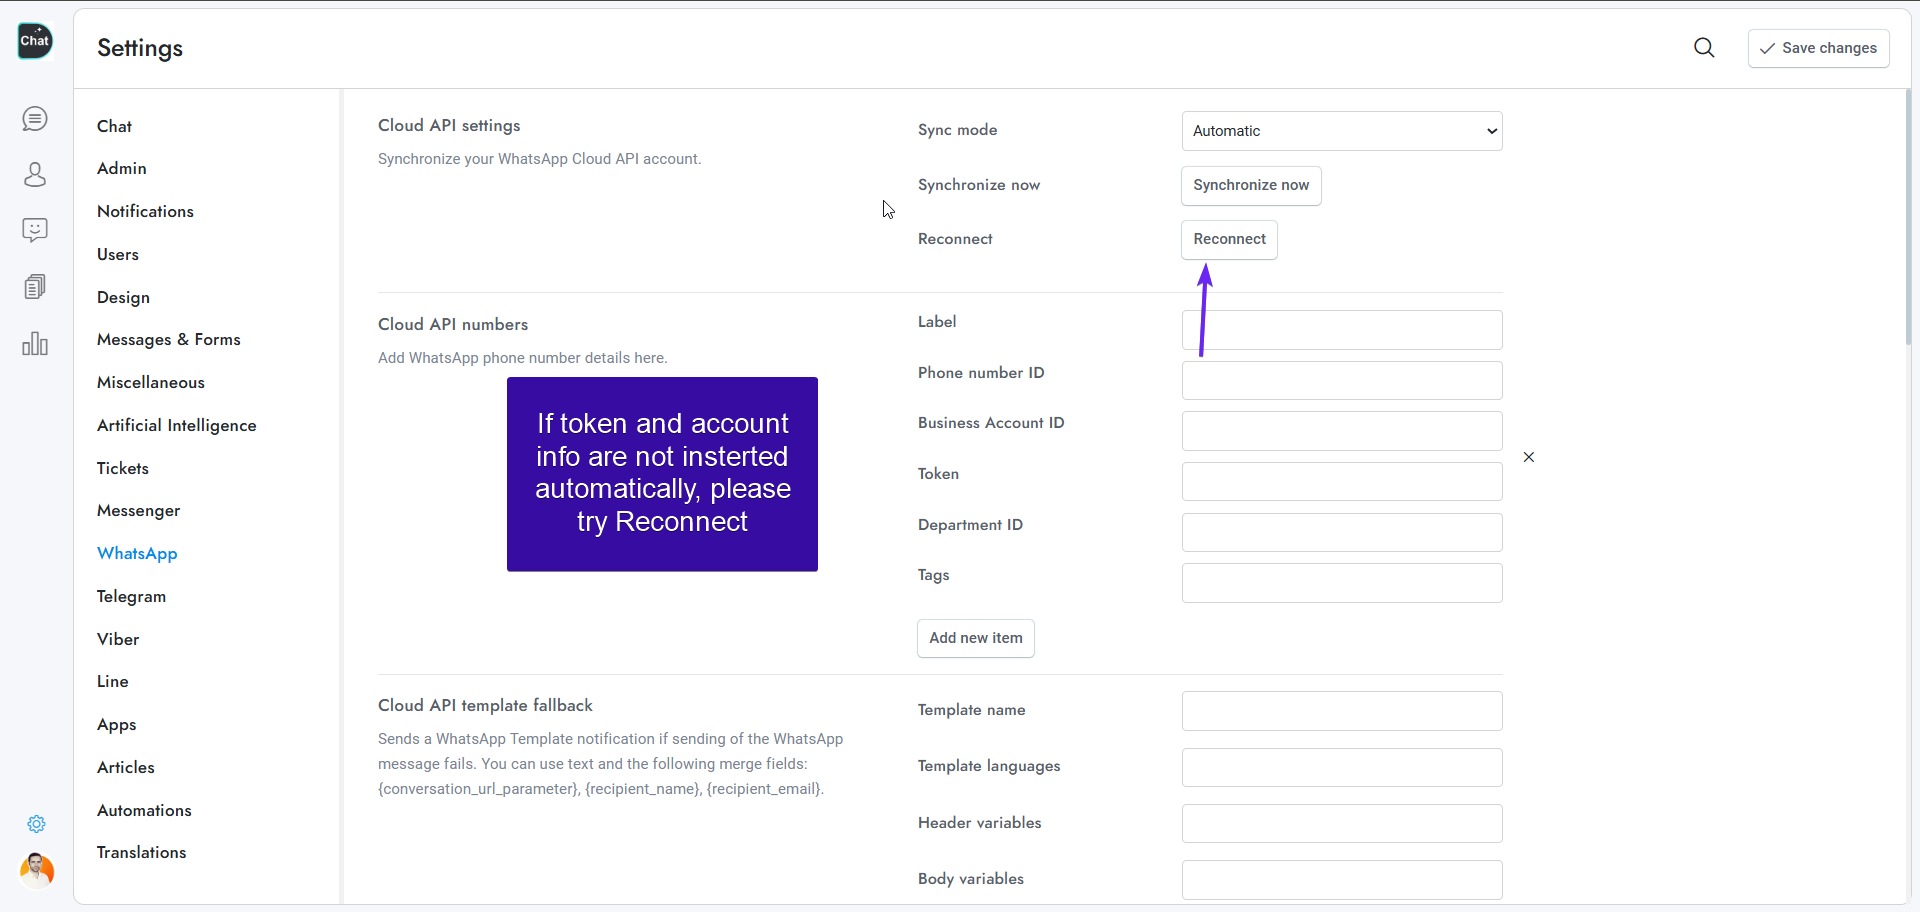
if failed, try to reconnect
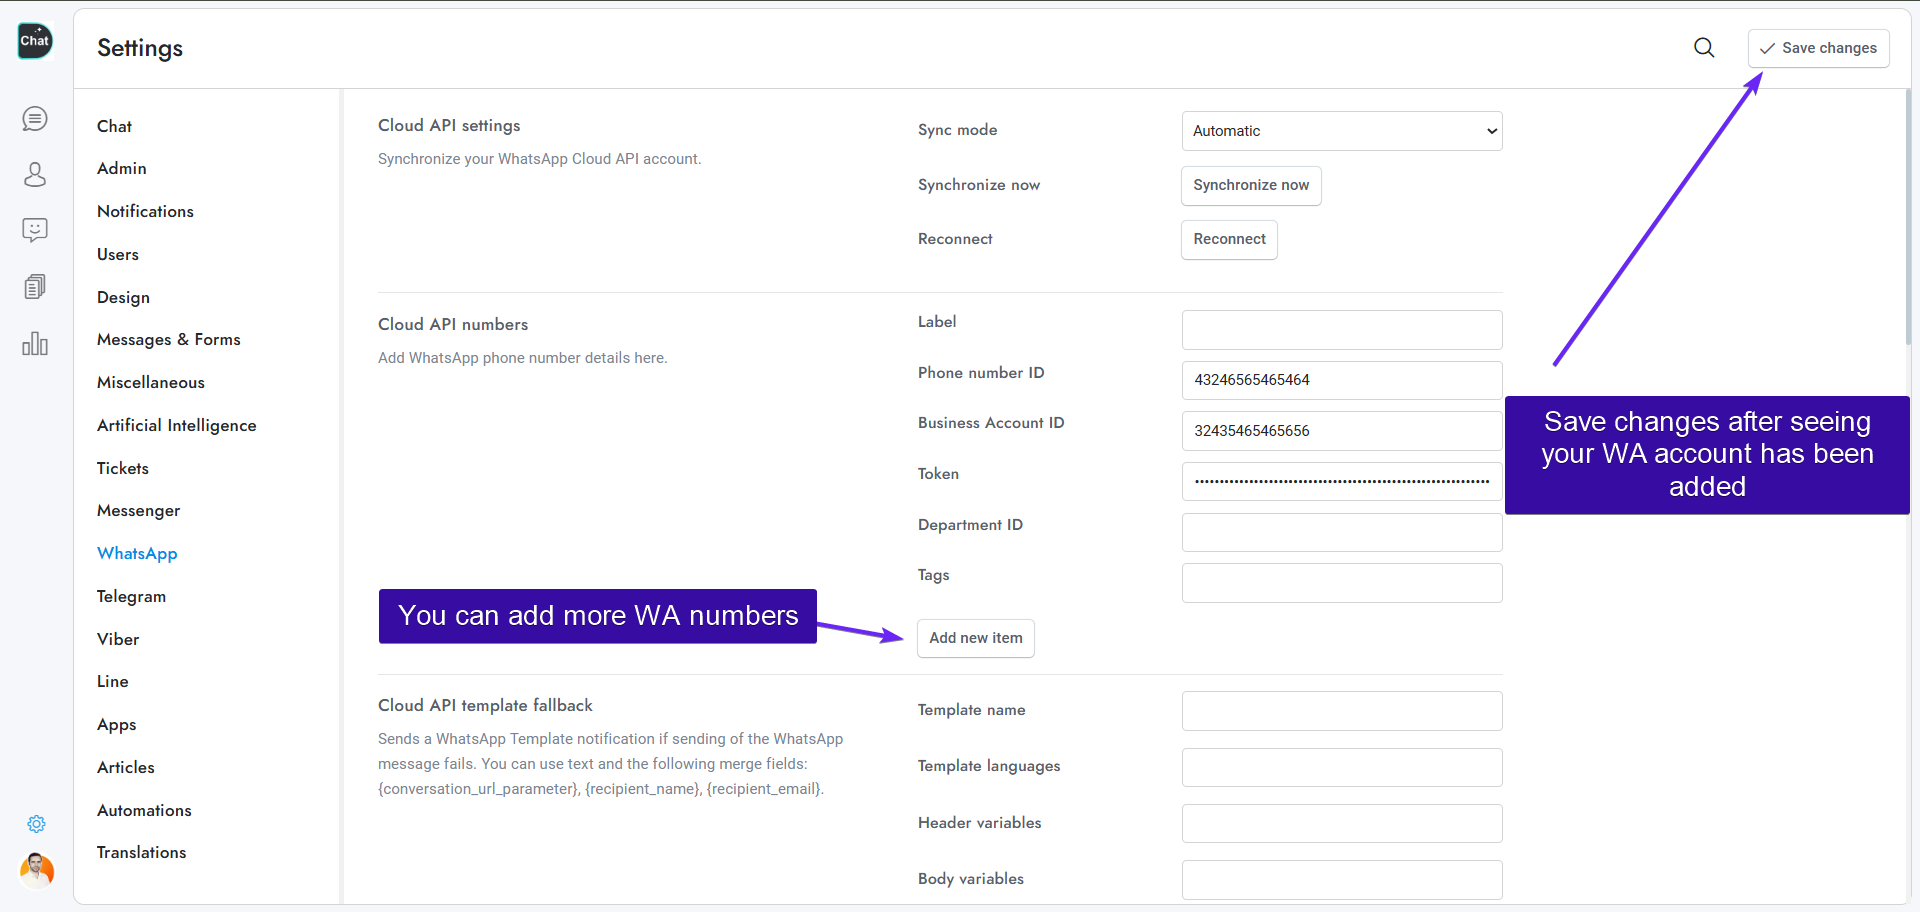
Save changes after seeing your WA account has been added
### Steps Explanation:
- Click **Synchronize now** and complete the procedure.
- To add new numbers, visit [https://business.facebook.com/wa/manage/phone-numbers/](https://business.facebook.com/wa/manage/phone-numbers/) . If you add new numbers after the sync process, you will need to sync them again. All numbers will be automatically synchronized. If you wish to disable specific numbers, you can delete them from **Settings > WhatsApp > Cloud API numbers**.
- If you sync again with the same phone number and do not receive the verification SMS or call, you can enter the latest PIN you received and it will work.
If you do not receive the messages sent to your WhatsApp number in CHAT.devad.io, please check the following:
- Click **Reconnect** and complete the procedure.
- Go to the [Meta Business Suite](https://business.facebook.com/billing_hub/payment_methods) and add a payment method.
if you add new phone numbers, please navigate to https://business.facebook.com/wa/manage/phone-numbers/. If you add numbers after the initial setup, you must run the sync process again to include them, as all numbers are synchronized automatically. To disable specific lines, you can remove them via Settings > WhatsApp > Cloud API numbers. Finally, if you re-sync an existing number but do not receive a verification call or SMS, simply enter the last PIN you received, as it will still be accepted.
### Troubleshooting: Sign-Up Errors
If you encounter issues during the Embedded Sign-Up process, here are common error messages and the steps you should take.
Before examining specific error messages (Automatic Mode or even Manual Mode), ensure you’ve addressed these common issues:
- **Invalid Phone Number:** You must use an active, standard mobile phone number (As Many virtual or VoIP numbers get rejected by WhatsApp).
- **Onboarding Limits:** Meta limits the number of new accounts you can create until your main business portfolio is fully verified. If you hit a limit, you may need to wait or accelerate verification.
- **Missing Compliance:** Your website, legal documents, or business information is incomplete or inconsistent.
- **Lack of Admin Access:** The Facebook account used to sign up must have **full Admin access** to the relevant Meta Business Account
- **Invalid account linking**. this is the most frequent issue’ It could be due to non-approved or **pending**Whatsapp Number or Whatsapp Manager .
**Verfication & approval:** The Whatsapp Manager and phone number both must be approved and verfied to be able to connect. other wise try Connect with Whatsapp Business App in facebook intergation windows
for most cases of failing connecting Whatsapp with our CHAT App (CHAT.devad.io) your WhatsApp number, your display name, or WhatsApp Account Manager may be pending review. Approval typically takes a few days; if it takes longer, please contact Meta Support regarding your Business Manager via this link: [https://www.facebook.com/business-support-home/](https://www.facebook.com/business-support-home/)
after getting approved please try connecting with CHAT App.
if you dont want to wait, try using “Connecting with Whatsapp Business Mobile App” method.
---
### 2nd Option: Manual Sync Mode:
Go to [https://chat.devad.io/?setting=whatsapp](https://chat.devad.io/?setting=whatsapp) then from section *Cloud API settings **follow the steps below***
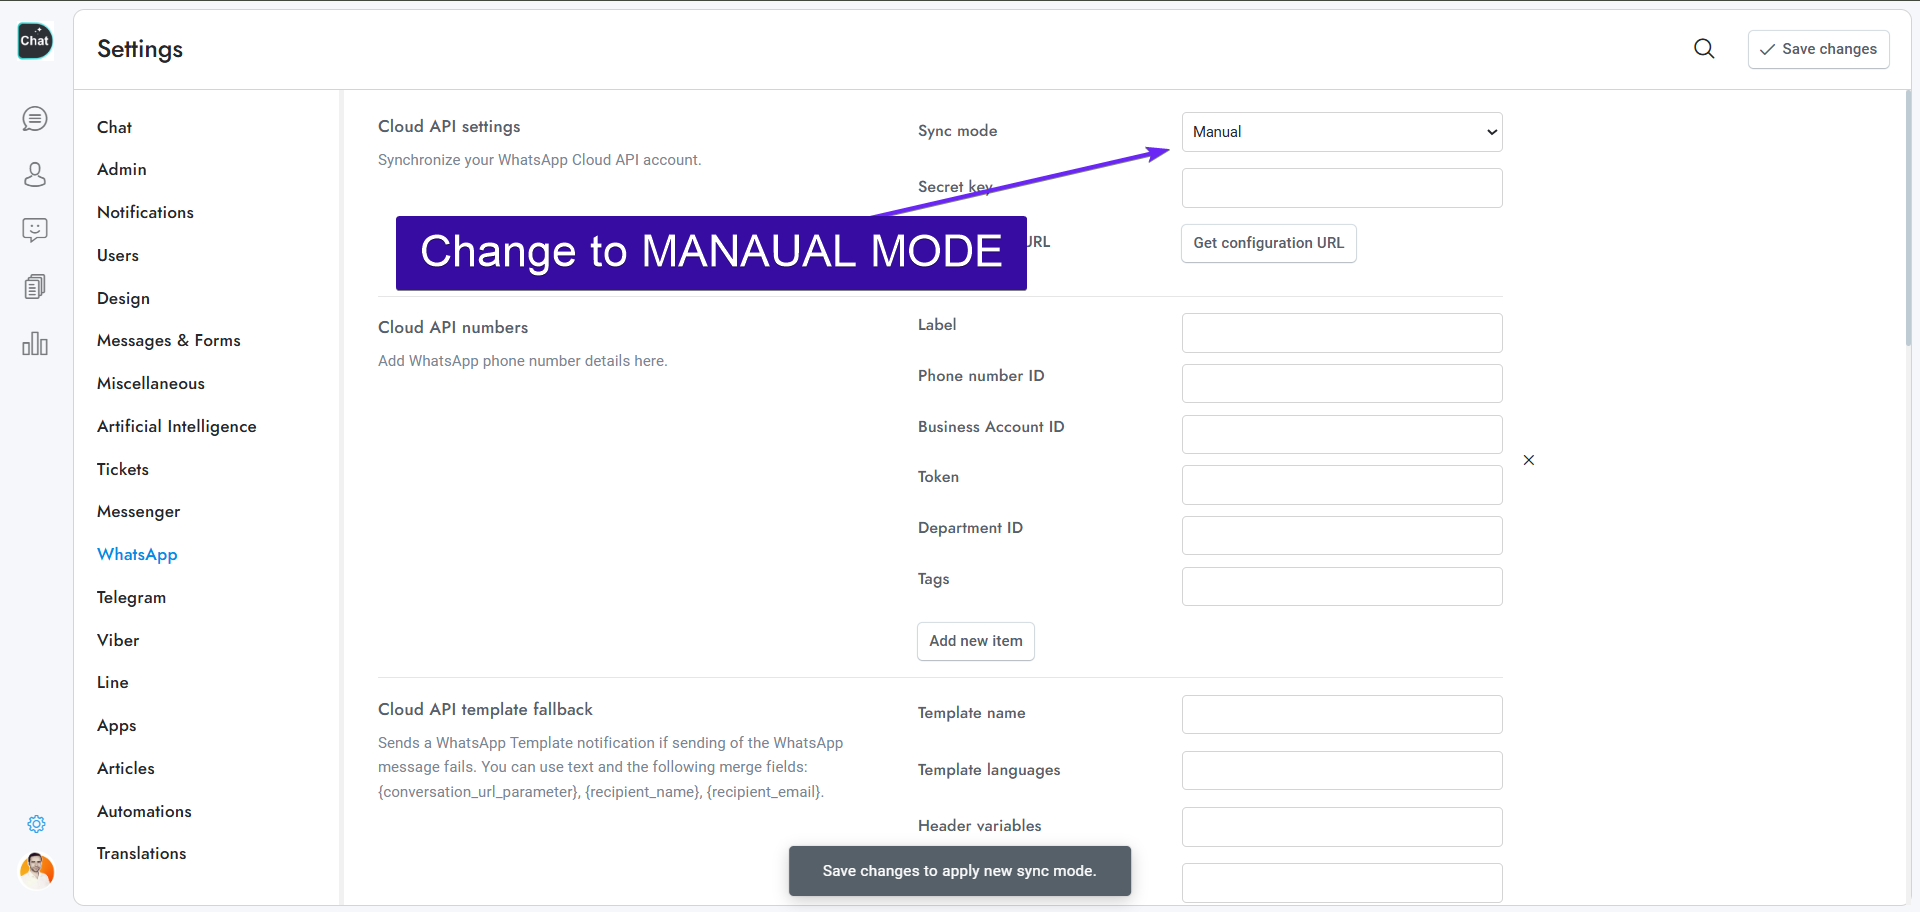
Cahnge to Manual Mode
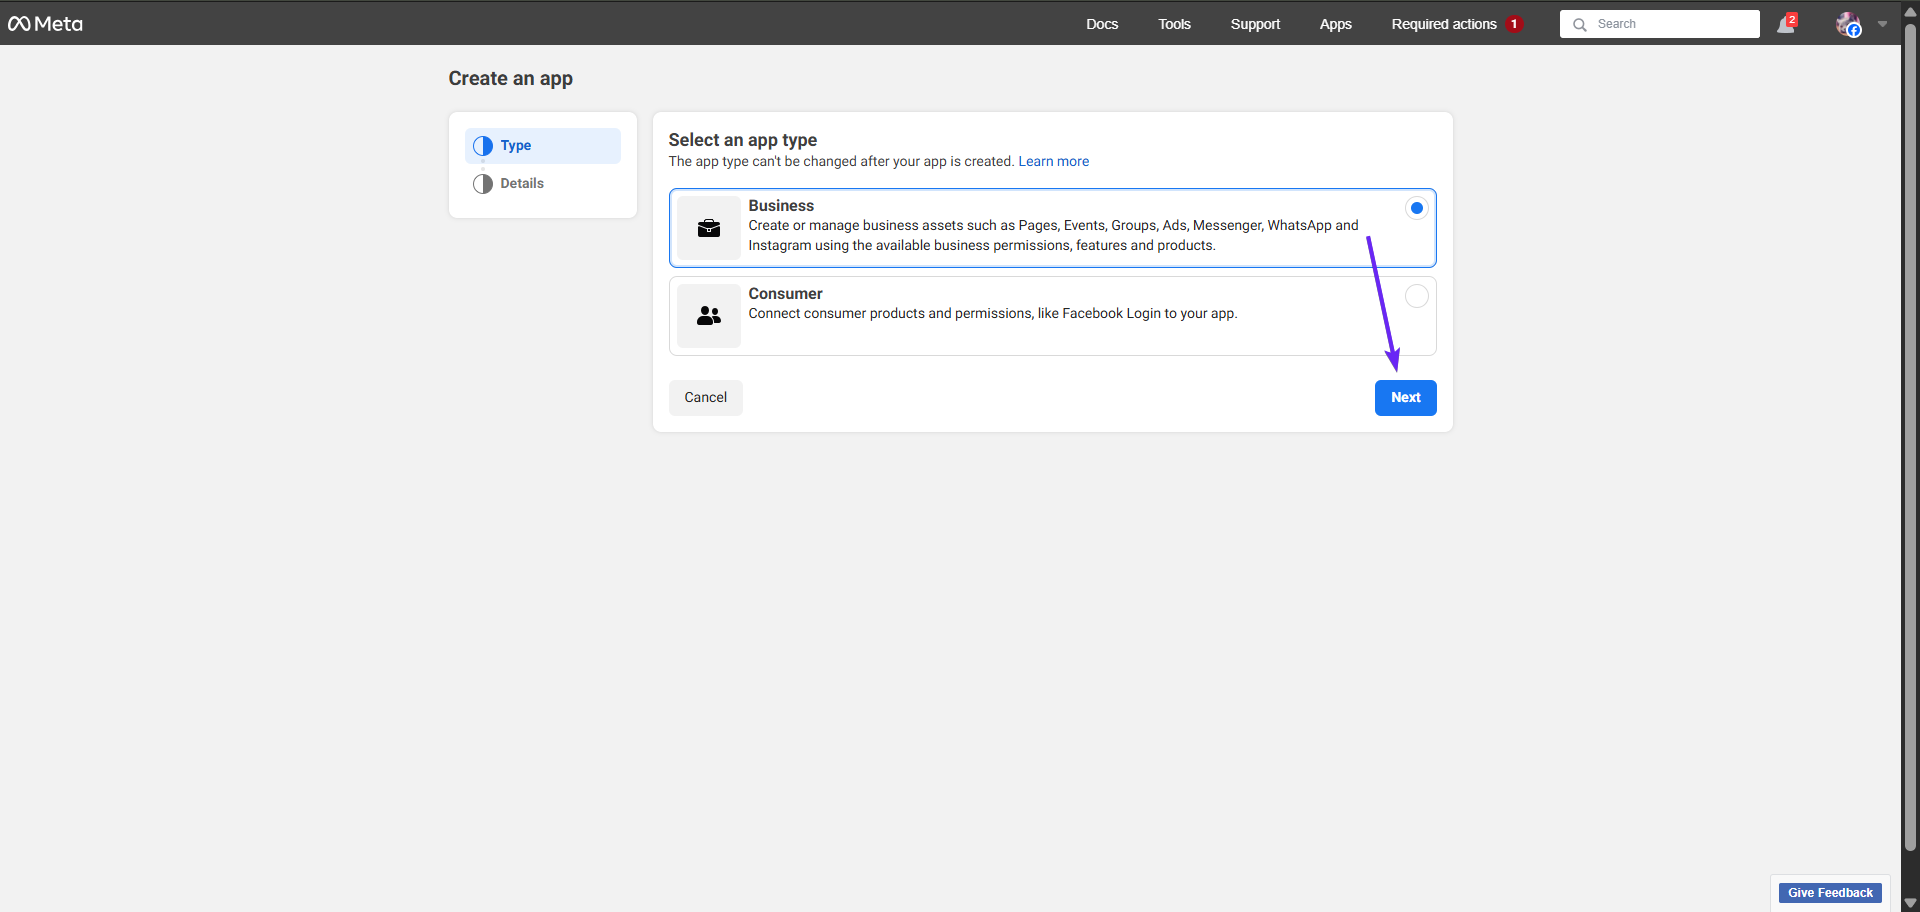
Go to [https://developers.facebook.com/apps/create/](https://developers.facebook.com/apps/create/) and create an app, choose App type as Business, chaose your Business portfolio
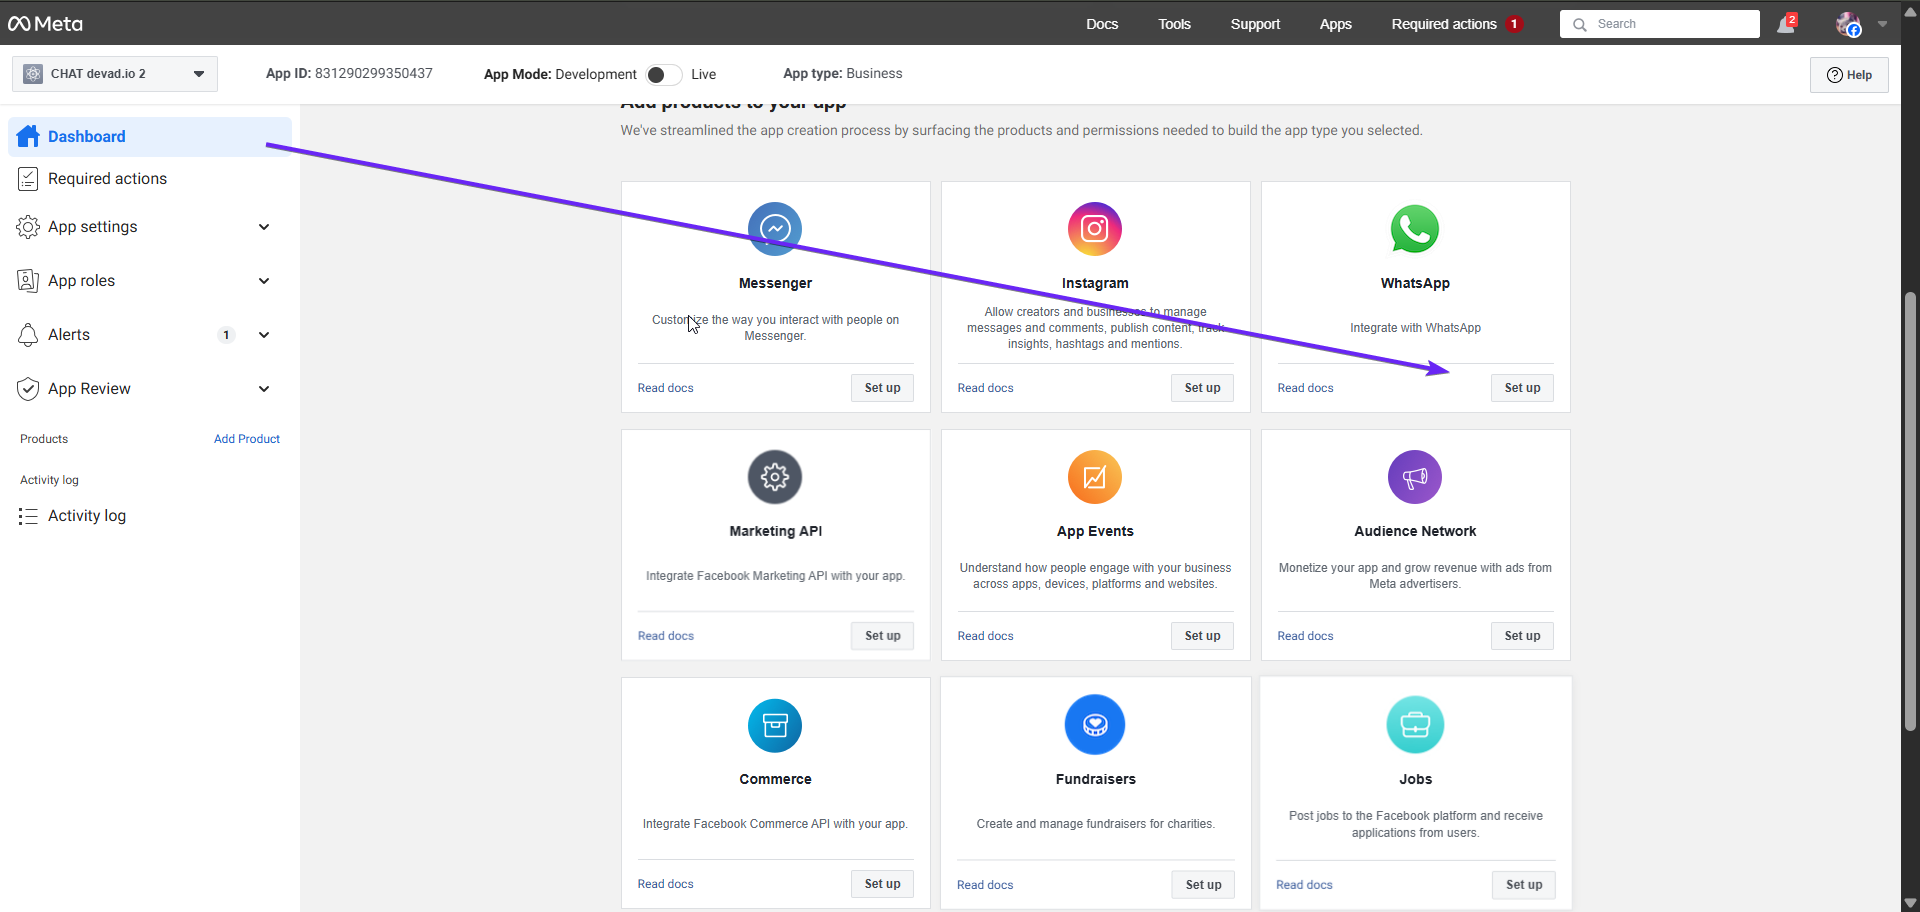
add WhatsApp
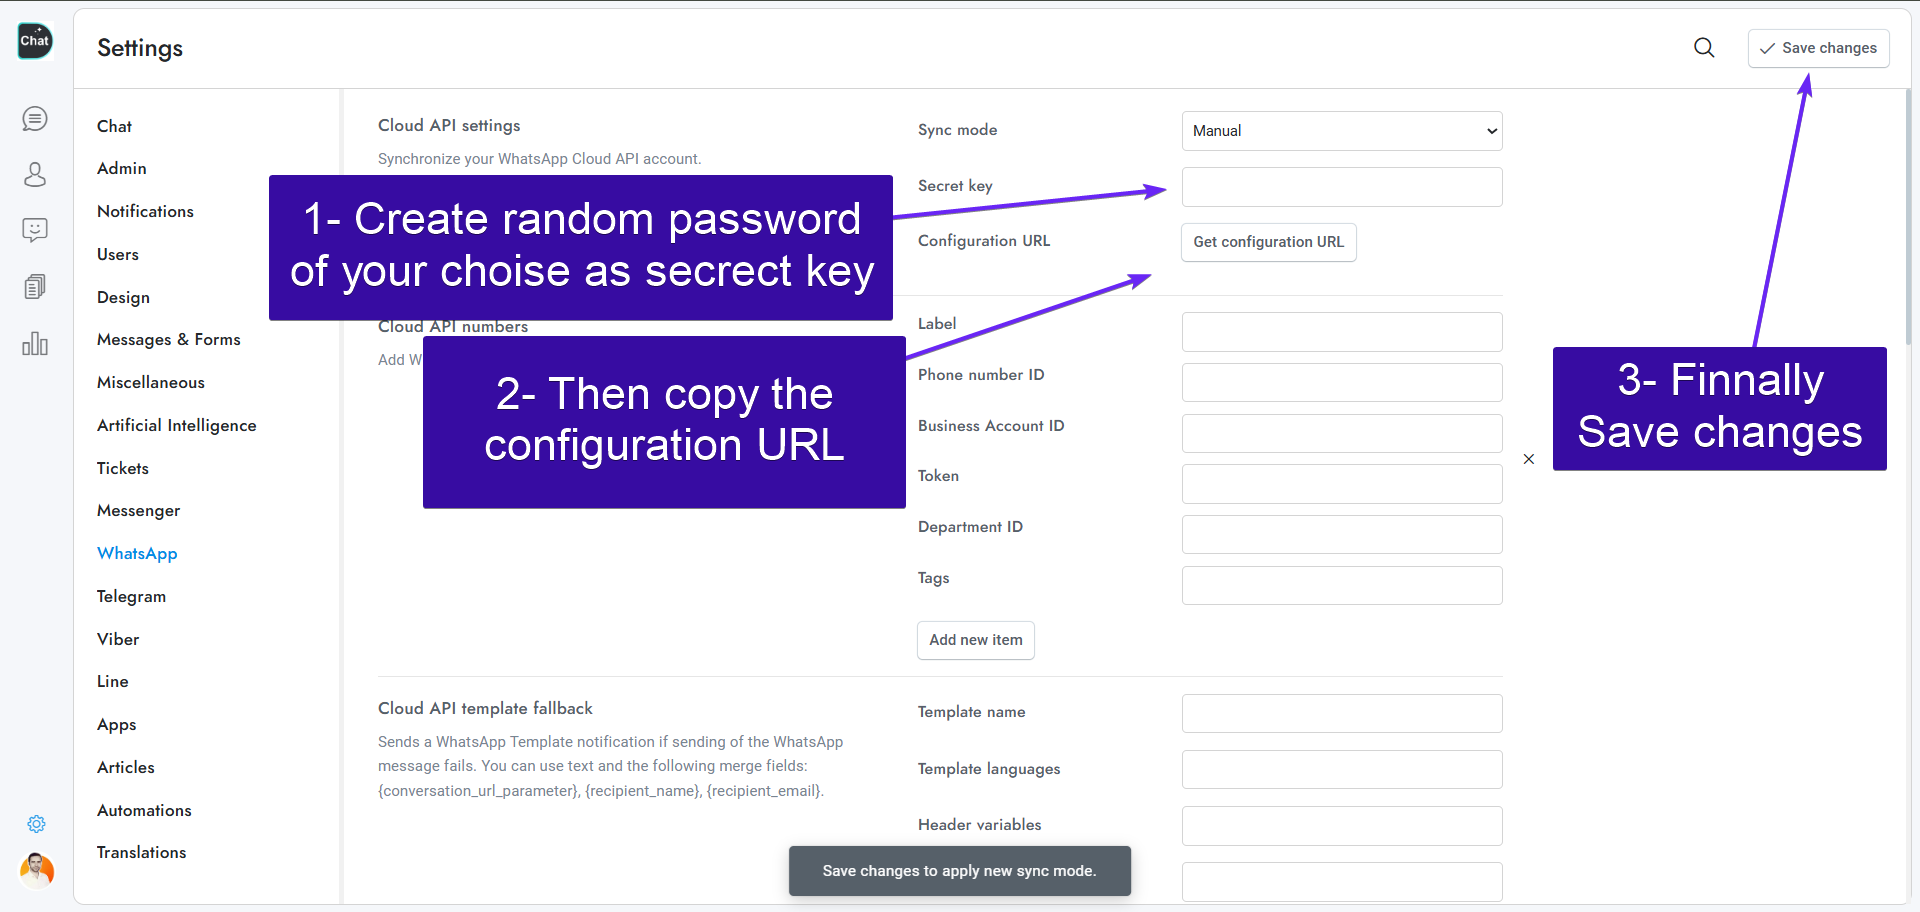
create random secret key, copy the config. URL to add in the facebook app in next step
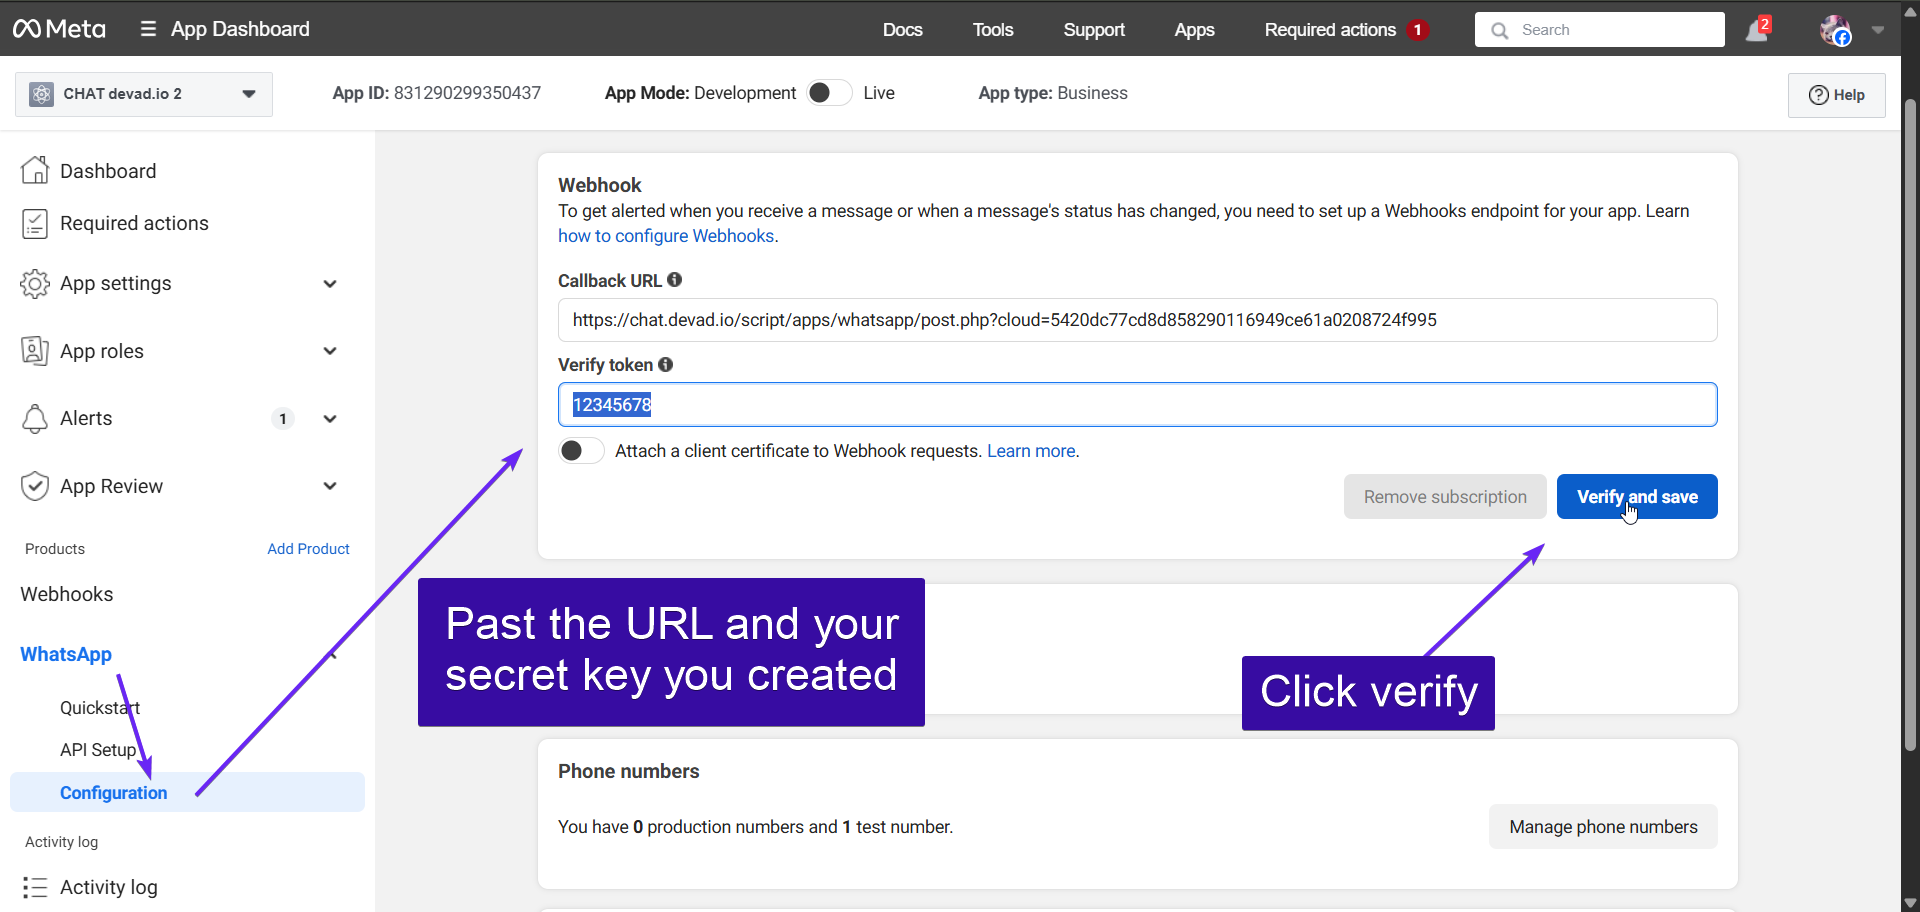
Past the config. URL and your secret key, then verify and save. then refresh the page
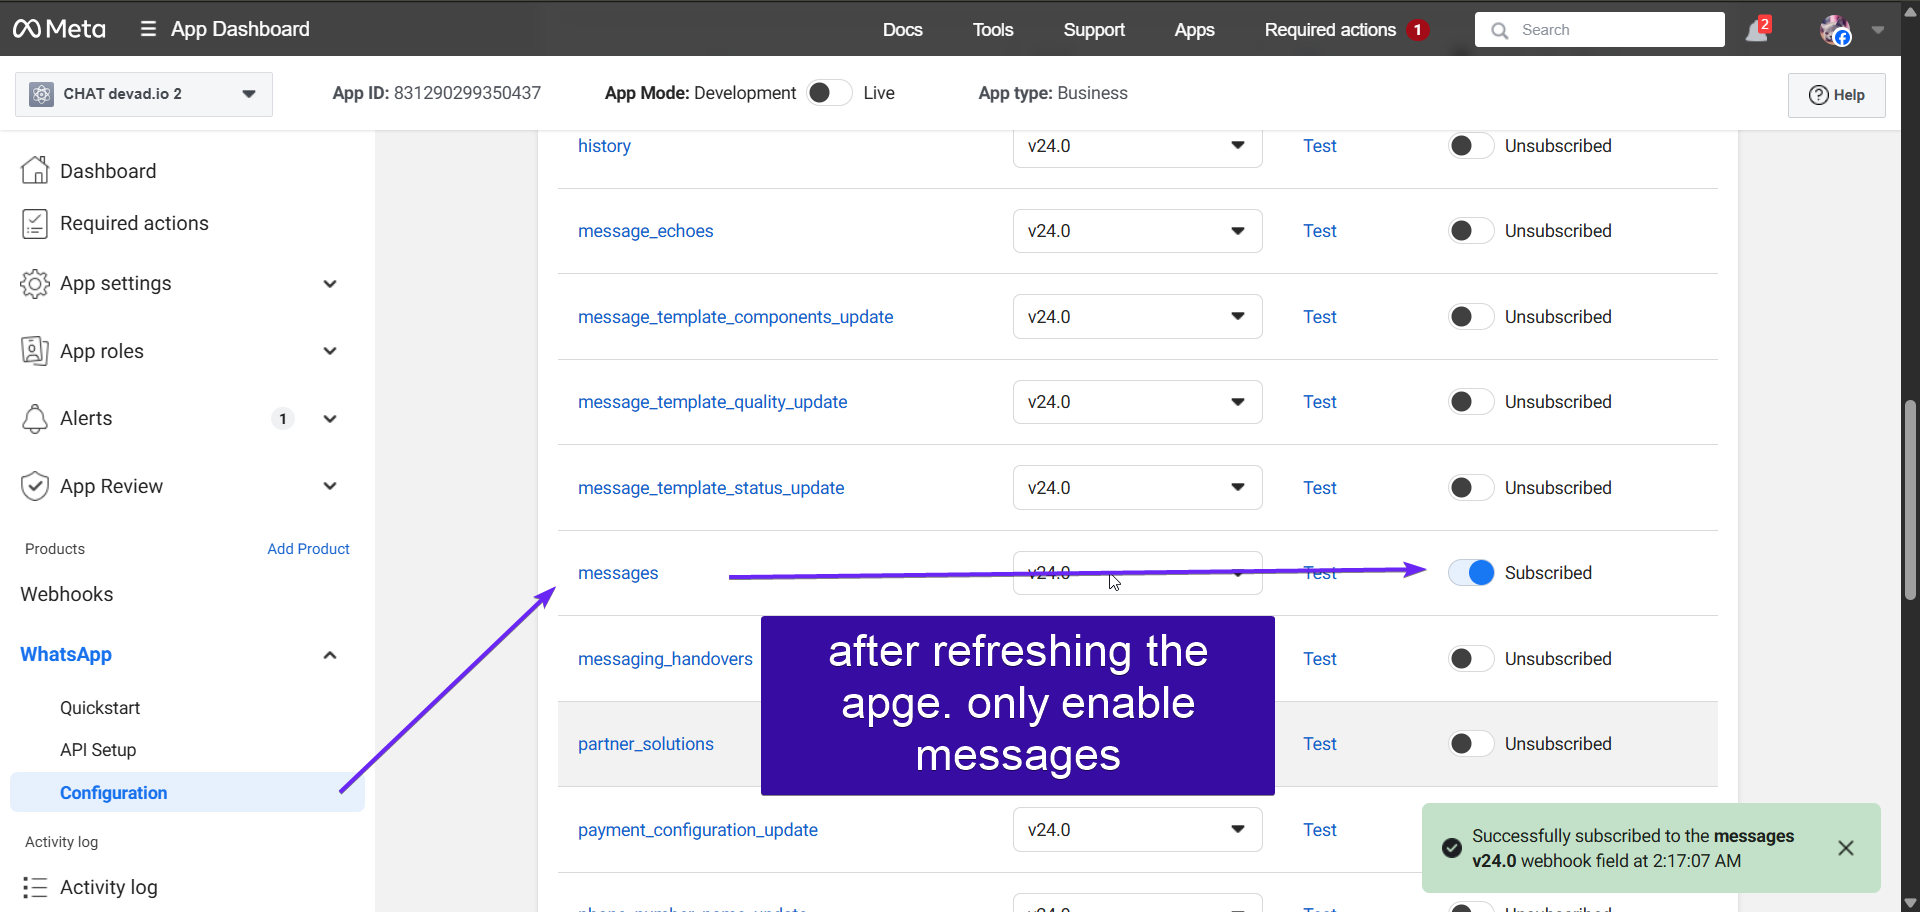
After refreshing the page, only enable the messages
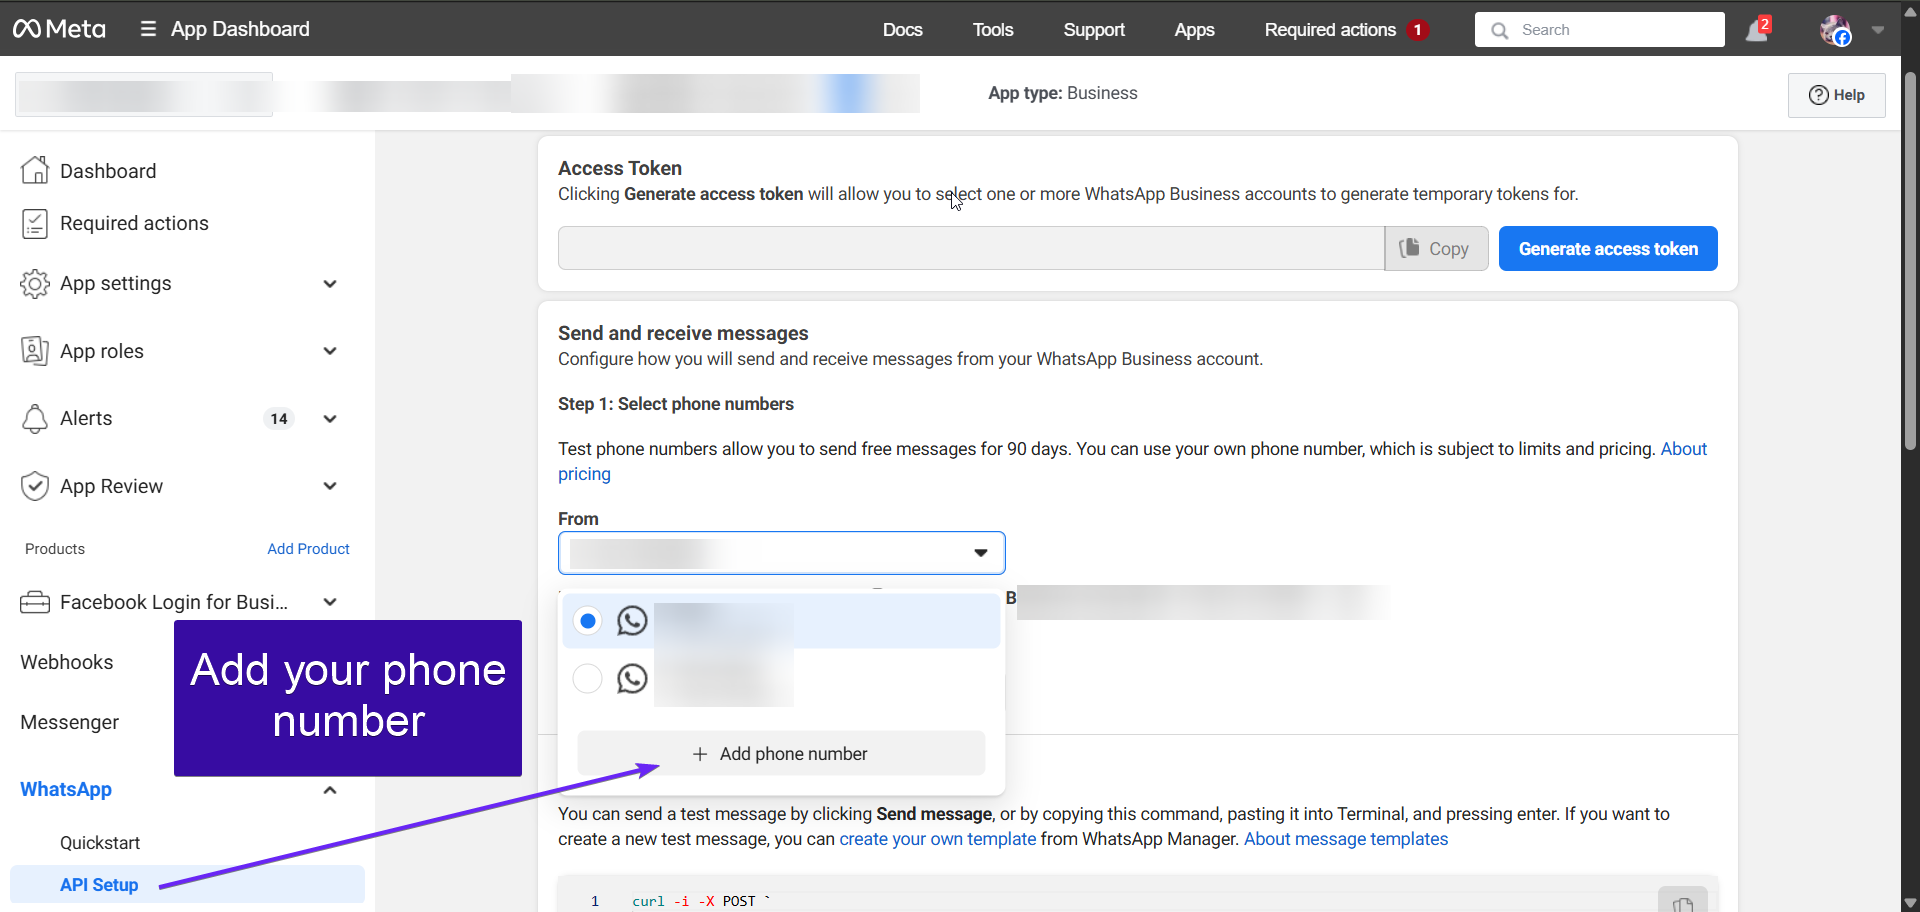
in Whatsapp Section go to API Setup and add your Whatsapp Business phone number
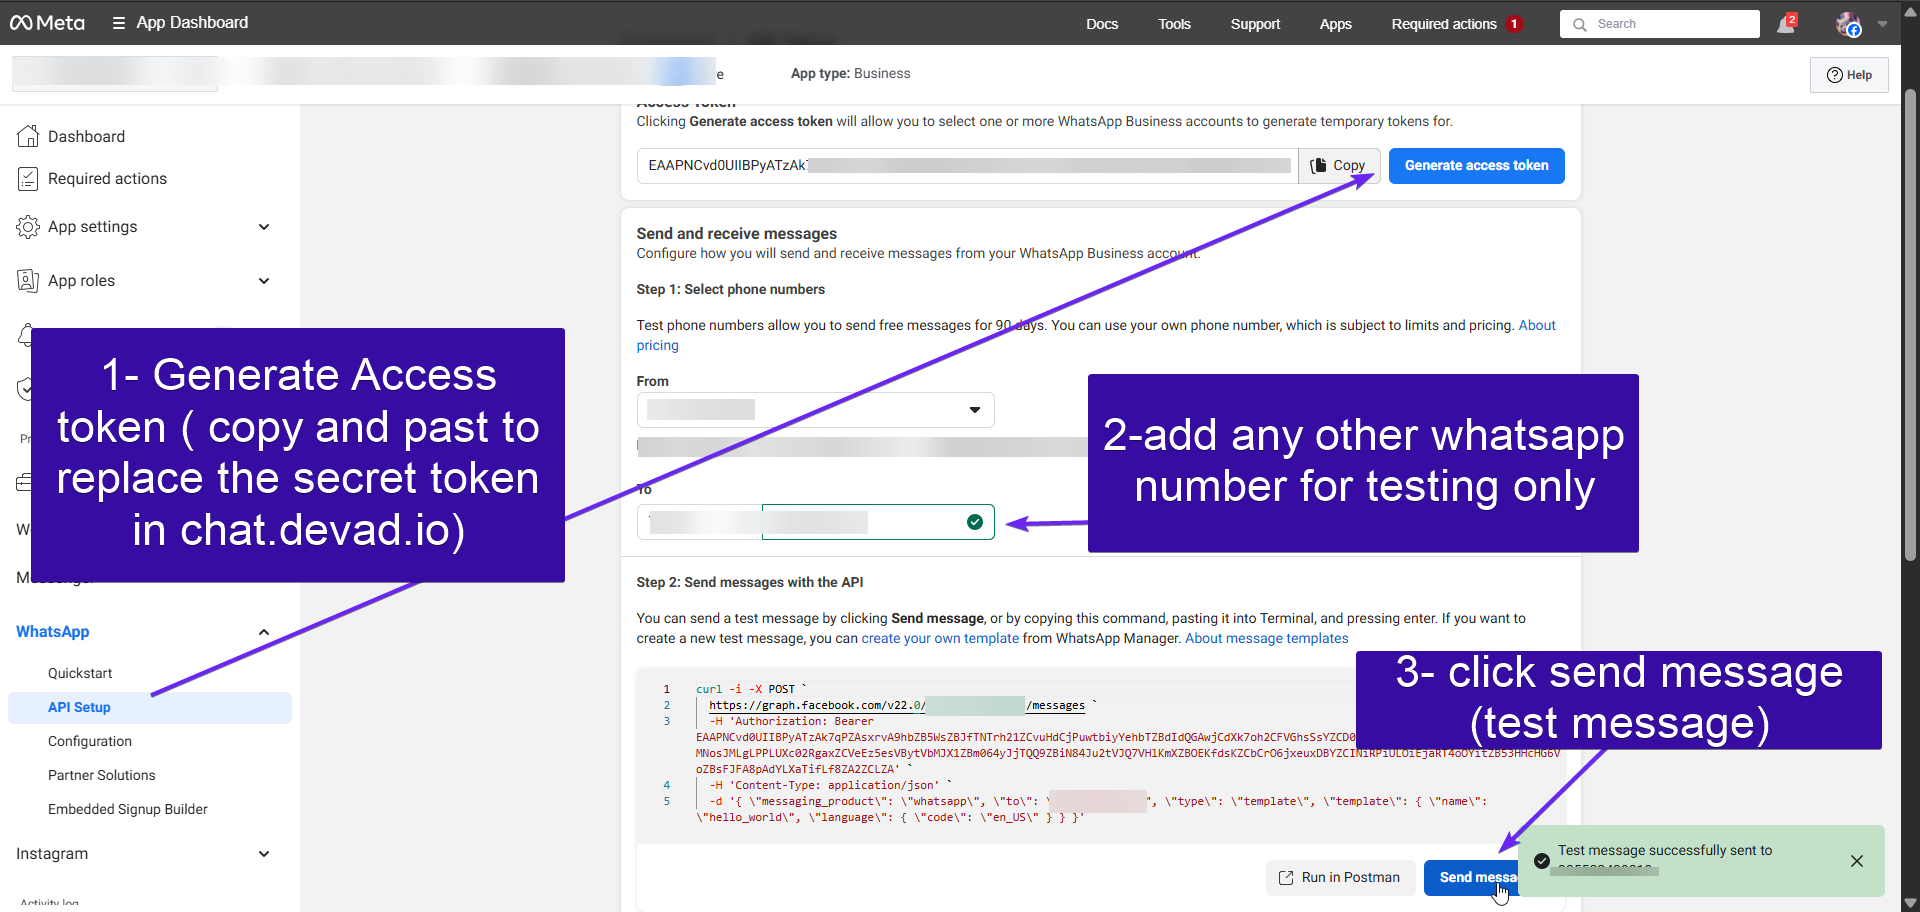
Generate Secret token, add any WhatsApp Number, then send the test message, and reply to that message
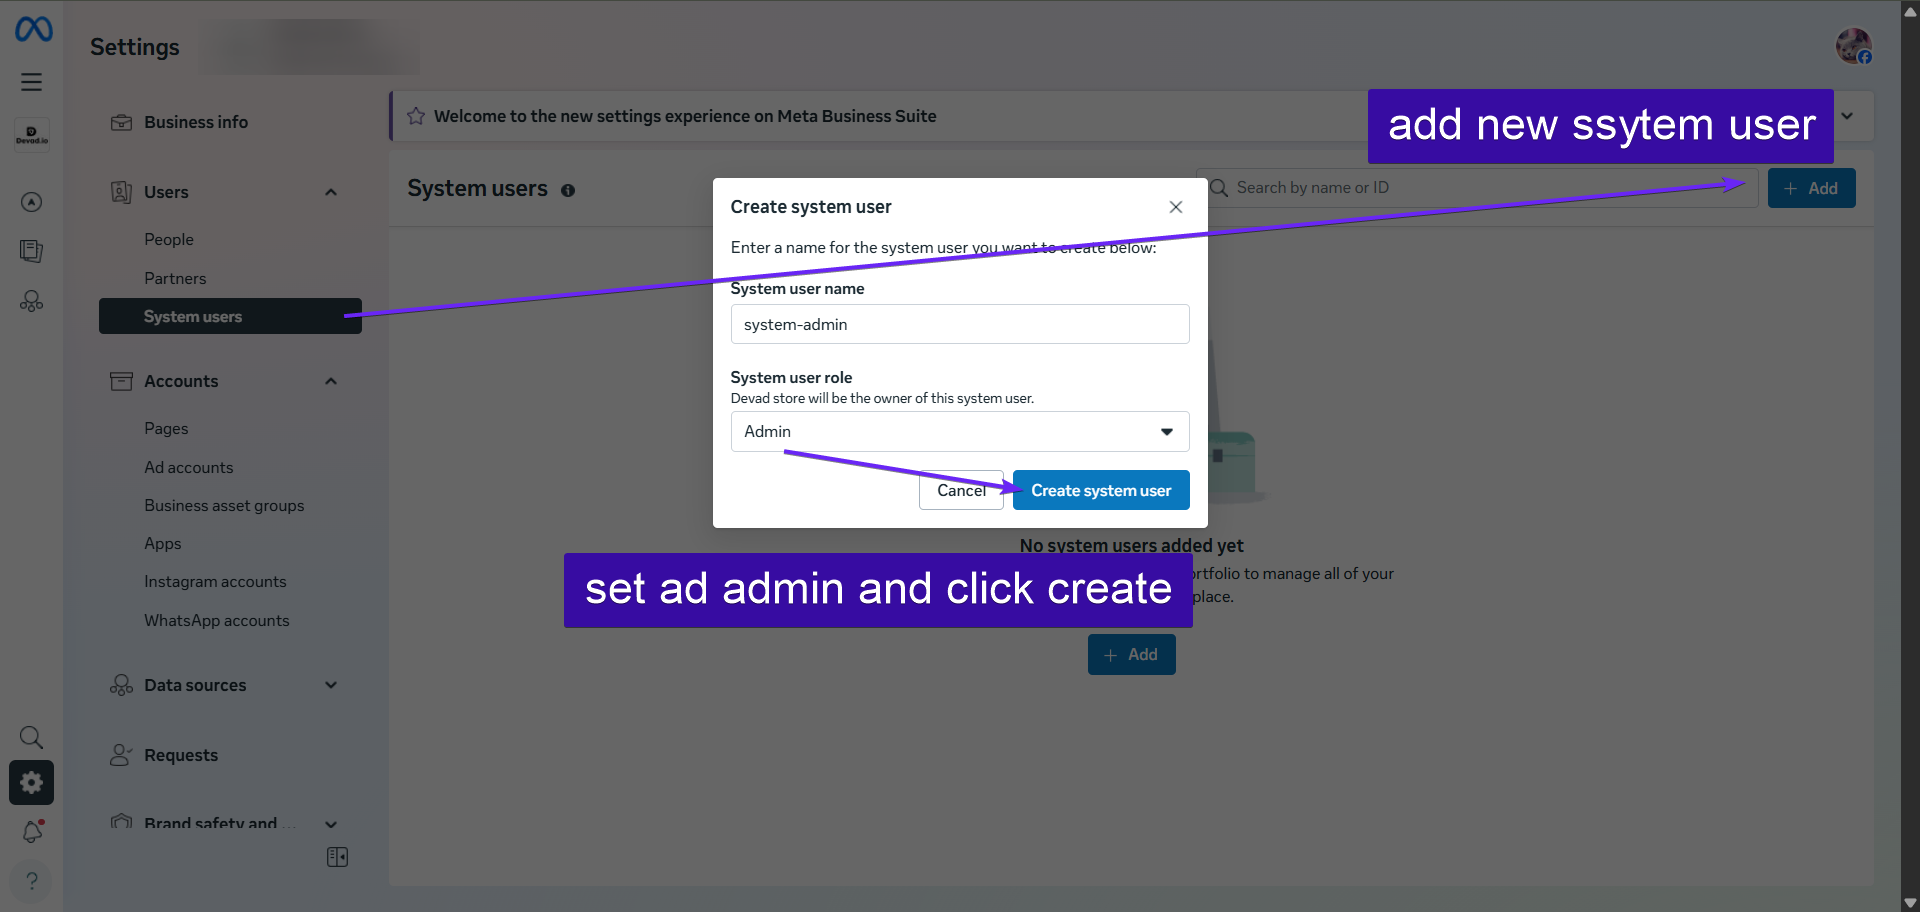
Go to [https://business.facebook.com/latest/settings/system_users](https://business.facebook.com/latest/settings/system_users) add syste user with admin role
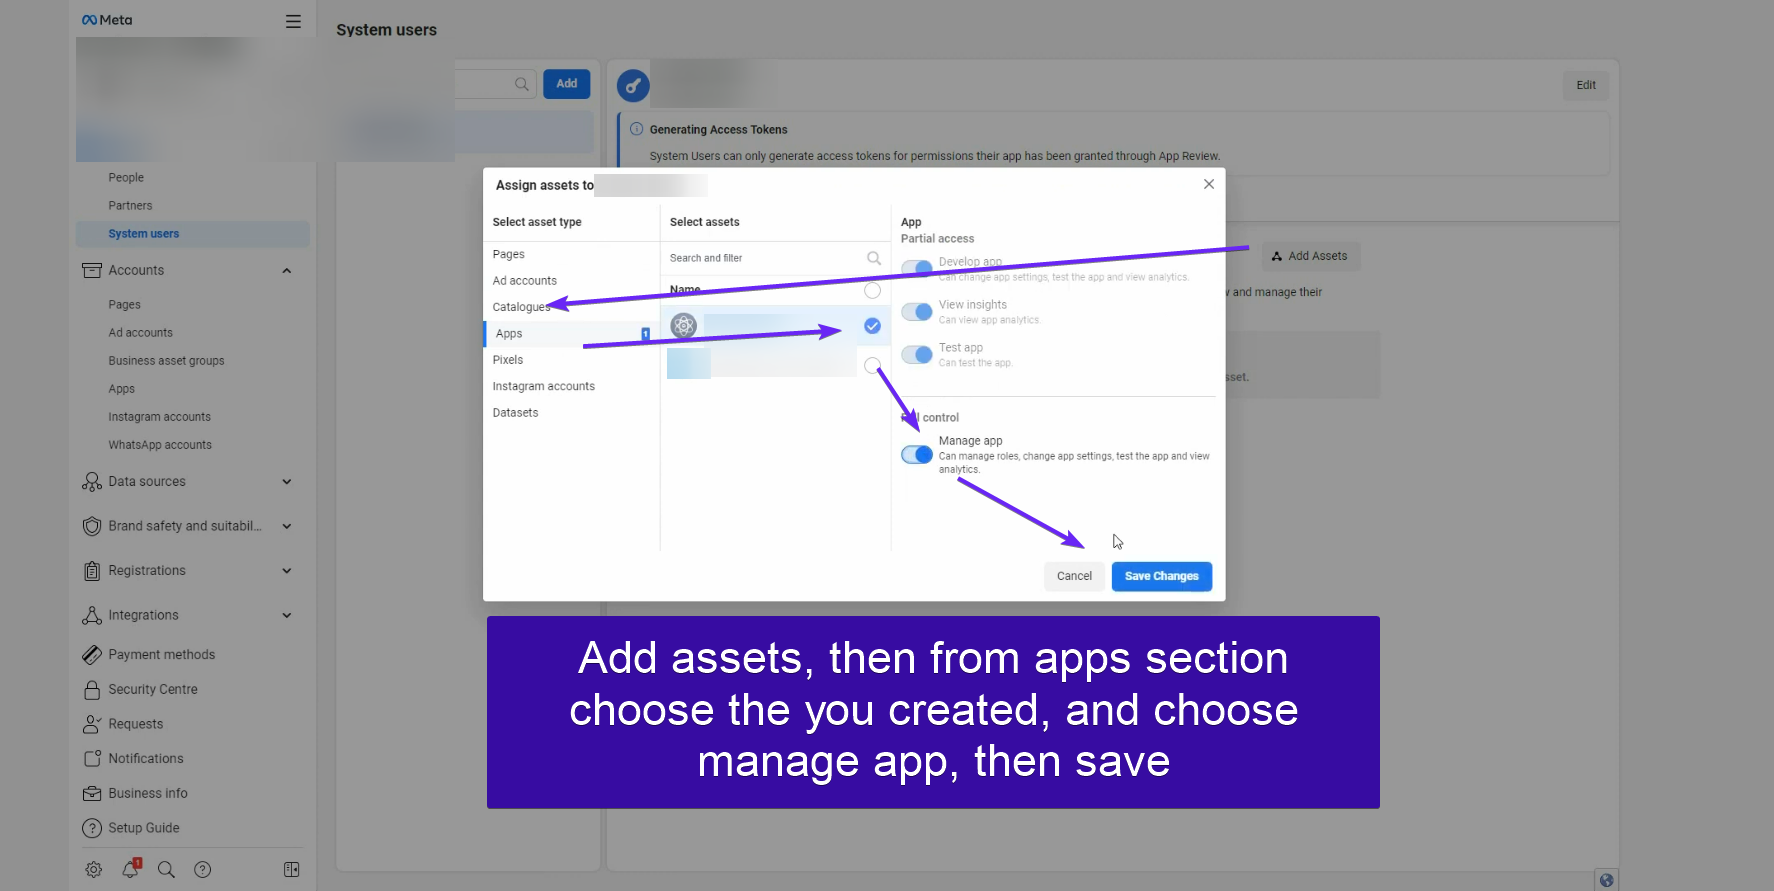
Add assets, from apps section choose the app you created and choose manage app. then save
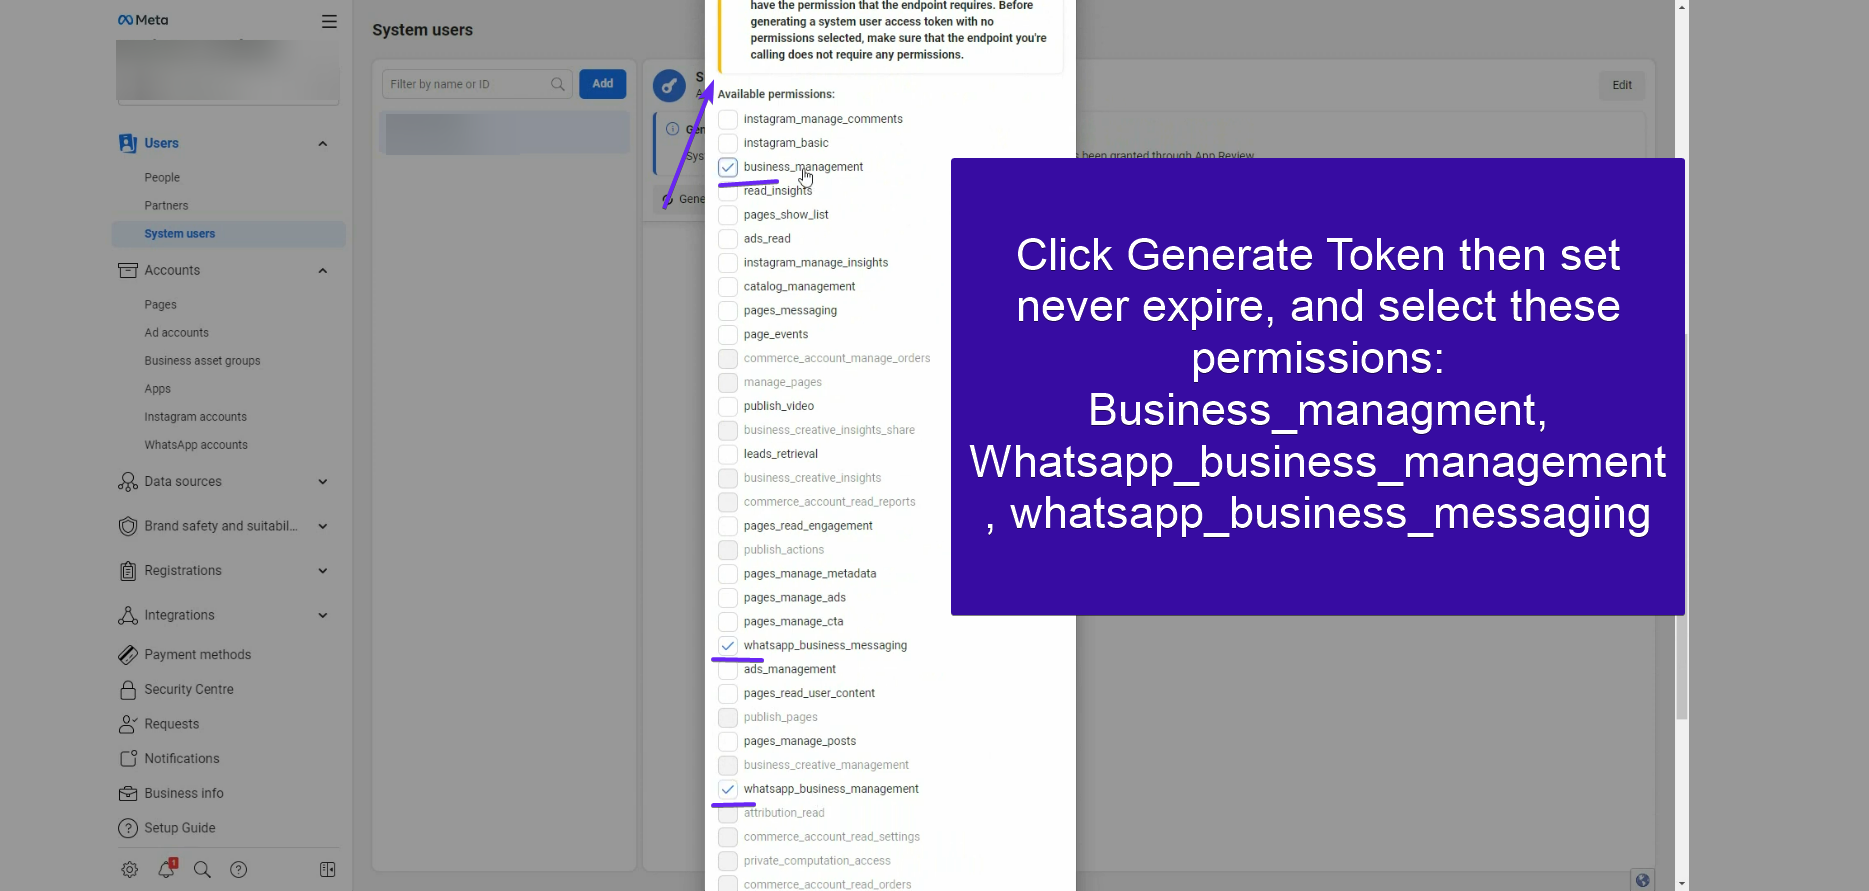
Click Generate Token then set never expire, and select these permissions: Business managment, Whatsapp_business_management, whatsapp_business messaging. then copy system user token
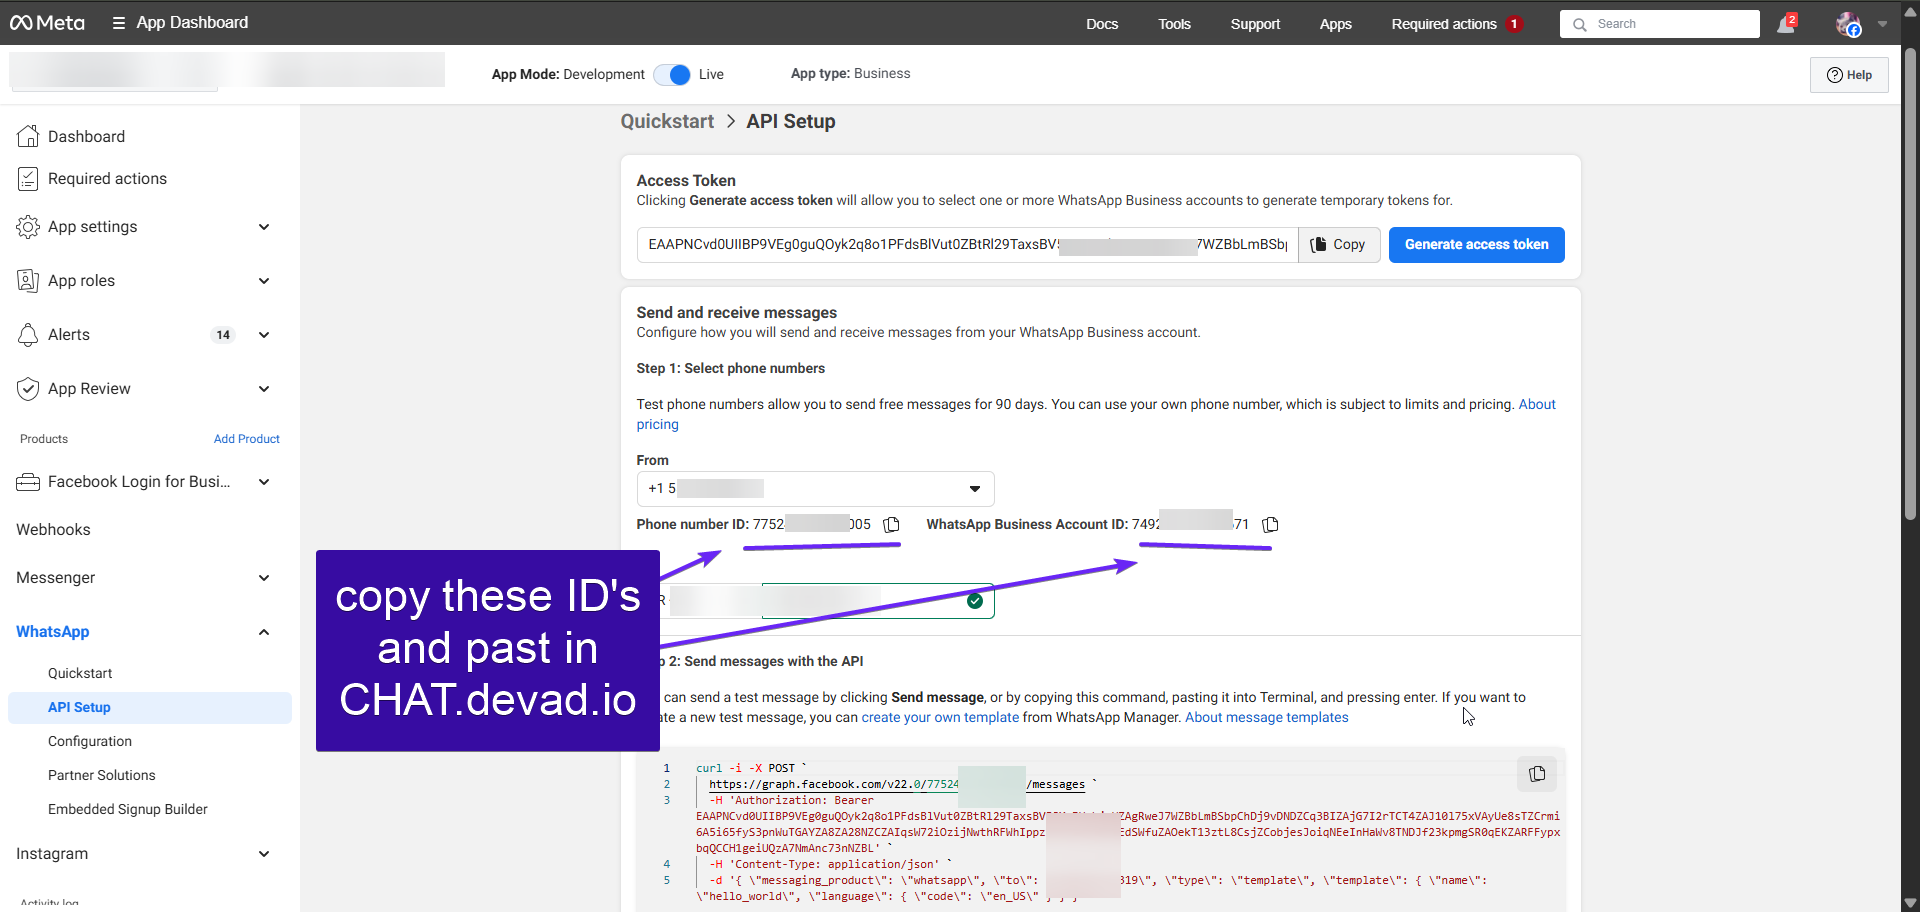
copy phone and business ID, and past in CHAT.devad.io
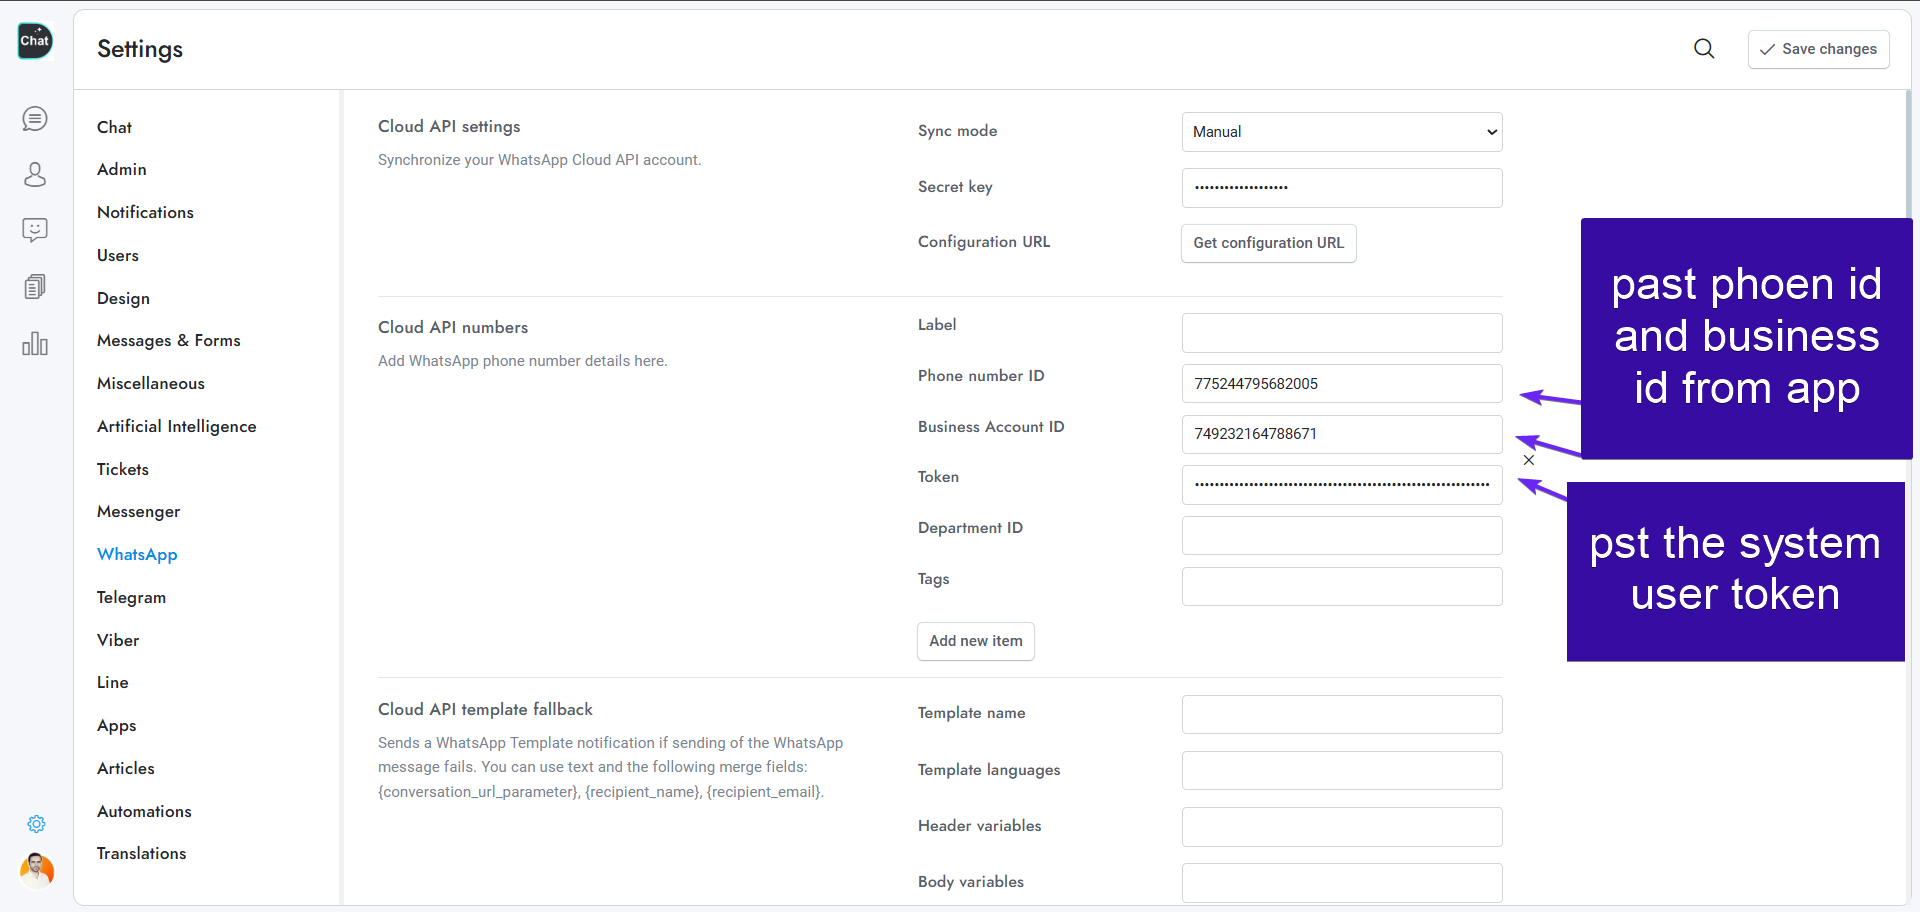
past phone and business ID, and past system user token
### Steps Explanation:
- Create a new account at [https://developers.facebook.com](https://developers.facebook.com) or login with your existing account.
- Create a new app and choose **Other** as the **app type**. Then select **Business**. Enter a name for the app and select the Business Account used for WhatsApp. [](https://devad.io/help/media/docs/meta-sync-1.jpg)
- In **CHAT.devad.io > Settings > WhatsApp > Cloud API settings > Secret key** enter a random string then go to [https://developers.facebook.com/apps](https://developers.facebook.com/apps) and select your app. Click **Add product** and add **WhatsApp**, then go to **WhatsApp > Configuration** and in **Webhook URL** enter the URL you get from **CHAT.devad.io > Settings > WhatsApp > Cloud API > Configuration URL**. In **Verify token** enter the secret key you previously entered in CHAT.devad.io. Click **Verify** and save, click **Webhook fields > Manage**, enable the following Webhook fields: **messages**. [](https://devad.io/help/media/docs/whatsapp-cloud-1.jpg)
- To verify the integration, simply go to [https://developers.facebook.com](https://developers.facebook.com) and select your app. From there, click on “WhatsApp” in the left menu and then select “API Setup”. Copy the **Phone number ID** and paste it into **CHAT.devad.io > Settings > WhatsApp > Cloud API numbers > Phone number ID.** Enter the desired phone number in the “To” field, such as your personal WhatsApp number, and send a test message. Check your WhatsApp account and send a reply, which should then appear in CHAT.devad.io. To reply to the test number from CHAT.devad.io, copy the “Temporary access token” and paste it in **CHAT.devad.io > Settings > WhatsApp > Cloud API numbers > Token**. [](https://devad.io/help/media/docs/whatsapp-cloud-3.jpg)
- To activate the WhatsApp integration for all phone numbers and add a live phone number, refer to the following guidelines. In **CHAT.devad.io > Settings > WhatsApp > Cloud API numbers > Token** enter the permanent access token, follow the instructions below for getting it.
- Visit [https://business.facebook.com](https://business.facebook.com) and go to **Left menu > Settings > Business settings**, then go to **Users > System Users** to view your admin system user, or create a new one. Open the user and click **Add Assets**, then select the app used for the WhatsApp API integration and check **Develop App**, or **Full control**. The system user needs to be an admin. If you do not see the option, click **Business settings**.
- Click **Left menu > Account > Apps**. Select your app or add it. Make sure the **system user** is there and has full control. If not, click **Add user**, select the system user, click **Full control**, and click **Assign**.
- Click **Left menu > Apps** and under **Select Assets** choose your app, assign **Full control** and save.
- From **Left menu > WhatsApp accounts** select the WhatsApp account linked to your appp, then click **Assign people** and select the **System user**, grant to it **Full control**.
- From **Users > System Users** select the user you just created and click **Generate New Token**, click **Apps** and select the app used for the WhatsApp API integration, set the **Token expiration** to **Never**, enable the following permissions: **whatsapp_business_management**, **whatsapp_business_messaging**, **business_management**. Click **Generate Token** and save. Paste the token in **CHAT.devad.io > Settings > WhatsApp > Cloud API numbers > Token**. [](https://devad.io/help/media/docs/whatsapp-cloud-2.jpg)
- After activating the number, copy the **Phone number ID** and paste it into **CHAT.devad.io > Settings > WhatsApp > Cloud API numbers > Phone number ID.**
- If the number is in **pending** status, you need to enter your app dashboard and then from **Left menu > WhatsApp > API Setup** click **Generate access token**.
- Please keep in mind that if you use your current WhatsApp business number in CHAT.devad.io, it will no longer be usable with your WhatsApp Business app, and you will need to migrate it following [these](https://developers.facebook.com/docs/whatsapp/cloud-api/get-started/migrate-existing-whatsapp-number-to-a-business-account) instructions.
---
### 3rd Option: 360dialog
- Go to [https://www.360dialog.com/](https://www.360dialog.com/) and create a new account.
- Enter your dashboard and from **Left menu > WhatsApp Accounts** generate the API key and copy and paste it in https://chat.devad.io/?setting=whatsapp **> 360dialog settings**.
- Click https://chat.devad.io/?setting=whatsapp **> 360dialog settings > Synchronize now**.
- Done! CHAT.devad.io should start receiving the WhatsApp messages sent to your number, and you can reply to those messages from CAHT app.
- Note that you can also use the free sandbox account for testing, more details at [https://docs.360dialog.com/whatsapp-api/whatsapp-api/sandbox](https://docs.360dialog.com/whatsapp-api/whatsapp-api/sandbox) . The sandbox account has limitations and some features, such as media attachments, will not work.
- More Detail about [360dialog](https://devad.io/guides/chat-devad-io-docs/setting-up-your-360dialog-account/) Setup visit this page: [https://devad.io/guides/chat-devad-io-docs/setting-up-your-360dialog-account/](https://devad.io/guides/chat-devad-io-docs/setting-up-your-360dialog-account/)
---
### 4th Option: Twilio
- Go to [https://www.twilio.com](https://www.twilio.com/) and create a new account.
- Verify your phone number.
- Complete the form and choose **WhatsApp, Alerts & Notifications, With no code at all, 3rd party integrations**.
- From the Twilio console copy **ACCOUNT SID** and **AUTH TOKEN** and paste them into **CHAT.devad.io > Settings > WhatsApp > Twilio settings**, save the changes.
- You will now set up a free test account to run some tests and make sure the integration works with CHAT . From the left menu click **Messaging > Settings > WhatsApp sandbox settings** and enter into **WHEN A MESSAGE COMES IN** and **STATUS CALLBACK URL** the URL of CHAT, get it from **CHAT.devad.io > Settings > WhatsApp > Twilio settings > Get configuration URL**. Mind that localhost will not work, you need a public URL and a live server.
- From the left menu click **Messaging > Try it out > Send a WhatsApp message**. Follow the instructions and send the message with the code to the WhatApp number provided. Click the next buttons until the configuration is complete.
- Done! CHAT.devad.io should start receiving the WhatsApp messages sent to the sandbox account, and you can reply to those messages from the CHAT.devad.io.
- To publicly use the WhatsApp integration with your customers you need also to complete the steps below:
- Update your account and enable billing, you can do that here.
- Purchase a Twilio number, which will be the phone number of your official WhatsApp Business account. More details here. You cannot use the phone number of your existing WhatsApp Business account, you must use a Twilio number. More details here.
- From the Twilio console go to **Messaging > Services** and create a new Messaging Service. Click **Add Senders**, select **WhatsApp Number** as the sender type, and add the Twilio number you purchased. Copy the **Service SID** and paste it into CHAT.devad.io **> Twilio settings > Sender**.
- More Detail about **Twilio**Setup visit this page: [https://devad.io/guides/chat-devad-io-docs/how-to-connect-whatsapp-twilio-to-chat-devad-io/](https://devad.io/guides/chat-devad-io-docs/how-to-connect-whatsapp-twilio-to-chat-devad-io/)
---
### FAQ & Troubleshooting and
### **Frequently Asked Questions (FAQ)**
**Q: I signed in, but why can’t I see my WhatsApp number in the CHAT App?** **A:** This usually happens because your WhatsApp Manager is not yet verified or your WhatsApp number has not been approved by Meta. Please wait at least **48 hours** and try again. If it is still not approved or verified after this period, please contact Meta Support directly at: [https://www.facebook.com/business-support-home/](https://www.facebook.com/business-support-home/)
**Q: What are the limitations of using Twilio or 360dialog?** **A:** Both providers have specific constraints, such as Twilio’s **1600-character message limit**. For the most stable and feature-rich experience, we highly recommend using the **Official WhatsApp Cloud API** integration.
**Q: Do you provide support for Twilio or 360dialog setups?** **A:** No. We cannot provide technical support for third-party configuration, delivery issues, or platform-specific errors related to Twilio or 360dialog.
**Q: Where can I find a complete guide on WhatsApp Business setup?** **A:** You can find our comprehensive guide on creating and maintaining a healthy WhatsApp Business account here: **[WhatsApp Business Health & Setup Guide](https://devad.io/guides/chat-devad-io-docs/how-to-create-and-keep-whatsapp-business-account-healthy/)**.
**Q: How do I add new phone numbers or manage existing ones?** **A:** To add new numbers, visit your **[Meta WhatsApp Manager](https://business.facebook.com/wa/manage/phone-numbers/)**. If you add a number after the initial setup, you must **run the sync process again** in CHAT App to import them. To disable specific lines, navigate to **Settings > WhatsApp > Cloud API numbers**.
**Q: What if I don’t receive a verification SMS or call during a re-sync?** **A:** If you are re-syncing an existing number and the code doesn’t arrive, simply **enter the last PIN you received**. Meta typically accepts the previous PIN for re-connections.
**Q: Why am I seeing errors during the sign-up process?** **A:** Most sign-up issues (in both Automatic and Manual modes) are caused by:
- **Invalid Phone Number:** Virtual or VoIP numbers are often rejected; use a standard mobile number.
- **Onboarding Limits:** Meta may restrict new accounts until your Business Portfolio is verified.
- **Missing Compliance:** Ensure your website and legal documents are complete and consistent.
- **Permissions:** The Facebook account must have **Full Admin access** to the Meta Business Account.
**Q: What does the “Invalid account linking” error mean?** **A:** This is the most common error. It usually indicates that the WhatsApp number or the WhatsApp Manager is **unapproved or still pending review** by Meta.
**Q: What are the verification and approval requirements?** **A:** Both your WhatsApp Manager and the specific phone number must be **fully approved and verified** to connect. If you encounter status issues, you can alternatively try the **“Connect with WhatsApp Business App”** method within the integration window.
**Q: Is there a way to connect without waiting for Meta’s manual approval?** **A:** Yes. If you prefer not to wait for the official API approval process, use the **“Connecting with WhatsApp Business Mobile App”** method for a faster setup.
### Unofficial WhatsApp API ?
CHAT devad.io only supports the Official WhatsApp Cloud API, 360dialog, or Twilio. Unfortunately, unofficial WhatsApp APIs are not supported. However, you can still implement them using the CHAT.devad.io API and Webhooks. For more details, visit [https://chat.devad.io/docs/api/web](https://chat.devad.io/docs/api/web) (SOON we will share api doc). Please be aware that you must possess coding skills as a developer to proceed with this task. Additionally, our default integrations are equipped with advanced features including chatbot support, automated messages, human takeover, WhatsApp rich messages, attachments, and more. Consequently, although setting up a basic integration for sending and receiving text messages is relatively straightforward, ensuring its flawless functionality is a more intricate process.
### How to Connect WhatsApp Twilio to Chat.devad.io
💡
Connect your WhatsApp account using Twilio, a powerful cloud communications platform. This guide will walk you through setting up a free test account and then moving to a live production environment.
### Twilio Account Setup
To get started, you need a Twilio account.
Go to the [Twilio Signup Page](https://www.twilio.com/) and create a new account. Once signed up, you will need to verify your phone number.
💪
**Setup Tip:** When asked, choose “WhatsApp”,
“Alerts & Notifications”, “With no code at all”, and “3rd party integrations” to customize your dashboard experience.
### Testing with a Free Sandbox Account
Before you pay for anything, you can use Twilio’s free sandbox to test the integration with Chat.devad.io.
- Log in to your **Twilio Console**.
- Navigate to **Messaging > Settings > WhatsApp sandbox settings** in the left menu.
- You will see two fields: **WHEN A MESSAGE COMES IN** and **STATUS CALLBACK URL**.
- Go to your **Chat.devad.io** dashboard.
- Navigate to **Settings > WhatsApp > Twilio settings** and copy the **Configuration URL**.
- Paste this URL into both fields in Twilio.
- Save the changes.
### Activate the Sandbox
- Go to **Messaging > Try it out > Send a WhatsApp message** in Twilio.
- Follow the on-screen instructions to send a code to the provided WhatsApp number from your personal WhatsApp.
- Once connected, send a test message!
✔️
**Success!** Chat.devad.io should now receive
messages sent to the sandbox account, and you can reply directly from the dashboard.
### Going Live (Production Setup)
Ready to use your own number with real customers? Follow these steps.
### Step 1: Upgrade and Purchase a Number
- [Upgrade your Twilio account](https://www.twilio.com/console/billing/upgrade) and enable billing.
- Purchase a **Twilio Phone Number**.
❌
**Critical:** You cannot use your existing personal
or WhatsApp Business App phone number. You **must** purchase a new number from Twilio for this API
integration.
### Step 2: Create a Messaging Service
- Go to **Messaging > Services** in the Twilio Console.
- Click **Create Messaging Service**.
- Follow the setup steps. When asked to **Add Senders**, select **WhatsApp Number**.
- Add the Twilio number you just purchased.
### Step 3: Connect to Chat.devad.io
- In your Twilio Console, copy your **Account SID** and **Auth Token**.
- Go to **Messaging > Services** and copy the **Service SID** of the service you just created.
- Go to **Chat.devad.io > Settings > WhatsApp > Twilio settings**.
- Paste the **Account SID**, **Auth Token**, and **Service SID** (into the “Sender” field).
- Save the settings.
### Frequently Asked Questions
### What are the limitations?
Twilio has a message length limit of 1600 characters.
If you need to send longer messages or want fewer restrictions, we recommend using the Official WhatsApp API via
360dialog.
### How does billing work?
You pay Twilio directly for their services (phone number
rental + per-message fees) and for WhatsApp conversation fees. Chat.devad.io does not charge extra for this integration.
### Twilio and 360dialog limitations?
Twilio and 360dialog have several limitations, such as Twilio’s 1600-character message limit. We highly recommend using our Official WhatsApp API
### support for Twilio or 360dialog?
We cannot provide support for Twilio or 360dialog configuration, including all related issues.
### Any details about Whatsapp Business setup?
Please Visit this Full Guide https://devad.io/guides/chat-devad-io-docs/how-to-create-and-keep-whatsapp-business-account-healthy/
[For any Issues Please Check this Full Guide](https://devad.io/guides/chat-devad-io-docs/how-to-create-and-keep-whatsapp-business-account-healthy/)
### How to Create and Keep WhatsApp Business Account Healthy
### 🚀 WhatsApp Success Starts Here: The Essential Compliance Guide for Your Business
Are you using the Meta Embedded Sign-Up through **CHAT.devad.io** to connect with customers on WhatsApp? To ensure uninterrupted service, instant approval, and maintain customer trust, it’s vital to comply with Meta’s policies. This guide outlines the key best practices your business must follow to prevent account suspension and setup delays.
---
### 1. Setting Up Your Meta Business Portfolio (The Foundation)
Your “Meta Business Portfolio” (often called the Business Manager Account) is the official identity Meta uses to verify your business. This is the central hub that manages your WhatsApp access. Getting this right is the first step in successful onboarding.
### 📝 Registration and Profile Information
- **Use Accurate, Matching Information:** Every detail you provide must **exactly** match your official legal business documentation (registration certificate, tax ID forms). Inconsistencies lead to immediate rejection.
- **Business Contact Details:**
- Provide a valid business phone number that you can consistently access.
- Use a professional email address, preferably one linked to your company domain (e.g., `info@yourbusiness.com`).
- **Avoid Personal Accounts:** Always ensure you are working within a dedicated **Meta Business Account**; never attempt to link your personal Facebook or WhatsApp profile.
- **Complete All Fields:** Do not leave any profile fields blank, even those marked as optional.
### 📄 Business Information Requirements
Ensure your profile details are complete and match your legal records:
- Business name (exactly as legally registered)
- Complete business address with postal code
- Business registration number (if applicable)
- Tax ID/VAT number (if applicable)
- Specific business category (choose the most accurate option)
- Active website URL (must be active and related to your business)
- Clear, professional business description
---
### 2. Essential Website Compliance Requirements
Meta uses your website as the primary source to verify your legitimacy and compliance. A poor or incomplete website is one of the fastest ways to get your account rejected.
### 💻 Minimum Website Standards
- **HTTPS is Mandatory:** Your site must have an SSL certificate (meaning the address starts with `https://`). HTTP sites are rejected.
- **Fully Functional and Complete:** The site must be complete and easily navigable. Avoid “under construction” pages or broken links.
- **Consistent Information:** The business name, address, and phone number displayed on your website must be perfectly consistent with the information in your Meta Business Portfolio.
- **Mobile Responsive:** The website must function correctly on mobile devices.
### 🔑 Required Legal and Contact Pages
Your website must clearly feature the following pages, which are crucial for compliance:
- **Contact Information:** Must display complete, verifiable contact details (address, phone, email) that match your Meta account.
- **Privacy Policy:** A comprehensive policy explaining how you collect, use, and protect customer data, compliant with local regulations.
- **Terms of Service/Use:** Clear terms for customers using your services or products.
- **Return/Refund Policy:** Required for all e-commerce or product-based businesses.
---
### 3. Best Practices for Your WhatsApp Phone Number
The phone number is your connection to your customers. Meta is strict about what numbers are allowed on the WhatsApp Business Platform.
### 📞 Phone Number Selection
- **Dedicated Business Number:** Do not use personal or temporary phone numbers.
- **No Virtual Numbers (VOIP):** Meta rejects most Virtual Numbers, Voice over IP (VoIP), or Interactive Voice Response (IVR) numbers. You must use a standard, valid phone number capable of receiving SMS or voice calls from a telecom provider.
- **Local and Current:** Use a phone number from the country where your business is registered. Ensure the phone number is active and easily accessible for verification.
- **Business Ownership:** Ensure the phone bill or registration document for the number is clearly in your **business name**, not an individual’s.
### 🔐 Security Practices
- **Two-Factor Authentication (2FA):** Always enable 2FA on your WhatsApp account for maximum security.
- **Secure SIM Card:** Protect your SIM card to prevent unauthorized swaps or access.
---
### 4. Content and Catalog Guidelines
What you sell and how you list it on WhatsApp are under strict review by Meta’s policies (WhatsApp Commerce Policy).
### 🚫 Prohibited Content
You cannot use the WhatsApp Business Platform to facilitate the sale or transaction of certain products, including:
- Adult services or content
- Weapons, ammunition, or explosives
- Illegal products or services (including recreational drugs)
- Tobacco products
- Prescription drugs or misleading healthcare claims
- Cryptocurrency (digital currency trading)
- Multi-level marketing (MLM) and “get-rich-quick” schemes
### 🛒 Catalog Management
- **Accurate and High Quality:** Use clear, high-quality images and detailed product descriptions.
- **Consistency:** Avoid listing products that are unavailable or using misleading descriptions.
---
### 5. Communication Best Practices
Your communication behavior directly impacts your account health and prevents blocks.
- **Respond Quickly:** Maintain a high quality score by responding to all customer messages within the **24-hour customer service window**.
- **Be Professional:** Keep communication professional at all times.
- **Use Approved Templates:** Any message you initiate **outside** the 24-hour window must use a pre-approved message template.
- **Avoid Promotion (in non-promo templates):** Do not use sales language in templates designated for non-promotional use (e.g., shipping updates).
---
### 6. What to Do if Your Account is Disabled
If your account is disabled or rejected, act quickly to resolve the issue:
- **Appeal Immediately:** Use Meta’s appeal process available through your Business Manager.
- **Provide Documentation:** Submit all required business verification documents immediately.
- **Address Issues Directly:** Respond specifically to the reason given for the disablement or rejection.
- **Be Patient:** Appeals typically take 3-7 business days.
- **Contact CHAT.devad.io Support:** Reach out to our team at **CHAT.devad.io** for guidance specific to your situation.
---
### 7. Troubleshooting: Understanding Sign-Up Errors
If you encounter issues during the Embedded Sign-Up process, here are common error messages and the steps you should take.
### Root Causes of Sign-Up Failure (The “Why”)
Before examining specific error messages (Automatic Mode or even Manual Mode), ensure you’ve addressed these common issues:
- **Invalid Phone Number:** You must use an active, standard mobile phone number (As Many virtual or VoIP numbers get rejected by WhatsApp).
- **Onboarding Limits:** Meta limits the number of new accounts you can create until your main business portfolio is fully verified. If you hit a limit, you may need to wait or accelerate verification.
- **Missing Compliance:** Your website, legal documents, or business information is incomplete or inconsistent.
- **Lack of Admin Access:** The Facebook account used to sign up must have **full Admin access** to the relevant Meta Business Account
- **Invalid account linking**. It could be due to non-approved or **pending**Whatsapp business account.
for most cases of failing connecting Whatsapp with our CHAT App (CHAT.devad.io) your WhatsApp number, your display name, or WhatsApp Account Manager may be pending review. Approval typically takes a few days; if it takes longer, please contact Meta Support regarding your Business Manager via this link: [https://www.facebook.com/business-support-home/](https://www.facebook.com/business-support-home/)
after getting approved please try connecting with CHAT App.
if you dont want to wait, try using “Connecting with Whatsapp Business Mobile App” method.
### 🛑 Business Account Creation Errors
| Error Message | Suggested Solution |
| --- | --- |
| An error occurred while processing this request. Please try again later. | Ensure you are using an active Facebook account or contact support for help. |
| You have reached the limit for the number of Businesses you can create at this time. | Please use an existing Meta Business Account instead of trying to create a new one. |
| Your Facebook account is too new to create a business account. | Use an existing active Facebook account, or wait a few hours (and actively use the new account during that time) before trying again. |
| We limit how often you can post… to help protect the community from spam. | Your account may be flagged for suspicious activity. Use an existing, active Facebook account with no prior issues. |
| You’re no longer allowed to use Facebook Products to advertise. | This indicates prior issues. Use an existing, active Facebook account with no prior advertising issues. |
| Your payment account is disabled. | Contact Meta Support to resolve issues related to your payment account. |
| The name you chose for your business isn’t valid. | Add a valid name that precisely matches the legal name of your business. |
### 💬 WhatsApp Business Account Creation Errors
| Error Message | Suggested Solution |
| --- | --- |
| User does not have permission to create WhatsApp Business Accounts. | You need Admin level permission for the selected Business Account. Get Admin access or select an account where you already have it. |
| You can only create a limited number WhatsApp Business Accounts before your business and WhatsApp account verification is complete. | You must start Business Verification in your Meta Business Manager. You can create additional accounts after verification is complete. |
| We can’t verify the Meta Business Account that you selected. | The Business Account you selected doesn’t meet Meta’s policies. Check your Business Manager for reasons, resubmit verification, or select an already verified account. |
| Something has gone wrong. You will need to contact support and try again. | This may be a temporary issue on Meta’s side. Try the sign-up flow again in a few minutes. |
### 📱 Phone Setup and Verification Errors
| Error Message | Suggested Solution |
| --- | --- |
| Phone Number has been blocked. | Check alerts in your WhatsApp Manager for the reason and resolution. Contact support if you believe this is an error. |
| You have already linked the maximum number of phone numbers allowed… | Contact support to request an increase in your phone number limit. |
| This number is registered to an existing WhatsApp account. | The number is already in use (WhatsApp Messenger or Business App). You must deregister the number if you want to use it for the API, then wait up to 3 minutes and try again. |
| Code couldn’t be verified: You tried to register this number too many times. | You have reached the verification attempt limit. Please wait and try again later. |
| Your phone number doesn’t appear to be valid. | Double-check the number is correct. Ensure it is a standard, operational number from a telecom provider (no VOIP). Try again after 5 minutes. |
| You have guessed too many times. | Wait for about 12 hours before trying to verify the number again. |
For more details: [WhatsApp Embedded Signup Flow Errors](https://developers.facebook.com/documentation/business-messaging/whatsapp/embedded-signup/errors)
### Setting Up Your 360dialog Account
💡
We are thrilled to announce that you can now link your WhatsApp account through our partner, 360dialog. This is a great step toward integrating the native WhatsApp Business API.
### Setting Up Your 360dialog Account
If you don’t have a WhatsApp Business Account yet, don’t worry. The process is straightforward. You’ll need to sign up
for a 360dialog account and then add your phone number.
You can follow the embedded signup process here: [360dialog Embedded Signup Guide](https://docs.360dialog.com/docs/account-setup/creating-new-waba/embedded-signup)
❌
**Important:** Please make sure your Hosting Platform
Type is set to “Cloud API hosted by Meta” in your 360dialog phone number settings. If it’s not, you must change it.
[Click here for
instructions on how to change it.](https://docs.360dialog.com/docs/account-setup/hosting-type-change)
### Using a Number Already on WhatsApp Business App?
You might want to use a phone number that you are currently using on your Android or iPhone WhatsApp Business App. That
is perfectly fine, but there is a catch. You must delete the account from the mobile app first.
❌
**Warning:** Deleting your account from the WhatsApp
Business App will erase your chat history. This process does not transfer or save your old messages.
**How to delete your account:**
- Open your WhatsApp Business App.
- Go to **Settings**.
- Tap on **Account**.
- Select **Delete my account**.
- Confirm the deletion.
### Migrating from Another Provider?
If you are already using the WhatsApp Business API with a different provider (like Twilio) and want to switch to
360dialog, you will need to perform a migration.
Please refer to this guide for migration steps: [Migrate to 360dialog](https://docs.360dialog.com/docs/account-setup/migrating-phone-numbers/migrate-number-from-meta-or-alternate-bsp-to-360dialog-cloud-api)
### Connecting 360dialog to Chat.devad.io
Once your number is ready and your 360dialog account is set up, it’s time to connect it to Chat.devad.io.
- Log in to your **360dialog Dashboard**.
- Navigate to the **Left Menu** > **WhatsApp Accounts**.
- Generate your **API Key**.
- Copy the API Key.
- Go to your **Chat.devad.io** dashboard.
- Navigate to **Settings > WhatsApp > 360dialog settings**.
- Paste your API Key.
- Click **Synchronize now**.
✔️
**Success!** Your system should now be connected.
Messages sent to your WhatsApp number will appear in Chat.devad.io, and you can reply directly from
there.
💪
**Testing with Sandbox:** You can also use a free
sandbox account for testing purposes. [Learn more about the sandbox here.](https://docs.360dialog.com/whatsapp-api/whatsapp-api/sandbox) Note that the sandbox has limitations, such as no media
attachments.
### Setting Up Message Templates
To start a conversation with a user who hasn’t messaged you in the last 24 hours, you must use a Template Message.
**Where to find your template details:**
- **Namespace:** Go to *Left menu > WhatsApp accounts > Details* in 360dialog.
- **Template Name:** Look in your 360dialog templates area.
- **Default Language:** Look in your 360dialog templates area.
### Custom Parameters
If your template uses dynamic variables (like a customer’s name), you can define them in the **Custom parameters** field in Chat.devad.io. Separate multiple values with commas.
You can use these merge fields:
- `{recipient_name}`
- `{recipient_email}`
💡
**Note:** The order matters! The first merge
field you list will replace the first variable in your template, the second will replace the second, and so
on.
❌
**Language Compatibility:** Chat.devad.io will try to
match the user’s language. However, some languages need specific codes:
• Use `en_US` instead of
en_GB
• Use `pt_BR` instead of pt_PT
• Use `zh_CN` for zh_HK and zh_TW
• Use
`es_ES` for es_AR and es_MX
### Frequently Asked Questions & Billing
### How does billing work?
The cost of using WhatsApp via 360dialog has two parts:
- **360dialog Fee:** A recurring payment for the 360dialog service. The “API only” plan is usually
the best fit.
- **WhatsApp Conversation Fees:** You pay WhatsApp directly for conversations. The first 1,000
service conversations each month are free. Pricing depends on the message type and the user’s country. [Check Meta’s official pricing
here.](https://developers.facebook.com/docs/whatsapp/pricing)
### What are the limitations?
Compared to the Official WhatsApp API, third-party
providers like Twilio have limitations (e.g., Twilio has a 1600-character limit). We strongly recommend using the
Official WhatsApp API or 360dialog over other third-party wrappers when possible.
### Do you provide support for 360dialog issues?
We cannot provide direct support
for 360dialog configurations or account issues. Please refer to the [360dialog documentation](https://docs.360dialog.com/) for help with their platform.
### WhatsApp Shop
### WhatsApp Shop Integration
To showcase products from your shop, utilize the merge fields outlined below.
- **Order Processing:** When a user submits an order, the order details are transmitted to the URL defined in **Settings > WhatsApp > Order webhook**. The script at that URL is responsible for processing the order and confirming it to the user via the PHP API function `sb_whatsapp_send_message()`.
- **WooCommerce:** To integrate the shop with WooCommerce, please click [here](https://chat.devad.io/docs/#woocommerce-whatsapp) .
### WhatsApp shop
To displays the products of your shop use the merge fields below.
| Merge field | Description |
| --- | --- |
| {catalog id=”123″ product_id=”123″ body=”” footer=””} | Display a single product. Replace id with the catalog ID and product_id with a product ID. The attributes body and footer are optional. |
| {catalog id=”123″ product_id_1_1=”123″ product_id_1_2=”123″ product_id_2_1=”123″ section_1=”” section_2=”” header=”” body=”” footer=””} | Display multiple products. Replace id with the catalog ID. Add products by grouping them into sections, via the attributes product_id_[A]_[B], replace [A] with the section index, starting from 1, replace [B] with the product index, starting from 1 for each section. You must also add the attribute section_[A]=”” for each section, replace [A] with the section index. The attributes header and body are required, footer is optional. |
---
- When the user sends the order, the order information is sent to the URL specified in **Settings > WhatsApp > Order webhook**. The page at that URL should process the order and send a message to the user via the PHP API function **sb_whatsapp_send_message()**.
- To connect the shop to WooCommerce click [here](https://devad.io/help/docs/chat#woocommerce-whatsapp) .
---
### More information
- You cannot send a WhatsApp message to a user who has sent you a message more than 24 hours ago or has never messaged you before. WhatsApp prohibits this action. Instead, you must use a WhatsApp template or send an [text message](https://devad.io/help/docs/chat#text-message-fallback) . If you encounter an “Error message: Re-engagement,” it indicates this situation.
- If you does not receive WhatsApp messages make sure you are not assigning the WhatsApp conversations to a [department](https://devad.io/help/docs/chat#departments) and that the WhatsApp number used for testing is not a phone number of a CHAT.devad.io admin or agent. Also, make sure you setup correctly the WhatsApp webhook URL .
- If you can not send messages, an error should appear in the admin area when you try to send a message to the user.
- We cannot provide support for Twilio or 360dialog configuration, including all related issues.
- We cannot provide support in getting your WhatsApp account or WhatsApp message template approved.
- WhatsApp conversations and messages are compatible with [queue and routing](https://devad.io/help/docs/chat#queue-routing) .
- If you are testing with the sandbox and after 72 hours you can no longer send messages to your phone number you must link again your phone number to your sandbox.
- You can send [rich messages](https://devad.io/help/docs/chat#rich-messages) to WhatsApp. If you send chips, buttons or select rich messages, with more than 3 options, you can use the **whatsapp=”Your menu text”** shortcode attribute to set the text of the WhatsApp message menu.
- The [follow-up message](https://devad.io/help/docs/chat#follow-up-message) is supported, but the message is always sent, also if an agent replies.
- The [offline message](https://devad.io/help/docs/chat#offline-message) is supported, but the timetable is not sent.
- The chatbot is supported. The [human takeover](https://devad.io/help/docs/chat#human-takeover) feature is also supported. To enable the Dialogflow chatbot support for audio messages, activate **Settings > Artificial Intelligence > OpenAI > Speech recognition**
- The supported AI features include **language detetction**, **spelling correction**, **multilingual via translation**, **Google search**.
- Twilio and 360dialog has many limitations. For example, Twilio does not support messages longer than 1600 characters. We strongly recommend to use the Official WhatsApp API.
### WhatsApp Templates & Flows
### Understanding WhatsApp Templates
According to the official [WhatsApp Business Policy](https://www.whatsapp.com/legal/business-policy/) , businesses are prohibited from sending unsolicited marketing or solicitation messages directly to end users. The conversation must be initiated by the end user. Once a user messages you, you have a 24-hour window to respond. If you need to communicate with a user who has not contacted you previously, or if the 24-hour window has expired, you are required to use either the text message fallback feature or a WhatsApp message template.
- **Payment Method Required:** To utilize message templates, a valid payment method must be attached to your WhatsApp Business Account. This can be configured at [https://business.facebook.com/billing_hub/](https://business.facebook.com/billing_hub/) .
- **Bulk Sending:** To dispatch a specific message template to a group of users simultaneously, please utilize the [direct messages](https://chat.devad.io/docs/#direct-messages) functionality.
Meta’s free tier covers up to 1,000 user-initiated conversations per WhatsApp Business Account (WABA) monthly.
### Text Message Fallback
To activate the text message fallback option, you must configure your SMS settings by navigating to **Settings > Notifications > Text message notifications**. You can find comprehensive details regarding this setup [here](https://chat.devad.io/docs/#sms) .
### WhatsApp Message Templates Format
A WhatsApp message template is a pre-approved message format designed for repeated use to contact users once they have opted in and granted your application permission to message them. You are not permitted to input the actual content of your conversation directly into the template. Instead, the template should be used to notify the user of a new incoming message and provide instructions on how to access it, such as supplying a link to your website where the chat interface is hosted.
WhatsApp Cloud API
Twilio
360dialog
- **Management:** To retrieve the Template name and organize your templates, visit [https://business.facebook.com](https://business.facebook.com) . Navigate to the Left menu > Settings > More system settings. From there, proceed to Accounts > WhatsApp accounts > Settings and select WhatsApp Manager.
- **Languages:** In the Template languages field, input all language codes that your template supports, separated by commas. You can find the list of valid language codes [here](https://chat.devad.io/docs/files/language-codes.txt) (copy only the code, e.g., it, es, en_US). If a template supports multiple languages, the system will automatically select the one matching the user’s language. If no match is found, the default template language will be utilized.
- **Header & Body Variables:** In the sections for Header variables and Body variables, input the values separated by commas. You are free to use merge fields such as `{recipient_name}` and `{recipient_email}`. Ensure that the count of parameters entered here exactly matches the number of parameters defined in your template. Utilize this feature if your template relies on dynamic values. regarding image headers, the image URL should be passed as the first parameter. The sequence is crucial; the first merge field corresponds to the first template parameter.
- **Button Variables:** In the Button variables section, enter the links for your custom buttons or the text for quick replies prefixed with `quick_reply_` (e.g., `quick_reply_abcde`). Separate each value with a comma. The number of parameters here must align with the template’s parameters. If your buttons or call-to-actions use static values (like a fixed URL), enter `skip_parameter`. The order is vital, as the first merge field applies to the first template parameter.
**Twilio Configuration:**
Locate the Template SID and the template attributes. Enter these values, separated by commas, into **Settings > Twilio template**.
Enter the **Template SID** and the template attributes separated by commas into **CHAT.devad.io > Settings > Twilio template**.
- Get the **Namespace** value from **Left menu > WhatsApp accounts > Details**.
- Get **Template name** and **Template default language** from your 360dialog templates area.
- In **Custom parameters** Enter the values separated by commas, you can use the following merge fields: **{recipient_name}**, **{recipient_email}**. Use this feature if your template uses dynamic values. Order is important, the first merge field will be used as the first template dynamic value.
- CHAT.devad.io will try to use the template with the same language as the user, if it is not available, it will use the template with the default language. The following template languages are not compatible: en_GB(use en_US), pt_PT(use pt_BR), zh_HK and zh_TW(use zh_CN), es_AR and es_MX(use es_ES).
- **Namespace:** Retrieve the Namespace value by navigating to Left menu > WhatsApp accounts > Details.
- **Template Details:** Obtain the Template name and the Template default language directly from your 360dialog templates dashboard.
- **Custom Parameters:** In the Custom parameters field, enter the values separated by commas. You may use merge fields like `{recipient_name}` and `{recipient_email}`. Use this capability if your template requires dynamic values. The sequence is important; the first merge field is assigned to the first template dynamic value.
- **Language Matching:** CHAT.devadio will attempt to utilize the template matching the user’s language. If that is unavailable, it defaults to the template’s standard language. Note that the following languages are incompatible: en_GB (use en_US), pt_PT (use pt_BR), zh_HK and zh_TW (use zh_CN), es_AR and es_MX (use es_ES).
**Template Fallback!**Configure the WhatsApp template to be used as a fallback by navigating to Settings > WhatsApp > Cloud API template fallback. If you operate multiple numbers associated with different WhatsApp Business Accounts, a specific template must be generated for each account. You may assign a different template to each number, provided the template name and language code remain consistent. The test template button initiates a test message from the primary number.
### Sending Templates to New Contacts
- **Account ID Setup:** In **Settings > WhatsApp > Cloud API settings > Business Account ID**, input your Business Account ID. You can locate this ID at [https://developers.facebook.com/](https://developers.facebook.com) . Select your application and navigate to Left menu > WhatsApp > API Setup.
- **Select Recipients:** To dispatch the template to specific individuals, access the Dashboard Users section and select the intended recipients. Afterward, click the WhatsApp icon found in the top right corner.
- **Automatic Language:** If you utilize the WhatsApp Cloud API with a template that supports multiple languages, the system will automatically choose the language matching the user. If no match exists, the default template language is applied.
- **Twilio Parameters:** If you are using Twilio and your template includes parameters, input the parameter values separated by commas into the Body section.
- **Further Details:** For comprehensive information, click [here](https://chat.devad.io/docs/#direct-messages) .
### WhatsApp Flows
For additional details regarding WhatsApp Flows, please visit [here](https://business.whatsapp.com/products/whatsapp-flows) .
### Built-in Flows
Our App automatically creates and dispatches the following flows. To regenerate a flow, utilize the **Settings > WhatsApp > Clear flows** button.
- **Registration:** This flow is triggered when a new user sends their initial message to the WhatsApp number, provided the **Settings > Users > Require registration** option is active.
- **Follow-up:** This flow triggers if the **Settings > Messages & Forms > Follow-up message** option is enabled and the user has not provided an email address.
### Send Custom Flows
To send custom flows, use the specific merge field format. Replace “123” with your unique flow ID and populate the header, body, and button attributes with your text.
~~~
{wa_flow id="123" header="Your Header" body="Your Body Text" button="Button Text"}
~~~
### Essential Information & Limitations
Contact Rules
You cannot send a WhatsApp message to a user who contacted you more than 24 hours ago or has never messaged you. WhatsApp strictly prohibits this. Instead, use a [WhatsApp template](https://chat.devad.io/docs/whatsapp-templates) or send a [text message](https://chat.devad.io/docs/#text-message-fallback) fallback. An “Error message: Re-engagement” indicates this specific issue.
Troubleshooting Sending Issues
If you aren’t receiving WhatsApp messages, ensure conversations aren’t being assigned to a [department](https://chat.devad.io/docs/#departments) and that the test number isn’t an admin or agent number. For non-cloud versions, verify the WhatsApp webhook URL setup. If messages fail to send, check the admin area for specific error messages.
Support Scope for Providers
We do not provide support for Twilio or 360dialog configurations or related issues. Additionally, we cannot assist in getting your WhatsApp account or message templates approved by Meta.
AI & Rich Features
Supported features include language detection, spelling correction, multilingual translation, and Google search. You can also send [rich messages](https://chat.devad.io/docs/#rich-messages) . For menus with more than 3 options, use the `whatsapp="Your menu text"` shortcode attribute.
Sandbox & Limitations
If testing with the sandbox, re-link your phone number after 72 hours if sending fails. Be aware that Twilio and 360dialog have limitations, such as Twilio’s 1600-character limit. We strongly recommend using the Official WhatsApp API.
### WhatsApp voice & video calls
The WhatsApp call features enable users and agents to initiate and receive voice or video calls directly from the chat interface and admin area.
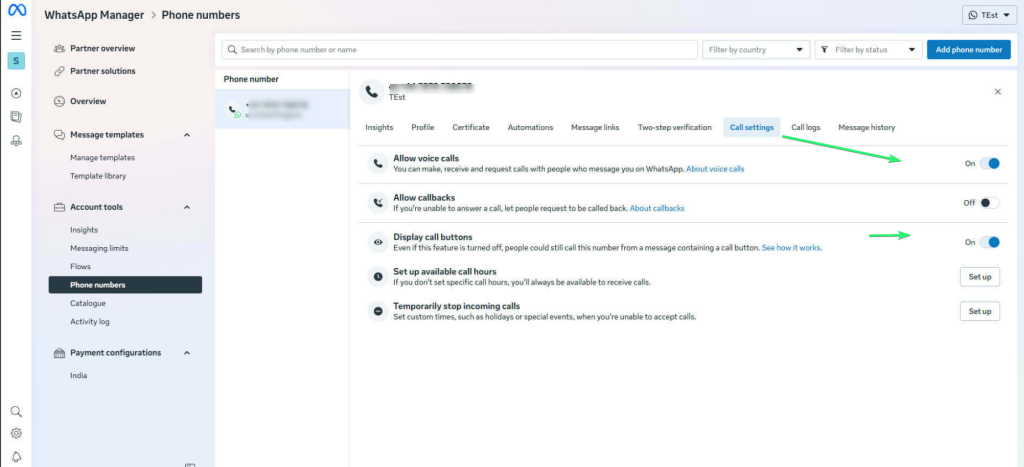Enable Whatsapp Call
WhatsApp calls are enabled by default for all WhatsApp numbers integrated with CHAT App. You can also enable or disable the WhatsApp calling feature from the WhatsApp Manager. To do so, go to WhatsApp Manager, navigate to Left menu > Settings > More system settings, then open Accounts > WhatsApp accounts > Settings and click WhatsApp Manager. From there, open the settings panel of your phone number and toggle the Voice and Video Calls option.
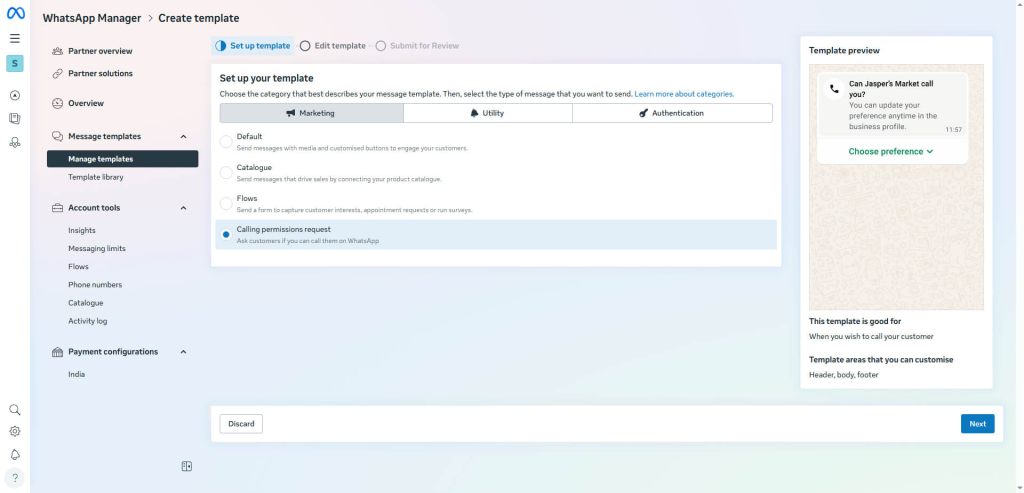Image 5
To initiate a WhatsApp call from the admin area, open a user profile and click the phone or video icon at the top right corner. You have to create a calling permissions request template from WhatsApp Manager > Message templates. As template type choose Calling permissions request. Enter the template ID in Settings > WhatsApp > Calls > Call permission template ID.
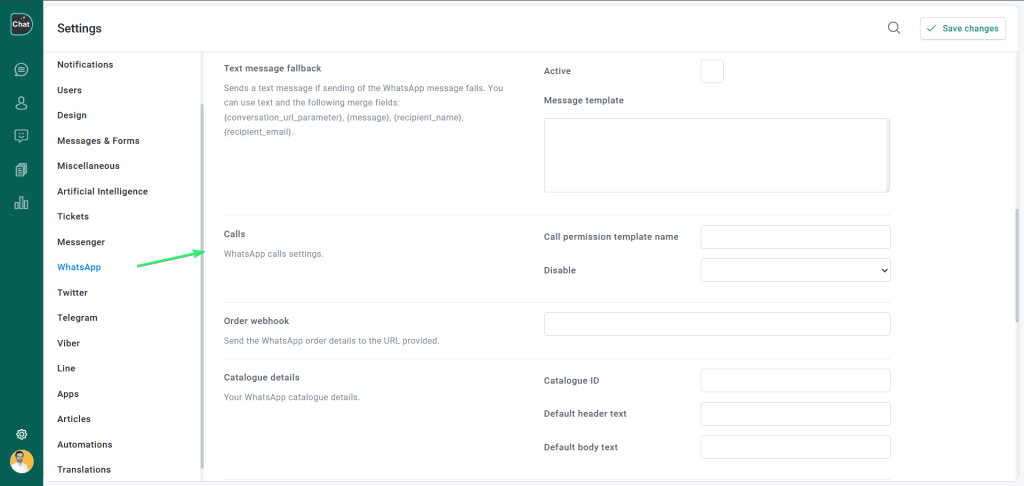
You must also add a valid payment method to your Business Portfolio before you can send the template.
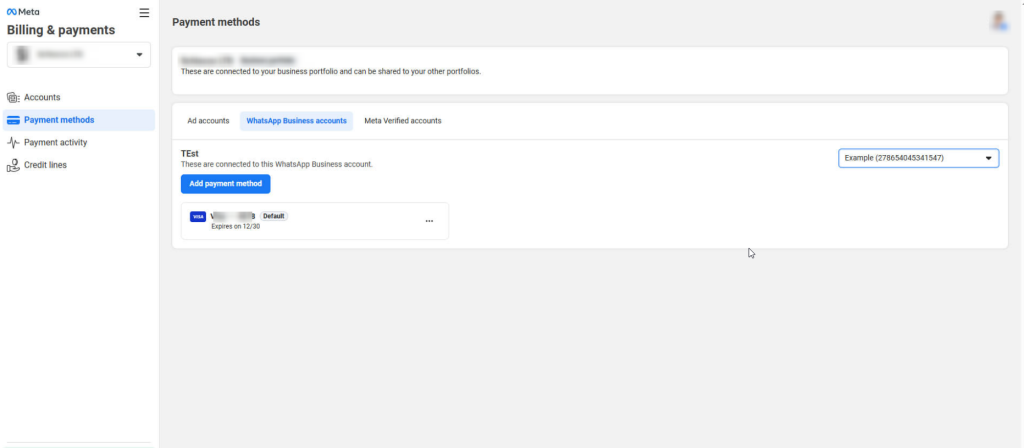
## More Integrations
### WordPress Integration
### **Step 1: Installation & Setup**
Follow these steps to get the **CHAT.devad.io** plugin running on your WordPress site.
- **Download:** Get the latest version of the plugin from **[here](https://chat.devad.io/docs/files/CHAT-devad-io.zip)**
- **Upload:** Log in to your WordPress Admin. Go to **Plugins > Add New > Upload Plugin**. Choose the file named `CHAT-devad-io.zip` and click **Install Now**.
- **Activate:** Once the upload is finished, click the **Activate** button.
- Locate Settings: After activation, a new menu item named CHAT.devad.io will appear in your sidebar. You can also find the settings page directly at :*yourwebsite.com***/wp-admin/options-general.php?page=CHAT-devad-io**
- **Go Live:** By default, the chat is automatically shown on all pages of your site once configured.
---
### Step 2: Finding Your Chat ID & Configuring Settings
To connect your specific account to your WordPress site, you need to link it using your unique ID.
### How to find your Chat ID
- Go to your [CHAT.devad.io Account Installation tab](https://chat.devad.io/account/?tab=installation) .
- Look for the **Embed Code** section.
- In the script code provided, look for the numbers at the end of the URL.**Example:** In
~~~
~~~
, your ID is **55747**.
- **Copy** that ID and **Paste** it into the **Chat ID** field in your WordPress plugin settings, then click **Save**.
### Understanding the Plugin Settings
Once you’ve entered your ID, you can fine-tune how the chat behaves:
| Setting | What it does |
| --- | --- |
| Visibility | Choose specific Page IDs or Post Type slugs (like “product” or “blog”) where the chat should (or shouldn’t) appear. |
| Multisite Routing | For WordPress Networks. It automatically sends chats to specific departments that match your Site ID. |
| Sync WP Users | Automatically identifies logged-in WordPress users so they don’t have to type their name/email into the chat. |
| Force Language | Manually sets the chat language (e.g., “en” or “fr”) to override automatic detection. |
| Feedback Notices | Options like Rate it now or Dismiss allow you to manage the plugin’s feedback notifications in your dashboard. |
### Comprehensive Guide to CHAT.devad.io WordPress Integration
This guide provides a complete, step-by-step manual for configuring the WordPress version of CHAT.devad.io. It covers essential setups such as user synchronization, WooCommerce integration, multilingual support, and advanced developer features. Please note that the settings details provided below are strictly related to the WordPress version of the software installed on your server. If you are utilizing the cloud version of CHAT.devad.io alongside its WordPress plugin, the specific features outlined in this documentation are not available.
### User Synchronization and Authentication
One of the core features of the integration is the ability to seamlessly synchronize your WordPress user base with the chat platform. WordPress users can be automatically synchronized with CHAT.devad.io by selecting “WordPress” under the **Users system** option located in the **Settings > WordPress** area.
**Success!** When active, the front-end chat automatically recognizes all logged-in WordPress users and creates a new CHAT.devad.io user account with the exact same details (name, surname, email, and password).
Furthermore, the log-in form is designed to recognize the email and password of each WordPress user. Upon logging into CHAT.devad.io, the user is automatically logged into WordPress as well, ensuring a unified experience.
### Automatic Registration Setup
To facilitate the creation of a WordPress user whenever a visitor registers through CHAT.devad.io, you must enable the specific option found at **Settings > WordPress > WordPress registration**. It is mandatory to include both password and email fields in the registration form; they are required for this process to function correctly. Once registered, the WordPress user is logged in automatically.
### Direct Access to Admin Area and Progressive Web App
Administrators and agents have the flexibility to access the admin area directly, bypassing the WordPress interface. This is done by navigating to `/wp-content/plugins/script/script/admin.php` and logging in with your default WordPress user credentials or agent email and password. Please keep in mind that your `wp-content` folder location might differ depending on your server configuration.
By accessing the admin interface directly, you also gain the ability to utilize the admin area as a **Progressive Web App (PWA)**. You can find more details on setting this up by clicking the relevant documentation links within the platform.
### Login and Logout Procedures
To securely logout from the admin area of CHAT.devad.io, you must logout from WordPress via the admin area of CHAT.devad.io. Once you have successfully logged out, you will be able to login with a different WordPress account. To access the admin area from within the WordPress dashboard, you must be logged in with one of the following permissible WordPress user roles: **administrator**, **author**, or **editor**.
### Getting Page and Post Type IDs
For advanced configuration, you may need to retrieve specific IDs or slugs for pages and posts.
- **Get a page or Post Type ID:** To get the ID of a specific page or Post Type, go to the admin area of WordPress and edit the page or post. The ID is displayed in the address bar.
*Example:* `http://your-site.com/wp-admin/post.php?post=11&action=edit&lang=en` (In this URL, the page/post ID is equal to 11).
- **Get a Post Type slug:** The Post Type slug for the blog archive and posts is `post`. The Post Type for pages is `page`. To obtain the slug of a custom Post Type, go to the admin area of WordPress and open the custom Post Type page from the left menu. The slug is displayed in the address bar.
*Example:* `http://your-site.com/wp-admin/edit.php?post_type=food` (In this URL, the slug is `food`).
### Preventing WordPress Emoji Replacement
To prevent WordPress from replacing the chat emojis with the default WordPress ones, you must enter the specific code below into the `functions.php` file of your active theme.
~~~
function disable_emojis() {
remove_action("wp_head", "print_emoji_detection_script", 7);
remove_action("admin_print_scripts", "print_emoji_detection_script");
remove_action("wp_print_styles", "print_emoji_styles");
remove_action("admin_print_styles", "print_emoji_styles");
}
add_action("init", "disable_emojis");
~~~
### WordPress Multisite and Multilingual Configuration
**WordPress Multisite:** If you are running a multisite installation, you must install CHAT.devad.io on the **main website**.
**WordPress Multilingual:** If you want the chat interface to use the same language as the current page on your website, you must disable the **Settings > Chat > Language** option. The multilingual feature is fully compatible with the **WPML** and **Polylang** plugins. To activate the multilingual feature, navigate to **Settings > WordPress > Multilingual plugin** and choose either WPML or Polylang.
Note that the multilingual feature for WooCommerce product attributes requires the **WooCommerce Multilingual Plugin** if you are using WPML, or the **Polylang for WooCommerce Plugin** if you are using Polylang.
### How To Export and Import Users in CHAT.devad.io Safely
If you want to import users into Devad Chat, the safest method is to start with an export from the same tenant first. That exported CSV already contains the correct column names, the correct custom-field labels, and the correct structure expected by the system.
This is the recommended workflow for tenant admins and support teams.
### Where To Export Users
To download a user CSV on the test environment, open:
- https://up.chat.devad.io/?area=users
Then press the download/export button in the users area.
For production, use the same users page on your live domain:
- https://chat.devad.io/?area=users
### Where To Import Users
To upload a CSV on the test environment, open:
- https://up.chat.devad.io/?setting=users
Then scroll to the end of the Settings page and use:
- Import users
- Import users from a CSV file
For production, use the same settings page on your live domain:
- https://chat.devad.io/?setting=users
### Why You Should Export First
A manually created CSV can easily use the wrong column names, miss important fields, or assign the wrong user type. Exporting first avoids that problem.
The exported file includes the main system columns:
- ID
- First Name
- Last Name
- Email
- Profile Image
- Type
- Creation Time
It also includes:
- standard fields such as Birthdate, City, Company, Country, Language, Phone, and Website
- any custom fields created for that specific tenant
Because of that, the exported CSV should be treated as the official template for future imports.
If you are not sure which columns are supported, export users first and use that file to see the full list of fields available for your tenant.
### Recommended Import Workflow
- Export users from the same tenant.
- Open that exported CSV and edit it instead of building a new file from scratch.
- Keep the first row as the header row.
- Keep custom-field names exactly as exported.
- Test with one or two rows first before importing a large file.
### What Happens During Import
During import:
- one user is read per row
- blank rows are skipped
- ID and Creation Time are ignored
- custom fields are matched by the exported header name or the field slug
- duplicate email and duplicate phone rows are rejected
- the result popup shows imported, skipped, and failed counts
- the popup also shows warnings, row-level errors, and import guidance
### Minimum Required Data
Each row should contain at least one useful identifier.
Recommended fields:
- First Name
- Last Name
- Email
- Phone
### Allowed Type Values
CSV import allows only these user types:
- lead
- user
- visitor
Important:
- if Type is missing or empty, the imported row is now safely set to lead
- CSV import does not create admin, agent, or bot accounts
### Example Without a Type Column
If the CSV does not include a Type column at all, the imported rows are treated as lead.
### Final Recommendation
For the lowest risk:
- always export first
- keep the original headers
- include Type when possible
- if Type is not present, expect the row to become a lead
### More Integration: Slack, Opencart, Martfury, Zalo, Zendesk, Viber, Line, WeChat
### Slack Integration & Synchronization
The Slack integration empowers your team to handle customer support directly from your existing Slack workspace. By synchronizing the two platforms, messages sent from Slack are mirrored in the chat dashboard, and user replies are pushed to Slack in real-time.
### How to Setup Slack
1
### Install & Activate
Navigate to **Settings > Apps**, locate **Slack**, and enter your license key to install the application. If you are using the Cloud version, simply click **Active**.
2
### Synchronize Workspace
Go to **Settings > Slack** and click the **Synchronize now** button. Follow the authentication prompts to connect your specific Slack workspace.
3
### Channel Configuration
Select a **Public Channel** (e.g., #general) to receive notifications. If you encounter issues, ensure you chose a public channel during the initial sync. If not, re-sync and select the correct channel type.
### Troubleshooting Slack Issues
Cannot Reply from Slack
Navigate to `/script/apps/slack/post.php` in your browser to verify connectivity. Additionally, check your Slack **Workspace Settings > Permissions** and ensure that “Anyone can create public channels” is enabled. If problems persist, contact Slack support.
Sync Not Working
This usually happens if a private channel was selected. Restart the synchronization process and strictly select a **Public Channel** (like #general).
### OpenCart Integration
This integration supports OpenCart 3 and OpenCart Multistore. It embeds the chat widget and synchronizes logged-in customer data automatically.
### OpenCart Setup Guide
1
### App Installation
Install the OpenCart app via **Settings > Apps**. Go to **Settings > OpenCart** and fill in your store URL and database details.
2
### API Configuration
In OpenCart Admin, navigate to **System > Users > API**. Edit the “Default” user, generate an **API Key**, enable the Status, and ensure your server IP is added to the allowed IP list.
3
### Edit Controller File
Edit `catalog/controller/common/header.php` via FTP. Insert the following code block inside the `$data` variable definition:
~~~
$data['script'] = $this->customer->getFirstName() ? 'var SB_DEFAULT_USER = { first_name: "' . $this->customer->getFirstName() . '", last_name: "' . $this->customer->getLastName() . '", email: "' . $this->customer->getEmail() . '", extra: { opencart_id: ["' . $this->customer->getId() . '|' . (isset($_COOKIE['OCSESSID']) ? $_COOKIE['OCSESSID'] : '') . '", "Open Cart ID"], phone: ["' . $this->customer->getTelephone() . '", "Phone"], opencart_store: ["' . $this->config->get('config_name') . '", "OpenCart Store"], opencart_store_url: ["' . $_SERVER['HTTP_HOST'] . '", "OpenCart Store URL"] } };' : '';
~~~
4
### Update Template & API
Edit `catalog/view/theme/default/template/common/header.twig` (or your active theme folder). Add
~~~
~~~
inside the `` tag. Finally, download the `sb.php` file from the installation package and upload it to `catalog/controller/api/`.
### Active eCommerce Integration
For Active eCommerce CMS users, this integration enables chat features and supports “Sellers Chat” for multi-vendor marketplaces. **Note: Not compatible with the Cloud version.**
- **App Setup:** Activate the App and enter your database details. Retrieve the **Secret Key** (APP_KEY) from your website’s root `.env` file.
- **Code Integration:** Edit the file `\resources\views\frontend\inc\footer.blade.php`. Insert the code below immediately after the `