
Guides
Create and publish an illustrated CHAT Help Center guide
Publish a clear, illustrated guide in your CHAT Help Center. This walkthrough covers a new entry, from preparing its answer to checking the page your readers see.
What do I need before I begin?
Access to the intended Help Center and permission to edit its content.
An approved answer for one reader task, with any relevant account or product requirements.
A screenshot with customer details, credentials and private account information removed.
Decide the expected result before writing. For example, a guide about publishing an article ends with a readable page and a checked public link.
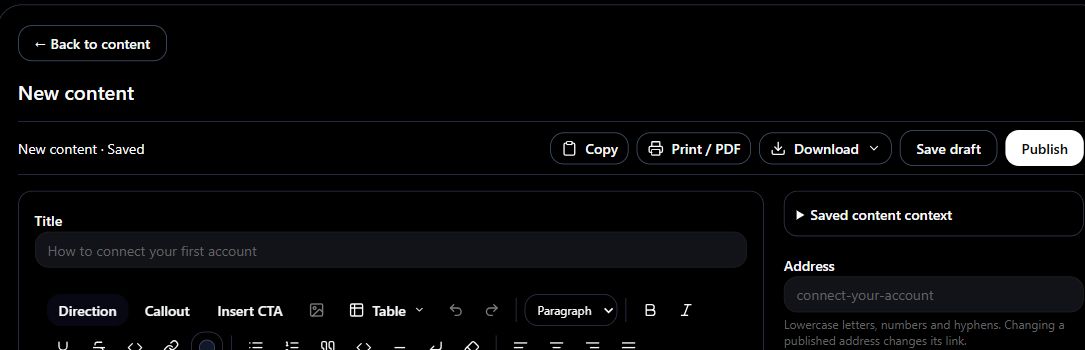
1. Open a new entry in the correct Help Center
Open CHAT, then Help Center and Content. Confirm the workspace or platform context before selecting New content. Ask the owner to review your access when editing controls are unavailable.
Use one guide for one complete task. Put background definitions in a linked reference page instead of interrupting every step.
2. Set the title, address and content type
Enter a title that names the reader's action and result.
Review Address. Use lowercase words separated by hyphens, and keep a published address stable when other pages link to it.
Select Guide in Content type.
Select the relevant category or subcategory. Check the app association when similar names appear.
Write a short description that explains what the reader will complete.
3. Write the steps and insert an image
Start with prerequisites, then write the actions in the order readers perform them. Name the actual controls, explain the expected result and include recovery for a failed or uncertain step.
Select Upload an image and choose a PNG, JPEG, GIF or WebP file up to 5 MB.
Place the cursor where the image belongs and choose Insert image.
Select the uploaded media item, write meaningful alternative text and add a caption.
Review the image in the editor. Check that labels are legible and no private information is visible.
Use a table for a compact comparison, not for an entire procedure. Check its headings and cells after saving.
4. Review language and save the draft
Expand Article details and SEO and review Language. Use an enabled language matching the text; choosing a language does not translate it.
Select Save draft for this new entry. Confirm the saved message, return to Content, search by the title and reopen the result. Check Guide, the category, language, body and image.
Do not use Save draft as a private staging action on an existing published page without coordinating its withdrawal. That action removes the page from the public Help Center until it is published again.
5. Publish and check the reader's page
Review every current field before selecting Publish. Publishing includes unsaved editor changes, rather than only the last saved draft.
Select Publish after the content is approved for public readers.
Open the entry through the public Help Center and copy its actual link.
Read the page and check its category, headings, lists, image, caption and links.
Check chatbot readiness separately when the guide is intended to supply chatbot answers.
What do I do when the result is uncertain?
Return to Content and search for the saved title before retrying. Reopen the existing entry and inspect its current state. Do not create a second page just because a response was delayed.
Preserve unsaved work before leaving or reloading an editor. Reconcile a changed saved version instead of overwriting another editor's work.
See content types, categories and publishing states for the reference behind these choices.